Here is the entry for March's Waltzingmouse Christmas card challenge which was to make a minimum of 3 identical cards using kraft, red and white or cream as your colours.
I made 3, but my husband really likes them so thinks they should be "our" Christmas card for this year so I may make more. I started with a square kraft base card and stamped 3 outline holly leaves from Waltzingmouse Festive Foliage and embossed it with white detail powder and embossed the berries over the top in red. I continued this red and white theme into the sentiment which is from Say It Loud Winter Holiday, embossing the small "bring on the" in white and the larger "Merry" in red. I think it's one of the most balance CAS cards I've ever made and really love it.
As it is a one-layer CAS card featuring leaves, I am also going to make it my second entry into this weeks Less is More challenge.
Thanks for visiting.
Monday, 14 November 2011
Saturday, 12 November 2011
Tag you're it!
This weeks challenge at CASual Friday is to make a clean and simple tag or a card with a tag on it. I don't really make tags - this is my first - and I'm not really thrilled with it but am not sure I can do anything better so it will have to "do" for my entry this week.
I used the colours from this weeks Annabelle stamps challenge which are to say it with "lime, black and white" as my starting point and took a lime tag from a pack I bought a couple of years ago from paperchase. I then used one of the fabulous birthday pressies from my OH - this gorgeous new stamp and die set from Hero Arts/Sizzix and stamped and embossed the trees and snowflakes directly onto the tag with white detail ep. I stamped the reindeer in black on white card and cut him out with the matching die - I used a black gel pen to highlight some of the details on him. The sentiment is from the same set and is embossed in black glitter ep.
Here are the links to the challenges if you want to play too.
http://cas-ualfridays.blogspot.com/2011/11/cfc28.html
http://annabellestamps.blogspot.com/2011/11/say-it-inlime-black-white.html
Craftilicious x
I used the colours from this weeks Annabelle stamps challenge which are to say it with "lime, black and white" as my starting point and took a lime tag from a pack I bought a couple of years ago from paperchase. I then used one of the fabulous birthday pressies from my OH - this gorgeous new stamp and die set from Hero Arts/Sizzix and stamped and embossed the trees and snowflakes directly onto the tag with white detail ep. I stamped the reindeer in black on white card and cut him out with the matching die - I used a black gel pen to highlight some of the details on him. The sentiment is from the same set and is embossed in black glitter ep.
Here are the links to the challenges if you want to play too.
http://cas-ualfridays.blogspot.com/2011/11/cfc28.html
http://annabellestamps.blogspot.com/2011/11/say-it-inlime-black-white.html
Craftilicious x
Leafy thanks
As its the second Saturday of the month, it's one layer week at Less is More and this month's one layer challenge is "leaves".
I started with a linnen base card in antique white. I used a couple of leaves from the Big Bloom Chrysanthemum set from Waltzingmouse and inked them with scattered straw DI. I used the kiss technique to stamp some thankful words from Say it Loud, also from Waltzingmouse in spiced marmalade DI to give the leaves some texture. I stamped "thanks" from the same Say it Loud set in marmalade again and added a couple of tiny golden gems to the start and end of the word. I used one of the phrases I'd used in the kiss technique to add to the sentiment and am therefore entering into this weeks aud sentiments challenge also which is thanksgiving or thankful cards.
http://simplylessismoore.blogspot.com/2011/11/week-41-one-layer-leaves.html
http://audsentimentschallengeblog.blogspot.com/2011/11/challenge-41-and-winner-of-40.html
Off to look after my OH who has been ill since my birthday earlier this week - I think he's suffering a Samson like loss of strength after his haircut last week!
Craftilicious x
I started with a linnen base card in antique white. I used a couple of leaves from the Big Bloom Chrysanthemum set from Waltzingmouse and inked them with scattered straw DI. I used the kiss technique to stamp some thankful words from Say it Loud, also from Waltzingmouse in spiced marmalade DI to give the leaves some texture. I stamped "thanks" from the same Say it Loud set in marmalade again and added a couple of tiny golden gems to the start and end of the word. I used one of the phrases I'd used in the kiss technique to add to the sentiment and am therefore entering into this weeks aud sentiments challenge also which is thanksgiving or thankful cards.
http://simplylessismoore.blogspot.com/2011/11/week-41-one-layer-leaves.html
http://audsentimentschallengeblog.blogspot.com/2011/11/challenge-41-and-winner-of-40.html
Off to look after my OH who has been ill since my birthday earlier this week - I think he's suffering a Samson like loss of strength after his haircut last week!
Craftilicious x
Friday, 11 November 2011
Flashback Friday Banner
At Flashback Friday today they want us to back and find the first ever banner we made - well for me, that was easy as I didn't have to go back to far! I made my first on in January this year for my friend's housewarming party and here it is in situ:
I cut the banners themselves from a K&Co 6x6 pad just with a gillotine and cut the letters forming the word "Welcome" with my Cricut and added a little distress ink to keep with the vintage feel of the papers.
I made her this housewarming gift to go with it - I bought the frame and decorated it with stamping, inking and some paper flowers.
Details of the flashback Friday challenge can be found here - and its a fun way to blog if you're short on new projects to share http://flashbackfridaychallenge.blogspot.com/2011/11/flashback-friday-170.html
I might even get a bit of time to make something new tonight so catch you later.
I cut the banners themselves from a K&Co 6x6 pad just with a gillotine and cut the letters forming the word "Welcome" with my Cricut and added a little distress ink to keep with the vintage feel of the papers.
I made her this housewarming gift to go with it - I bought the frame and decorated it with stamping, inking and some paper flowers.
Details of the flashback Friday challenge can be found here - and its a fun way to blog if you're short on new projects to share http://flashbackfridaychallenge.blogspot.com/2011/11/flashback-friday-170.html
I might even get a bit of time to make something new tonight so catch you later.
Wednesday, 9 November 2011
Quixotic Paperie New Sketch Challenge
Quixotic Paperie is where I get a lot of my stamps from - they stock a lot of US ranges - and they have just started a new monthly sketch challenge, which I have been meaning to enter and am just about getting in before the deadline - must try harder next time!
The first sketch was done by Mary J and its a lovely one
For my take on it, I've used one of the new Kraftin Kimmie winter stamps which I got from Quixotic Paperie last month. He's called Chilly Chickie and I just love his expression - he's coloured with Copics and cut with a nestie. A bit of glitter gives him a surface to skate on.
I used some plain blue paper and spritz it with perfect pearls for a cool shimmery feel and added some pale blue from a DCWV stack - this has Christmas writing all over it but its too small to see on the photo. The sentiment is actually from Stamping Bella (also from QP in the UK) and comes with one of the winter uptown girls.
There are still a couple of days to play in this first challenge - here's the link if you want to join in
http://quixoticpaperie.blogspot.com/2011/10/up-to-challenge.html
The first sketch was done by Mary J and its a lovely one
For my take on it, I've used one of the new Kraftin Kimmie winter stamps which I got from Quixotic Paperie last month. He's called Chilly Chickie and I just love his expression - he's coloured with Copics and cut with a nestie. A bit of glitter gives him a surface to skate on.
I used some plain blue paper and spritz it with perfect pearls for a cool shimmery feel and added some pale blue from a DCWV stack - this has Christmas writing all over it but its too small to see on the photo. The sentiment is actually from Stamping Bella (also from QP in the UK) and comes with one of the winter uptown girls.
There are still a couple of days to play in this first challenge - here's the link if you want to join in
http://quixoticpaperie.blogspot.com/2011/10/up-to-challenge.html
Saturday, 5 November 2011
Less is More in Orange and Red
Well it's still Saturday, just, but I am very late with my weekly entry to Less is More this week as we're off work for a few days and have been out and about today - this morning getting my OH's hair cut short for the first time in 28 years! It's been a little traumatic for him.......
Anyhow, here I am with my orange and red effort - very simple and not at all ground breaking - but I seem to be lacking mojo tonight.
I cut a strip of red card and die cut some flowers from it using my new Xcut dies - I used the "waste" rather than the flowers which is an idea I borrowed from my blogging mate Jenny on this card which deservedly won the ColorQ challenge. It's popped up on dimensional tape on top of some orange card and I cut one of the flower centre dies out and popped though on foam squares with some orange gems (which were a prize from the Annabelle Stamps challenge I won). I then repeat stamped a PTI birthday sentiment in orange ink above and below to form a border.
That's me for the evening, will visit other entrants tomorrow and may try something a bit more exciting as an entry myself.
Night all
x
Anyhow, here I am with my orange and red effort - very simple and not at all ground breaking - but I seem to be lacking mojo tonight.
I cut a strip of red card and die cut some flowers from it using my new Xcut dies - I used the "waste" rather than the flowers which is an idea I borrowed from my blogging mate Jenny on this card which deservedly won the ColorQ challenge. It's popped up on dimensional tape on top of some orange card and I cut one of the flower centre dies out and popped though on foam squares with some orange gems (which were a prize from the Annabelle Stamps challenge I won). I then repeat stamped a PTI birthday sentiment in orange ink above and below to form a border.
That's me for the evening, will visit other entrants tomorrow and may try something a bit more exciting as an entry myself.
Night all
x
Friday, 4 November 2011
off the edge.......
This week's challenge at CAS-ual Friday is to make any card but to have an element of it which falls off the edge of the card itself. I am most definitely in Christmas card mode at the moment - I seem to be struggling to make anything else - so here's is my off the edge bauble card.
I've really struggled to get a decent photo, but now the dark nights are in my chances of daylight photography are pretty limited and isn't helped by my choice of silver pearl as a base card - sorry :-( I have used the smallest nestie bauble die to cut out lots of tiny baubles from a double-sided snowflake DP in red and blue, and also from silver mirri. They were arranged patchwork style using pop dots for dimension and the silver ones at either end "fall" off the edge. I finished with some blue ribbon (which is a much better match to the blue DP IRL than it seems) and repeated a Merry Christmas sentiment from Waltzingmouse underneath just in black.
I do love the effect and thought I could make a few but it was quite fiddly to put together so maybe I need a more simple design to mass produce!
Catch you laters - Craftilicious x
I've really struggled to get a decent photo, but now the dark nights are in my chances of daylight photography are pretty limited and isn't helped by my choice of silver pearl as a base card - sorry :-( I have used the smallest nestie bauble die to cut out lots of tiny baubles from a double-sided snowflake DP in red and blue, and also from silver mirri. They were arranged patchwork style using pop dots for dimension and the silver ones at either end "fall" off the edge. I finished with some blue ribbon (which is a much better match to the blue DP IRL than it seems) and repeated a Merry Christmas sentiment from Waltzingmouse underneath just in black.
I do love the effect and thought I could make a few but it was quite fiddly to put together so maybe I need a more simple design to mass produce!
Catch you laters - Craftilicious x
Thursday, 3 November 2011
For Your Inspiration Guest DT
Today I have a Guest DT spot over at For Your Inspiration, which is a great fortnightly photo inspiration challenge if you haven't come across it before.
The current challenge is to use the following photo to inspire your project
I decided to interpret the colours, shapes and reflective surfaces and create a Christmas card. Now I know the photo with the invited pool doesn't scream Christmas but the golds and shimmers (and the fact that I've been in Christmas card mode for a while) all lead me down the Christmas theme.
I started with a black pearl 6 x 4 base card and cut a black, cream and gold spotted shape from DP from Papermania using a Spellbinders Label, and then I drew around the outside on some shiny cream card and cut it out by hand to create a thin matt. This echoed the colour of the building and the spots the lights. I took a gold oval (again cut with a Spellbinders die) to represent the shape of the building and the reflective quality of the pool and stamped a Christmas sentiment from Waltzingmouse and embossed that with pewter embossing powder. The reflections made the photography difficult but the sentiment reads "to aid in the attainment of PEACE on earth".
I hope you like the card and are inspired by the photo - can't wait to see what everyone else comes up with!
Tara (aka Craftilicious)
x
The current challenge is to use the following photo to inspire your project
I decided to interpret the colours, shapes and reflective surfaces and create a Christmas card. Now I know the photo with the invited pool doesn't scream Christmas but the golds and shimmers (and the fact that I've been in Christmas card mode for a while) all lead me down the Christmas theme.
I started with a black pearl 6 x 4 base card and cut a black, cream and gold spotted shape from DP from Papermania using a Spellbinders Label, and then I drew around the outside on some shiny cream card and cut it out by hand to create a thin matt. This echoed the colour of the building and the spots the lights. I took a gold oval (again cut with a Spellbinders die) to represent the shape of the building and the reflective quality of the pool and stamped a Christmas sentiment from Waltzingmouse and embossed that with pewter embossing powder. The reflections made the photography difficult but the sentiment reads "to aid in the attainment of PEACE on earth".
I hope you like the card and are inspired by the photo - can't wait to see what everyone else comes up with!
Tara (aka Craftilicious)
x
Wednesday, 2 November 2011
OH NO 4-0!
One of my friends is hitting the dreaded 40 this week and we're going out tonight to commiserate celebrate. Naturally this needed a special card and as soon as I saw the new release of "uptown girls" from Stamping Bella I had to have them as they are all so perfect for my friends. For the 40th I went with this version as the matching sentiment is so apt for the lady in question:
I decided to paperpiece their evening wear, and have done a close up below so you can see the detail. On the black glitter paper I just added some pencil lines to show curves. On the teal dress I used 3 shades of BG copic markers to add some depth of shading to the natural folds and some stickles to the trim. I love paperpiecing - its such a quick way to "colour" a card and can be just as effective as colouring on the right image. I edged the image, sentiment and mats with pewter embossing powder by "dipping" them into the ink pad. I like the uneven look it gives.
The rest of the colouring is done with copics and I finished the glasses with a little glossy accents. I used the same DP for the teal dress as one of my background papers - I like to do this as it ties the card together - and then I selected another from the same pad (DCVW linnen stack) to add some contrast and interest whilst keeping in the same colour family. A strip of black glitter covers the join and ties into the black dress and the "FORTY" was cute using a sizzix alphabet strip again from black glitter paper.
If you like the "girls", then make sure you check them out - they are Canadian but are available in the UK from Quixotic Paperie here and there are some awesome Christmas ones out now too. They are much bigger than standard bellas so make excellent larger cards (mine is A5 size)
I'm entering the following challenges with it:
Papertake Weekly - Anything Goes with bling
Sweet Stampin - Anything Goes
Totally Papercrafts - Glitter It
Phindy's Place - Paperpiecing
Thanks for stopping by.
Craftilicious x
I decided to paperpiece their evening wear, and have done a close up below so you can see the detail. On the black glitter paper I just added some pencil lines to show curves. On the teal dress I used 3 shades of BG copic markers to add some depth of shading to the natural folds and some stickles to the trim. I love paperpiecing - its such a quick way to "colour" a card and can be just as effective as colouring on the right image. I edged the image, sentiment and mats with pewter embossing powder by "dipping" them into the ink pad. I like the uneven look it gives.
The rest of the colouring is done with copics and I finished the glasses with a little glossy accents. I used the same DP for the teal dress as one of my background papers - I like to do this as it ties the card together - and then I selected another from the same pad (DCVW linnen stack) to add some contrast and interest whilst keeping in the same colour family. A strip of black glitter covers the join and ties into the black dress and the "FORTY" was cute using a sizzix alphabet strip again from black glitter paper.
If you like the "girls", then make sure you check them out - they are Canadian but are available in the UK from Quixotic Paperie here and there are some awesome Christmas ones out now too. They are much bigger than standard bellas so make excellent larger cards (mine is A5 size)
I'm entering the following challenges with it:
Papertake Weekly - Anything Goes with bling
Sweet Stampin - Anything Goes
Totally Papercrafts - Glitter It
Phindy's Place - Paperpiecing
Thanks for stopping by.
Craftilicious x
Tuesday, 1 November 2011
St Luke's Christmas
Our sponsor this month is Lili of the Valley and they have kindly donated a pair of matching stamps from their super cute collection - I love LOTV images as they are great to colour. We have these super cute mice making cakes and a pair of "recipe" sentiments to go with them as prize this month:
For my card, I decided to use one of my own LOTV Christmas stamps which I hate to say had not seen ink until now despite me buying in over 12 months ago! It will be getting inked again soon though as its nice and quick to colour but makes a striking Christmas card.
I coloured her with copics and stuck mostly to Christmas reds and greens and just added some very pale blue-green for the snow along with a little glitter for that frosty sparkle! The DP are from an old DCWV Christmas stack and the sentiment is cut from one of the DP sheets.
Now it's your turn - we can't see what you all come up with to get us in the mood for Christmas....
http://stlukescharitycardschallenge.blogspot.com/2011/11/christmas-is-coming.html
Craftilicious x
Sunday, 30 October 2011
Fairy Dell
It's taken me ages to make this card - as soon as I saw the inspiration photo at For Your Inspiration I knew exactly what I wanted to do as I was so drawn to the colours in the photo, but the vision in my head just wasn't translating to paper. This is the image - isn't it stunning - I wish I could find a forest like that to walk though..........
I persisted with my idea and eventually managed to get something that was close enough to the vision in my head to be happy enough to post. It's not my strongest card ever, but I do like the strong colours and simple layout.
I stamped and embossed the fairy silhouette stamp onto thick white card and coloured with a mixture of inks and cosmic shimmer paints - I think there would definately be fairies hidden in the undergrowth in such a colourful forest!!! I cut it out and mounted it onto a small card and finished with a simple fairy sentiment. Here's the link to the challenge if you want to play along - but be quick you only have a couple of days! http://foryourinspirationchallenges.blogspot.com/2011/10/fyi-challenge-16.html Do check back later in the week as I am going to be their Guest Designer for the next challenge and I can't say too much other than it's another fabulous inspiration photo they have in store for you!
I persisted with my idea and eventually managed to get something that was close enough to the vision in my head to be happy enough to post. It's not my strongest card ever, but I do like the strong colours and simple layout.
Saturday, 29 October 2011
Seeing stars.......
This week's LIM is all about stars, and I knew exactly what I wanted to do as soon as I saw the title as I love the sentiment stamp I've used.
I stamped the sentiment which is from Paper Make Up available form Quixotic Paperie in the UK and I embossed it on white card with pewter EP which has a subtle sparkle. I added a little glimmer dust to the stars and added 3 acrylic stars underneath. The bottom of both the sentiment panel and the silver mat were cut with a Martha Stewart punch. Sorry about my reflected hands in the mirri card - no matter what I tried I couldn't get rid of my reflection in the photo!
Catch you all later.
I stamped the sentiment which is from Paper Make Up available form Quixotic Paperie in the UK and I embossed it on white card with pewter EP which has a subtle sparkle. I added a little glimmer dust to the stars and added 3 acrylic stars underneath. The bottom of both the sentiment panel and the silver mat were cut with a Martha Stewart punch. Sorry about my reflected hands in the mirri card - no matter what I tried I couldn't get rid of my reflection in the photo!
Catch you all later.
Friday, 28 October 2011
CASual Sketch
I've not been feeling well today so I've not really been up to crafting, but as I made the VIP club over at CAS-aul Fridays last week, I wanted to play along again. :-D
This week they have a sketch which is a lovely clean and simple design open for interpretation. I decided to make a Christmas card for my stash as I have bought a lot of holiday stamps recently and haven't used many.
I started with a 3 inch red square, added a green striped mat and lovely Christmas ribbon. The bauble is from the new Waltzingmouse release and is embossed onto silver mirri card with red ep and green for the sentiment from the same set. They were cut with the matching nestie. Clean, simple and quick so I may make more when I'm feeling better.
Craftilicious x
Thursday, 27 October 2011
I've been showCASed!
Just a very quick post to say that I am honoured to have been showCASed in last week's Less is More Cocktails challenge with my "screwdriver" cocktail card. Thanks to the Diva and Lady of LIM for picking me and giving me the much coveted blog badge ;-)
Been a busy week with lots of evenings out but hopefully I'll get time to make something new to share this evening.
x
Been a busy week with lots of evenings out but hopefully I'll get time to make something new to share this evening.
x
Tuesday, 25 October 2011
Monster Birthday!
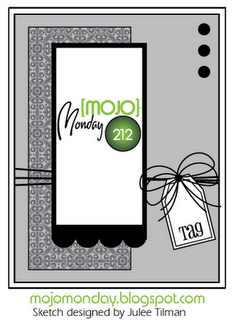
I needed a card for a five year old boys birthday this week and decided to give it a spooky theme as I love this image.
For the layout, I used the great sketch from this week's Mojo Monday - so I am entering my card into their challenge too.
http://mojomonday.blogspot.com/2011/10/mojo-monday-212.html
Thanks for visiting ;-)
The image is a digi from Polycraft from their Halloween set (I've cut off the pumpkin he was carrying to make it more generic for a birthday rather than Halloween) I still think he is spooky enough to meet their challenge this week though so am entering my card http://pollycraftchallengeblog.blogspot.com/2011/10/challenge-116-spooky-goings-on-mary-j.html He is very green, but little boys like all things green and slimey don't they!
http://mojomonday.blogspot.com/2011/10/mojo-monday-212.html
Thanks for visiting ;-)
Sunday, 23 October 2011
Partially embossed snowflakes
I've been out a Stamp Magic all day so not much time for blogging but I wanted to do a quick post tonight to beat the deadline on the There She Goes challenge which is to make a card only using partial images.
I used some stamps from their snowflake set and stamped and embossed them onto some small white squares deliberately letting them fall over the edges so on the majority I used only the partial image. I inked them once embossed with distress inks and spritz them with perfect pearls shimmer. I rounded the outer corner on each and mounted them onto white snippet dry embossed with snowflakes. I mounted onto a blue snippet, on a black square card and finished with one of the sentiments from the set.
I am entering the following challenges with this card:
Partial images - http://tsgclearstamps.blogspot.com/2011/10/there-she-goes-again-tsg126-partial.html
Holiday embossing - http://crazy4challenges.blogspot.com/2011/10/crazy-4-challenges-c4c109.html
Unused holiday stash - http://abcchristmaschallenge.blogspot.com/2011/10/u-is-for-unused-stash.html - neither the folder nor the stamps have been used before.
Winter theme with sentiment http://audsentimentschallengeblog.blogspot.com/2011/10/challenge-39-and-winner-of-38.html
Night all - thanks for stopping by
Craftilicious x
I used some stamps from their snowflake set and stamped and embossed them onto some small white squares deliberately letting them fall over the edges so on the majority I used only the partial image. I inked them once embossed with distress inks and spritz them with perfect pearls shimmer. I rounded the outer corner on each and mounted them onto white snippet dry embossed with snowflakes. I mounted onto a blue snippet, on a black square card and finished with one of the sentiments from the set.
I am entering the following challenges with this card:
Partial images - http://tsgclearstamps.blogspot.com/2011/10/there-she-goes-again-tsg126-partial.html
Holiday embossing - http://crazy4challenges.blogspot.com/2011/10/crazy-4-challenges-c4c109.html
Unused holiday stash - http://abcchristmaschallenge.blogspot.com/2011/10/u-is-for-unused-stash.html - neither the folder nor the stamps have been used before.
Winter theme with sentiment http://audsentimentschallengeblog.blogspot.com/2011/10/challenge-39-and-winner-of-38.html
Night all - thanks for stopping by
Craftilicious x
Saturday, 22 October 2011
Less is More with Dotty Mice
It's Saturday which means my favourite weekly challenge - Less is More and also the weekly sketch challenge from my favourite stamp store - Waltzingmouse
I don't always get to play along with the sketch challenge but this week I think it combines beautifully with this week's Less is More challenge with is to use Polka Dots.
I started with a 12cm square card blank and cut a 10 cm square white panel which I embossed with swiss dots and rounded two opposite corners. I cut a Christmas ornament using a nestie and put the resulting shape through the same folder - I coloured each dot with a darker shade of red copic and covered each with glossy accents. I added a small stamp from the new Seasonal Remedies set to the bauble and cut that out and glossed too and attached the bauble with twine and dimensional foam. I coloured a craftwork cards sentiment with the same copic and again covered it with glossy accents and finished it with 3 holly leaves from the Festive Foliage set.
I have quite a few cards I need to make but am running out of time today as I've been scaring myself silly trying to use a pressure cooker which has now been christened Hissing Henry! I'm off now to make a pie with the contents and then get ready for Stamp Magic in Doncaster tomorrow.
Craftilicious x
I don't always get to play along with the sketch challenge but this week I think it combines beautifully with this week's Less is More challenge with is to use Polka Dots.
I started with a 12cm square card blank and cut a 10 cm square white panel which I embossed with swiss dots and rounded two opposite corners. I cut a Christmas ornament using a nestie and put the resulting shape through the same folder - I coloured each dot with a darker shade of red copic and covered each with glossy accents. I added a small stamp from the new Seasonal Remedies set to the bauble and cut that out and glossed too and attached the bauble with twine and dimensional foam. I coloured a craftwork cards sentiment with the same copic and again covered it with glossy accents and finished it with 3 holly leaves from the Festive Foliage set.
I have quite a few cards I need to make but am running out of time today as I've been scaring myself silly trying to use a pressure cooker which has now been christened Hissing Henry! I'm off now to make a pie with the contents and then get ready for Stamp Magic in Doncaster tomorrow.
Craftilicious x
Friday, 21 October 2011
Colourful CASual Friday
The challenge at CASual Fridays this week is a simple one - they just want you to colour an image on your clean and simple card. Our niece and her family have just moved into a new house today so I needed to make a house warming card and I decided to make one for this challenge.
I've used the lovely cottage set from Waltzingmouse and stamped it 3 times onto a landscape 7 x 5 card to create a row of houses with some falling off the end of the card. I stamped the house again on some blending card and coloured it with copics, and then I did the same with the separate central portion stamp which I layered up with dimensional foam. I added the topiary pots from the same set which are also cut out and stuck on. I deliberately only coloured the central house to make it pop and I like the line drawing effect of the uncoloured ones. The sentiment is also from the same set.
http://cas-ualfridays.blogspot.com/2011/10/cfc25.html
Off to the post office now to get it posted.
Craftilicious x
I've used the lovely cottage set from Waltzingmouse and stamped it 3 times onto a landscape 7 x 5 card to create a row of houses with some falling off the end of the card. I stamped the house again on some blending card and coloured it with copics, and then I did the same with the separate central portion stamp which I layered up with dimensional foam. I added the topiary pots from the same set which are also cut out and stuck on. I deliberately only coloured the central house to make it pop and I like the line drawing effect of the uncoloured ones. The sentiment is also from the same set.
http://cas-ualfridays.blogspot.com/2011/10/cfc25.html
Off to the post office now to get it posted.
Craftilicious x
Wednesday, 19 October 2011
A very Tiddly evening
Firstly, Christy is looking for some fall inspired projects to possibly feature on her site and I had a great idea to use one of her images in a slightly different way. I used Fairy Fae catches a star but I fussy cut her out once coloured with copics, and then cut some leaves from an old My Minds Eye paper and had her catching leaves instead of stars. I kept to rich autumnal shades of browns, oranges and yellows with just a hint of the remnants of summer greens. I kept her wings really neutral with pale copics and showed their transparency by colouring the dress where it would show underneath. I painted some perfect pearls over the top for shimmer and added some glimmer dust for extra sparkle ;-) I really like how she came out and I think a fairy would like to catch all the lovely colourful leaves as she skips through the forest. Here's the link the challenge if you want to create a fall project too http://tiddlyinks.blogspot.com/2011/10/tiddly-tuesday-new-fall-images-and.html I'm also going to enter her into Flutterby Wednesday as this week their challenge is anything goes - as long as it has wings naturally!
I then decided to colour up this cute little spell casting witch for the current Tiddly Inks Challenge - Halloween is Coming. Regular blog readers will know that Halloween isn't a big thing over in the UK and we don't really send cards for it, so I don't tend to make Halloween projects, BUT, I do have a huge weakness for witches and wizards, so I've gone for a spooky feel but made it for a birthday - hope it still counts!
Again, I coloured her with copics but then overcoloured with lots of shades of stickles glitter. I used purple and black distress inks to create a dark background and misted the whole project heavily with perfect pearls in water and dried it with my heat gun - this gives it the spooky feel and in real live has left the image looking like it was drawn on leather not paper - can't get a good shot of it by camera though -sorry :( I think the spell she's casting is for a magical birthday - not anything sinister - she's too cute!
I am entering the following challenges with her:
http://tiddlyinkschallenge.blogspot.com/2011/10/challenge-69-halloween-is-coming.html
http://onestopcraftchallenge.blogspot.com/2011/10/week-153-halloween.html
http://abc-challenge.blogspot.com/2011/10/b-for-boo.html
Thanks for visiting :-D
Craftilicious x
Tuesday, 18 October 2011
Tea for Two!
I had a little splurge on copic sketch pens last week and got all the "0000" ultra pale shades and wanted to take them for a test drive... The perfect image for which I felt was this delightful fairy in a teacup by the very talented Mo Manning - all her images are just wonderful to colour.
Coloured with copics with a hint of perfect perals on the wings. I cut up some cubes of background papers and made a grid and did some faux stitching with a black fineliner.
I'm entering this into the current challenge on Mo's challenge site whcih is "inspired by a song" - this card has been inspired by the song "Tea for Two" - some for me and some for the little fairy in the teacup. http://mosdigitalchallenge.blogspot.com/2011/10/challenge-104-inspired-by-song.html
Coloured with copics with a hint of perfect perals on the wings. I cut up some cubes of background papers and made a grid and did some faux stitching with a black fineliner.
I'm entering this into the current challenge on Mo's challenge site whcih is "inspired by a song" - this card has been inspired by the song "Tea for Two" - some for me and some for the little fairy in the teacup. http://mosdigitalchallenge.blogspot.com/2011/10/challenge-104-inspired-by-song.html
Subscribe to:
Posts (Atom)


