Wednesday 29 June 2011

OLW

I found the one layer Wednesday inspiration photo last week a little difficult so I skipped it, but this weeks challenge to overlap without masking was intriguing and I managed to make something at the first attempt that I was really pleased with.


I started with a kraft card base and stamped a chrysanthemum from Waltzingmouse stamps in versamagic wheat in the bottom left corner.  I then stamped one of the new sentiments again from Waltzingmouse from the "say it loud" set in brilliance pearlescent chocolate.  I did decide to add a tiny pearl to the centre of the flower - hope this doesn't stop it being a one layer card....

I will upload this to my gallery on the waltzingmouse forum - they pick one card each week to be the "big cheese" - have a look here if you want to find out more about it and join in.

Craftilicious x

Saturday 25 June 2011

LIM meets CASual Fridays

I'm back with a second entry for this week's LIM sketch challenge which this time I am combining with a second entry into CASual Friday's getting edgy challenge too.


To be honest, this card has been a nightmare!  For starters, I decided to VOLUNTARILY use the dreaded acetate, and was promptly reminded why I hate the damn stuff!  I tried to cut out a martini glass from it using a quick cuts die but it wouldn't cut it fully no matter how many times I ran it through my big kick so I had to go over all the lines with a craft knife.  I then decided to put the glasses into stamped circles, which in retrospect I should have left off, and then I drew around a cardboard template of the martini glass with a very fine black pen, only I FORGOT I wanted the second glass tilted over to show the results of too many martinis - so SCRAP that one, start again.  I hadn't decided I didn't like the circles at this stage so repeated them - doh!  The next stumbling block was getting the acetate glasses to stick - they kept peeling up.  I finally got them stuck so just added extra waterfall stickles spilling out of the toppled glass.  I wanted to add the strip onto matching blue card edged with stars - the ones you see when you fall on the floor from martinis - and this is where the next problem came - I'd got black ink on my fingers and got dirty marks on the corner :-(   I couldn't bear to make the glasses again so I coloured over the marks with a white pen - doesn't show on the photo but it's not fab IRL.

Never mind, sometimes cards just don't work out and I'm giving myself brownie points for at least trying to use blinking acetate again............

Maybe see you again after lunch with a simpler acetate free idea!

Thanks for stopping by again

Craftilicious x

LIM Week 21

It's Saturday morning, the sun is trying to break through and we have a new challenge to play with from LIM - so everything is right with the world.....

Today we have a sketch, a simple one naturally, 3 circles on a strip across the top third of a square card.  I had a couple of ideas straight off when I looked at the challenge at 8am but I had to do the shopping first.  The three circles made me think of a baby set I got in the sale when Elzybels closed that I haven't used yet so this is my first card for today.


Aren't the triplets so cute?  You can obviously customise to the sex but as I don't have a recipient in mind for this card I just went with the full set as it comes and I will put this card into my box of cards for the St Luke's Charity card sale I run through our challenge blog donations.  I just coloured with skin tone copics, and matted onto blue and pink card and added one of the sentiments from the set underneath.

I'm going to have my breakfast now but will be back with another go later.

Thanks for visiting and have fun with this weeks challenge.

Craftilicious x

Friday 24 June 2011

Getting Edgy!

Sorry I've been MIA most of this week but I went down like a log with a bug on Monday and took to my bed for a couple of days.  I'm feeling much better now but I have totally lost my voice but whatever else this hinders it's no barrier to crafting so I'm back for my regular Friday night fix with CAS-ual Fridays  which this week is all about decorative edges - tearing, punching whatever takes your fancy to make a fancy edge!

I decided to play with some of my favourite MS punches to get my decorative edges on some strips of paper and I've been following my blogging mate Lynne's recent "snippet" posts with interest so took a leaf from her book and used some of the little bits in my stash I just can't throw away.  So this card is also being entered into Jules Sunday Snippet Challenge 


I used the branch punch on a dark teal strip, left a brown honeycomb snippet plain and then used a butterfly punch on a lime green strip onto which I stamped my sentiment.  I then decided to add another fancy edge to my focal image by stamping onto white card cut with a nestie, I then drew around the nestie on black and cut out for a fine border.  The flower stamp and the matching sentiment are from my favourite Elzybels set.  I added a little black glitter to the centre to make it pop.

Thanks for stopping by and leaving a comment :-)

Craftilicious x

Sunday 19 June 2011

A bunch of get well wishes

In addition to the anniversary card I made for her yesterday, my Mum also asked me to make her a couple of get well soon cards.

For the first one, I've returned to this weeks Waltzingmouse Sketch Challenge which this week lets you choose from any of their past sketches, so this time I have opted for WMSC37 but used the wonderful Back in the Saddle once more as this is just my favourite get well card stamp.


For the second card, I used this cute "sicky monster" from paper make-up.  I just love how ill he looks but can still make a cute card.  I coloured with copics, using a dotty technique on the towel to add texture.  The feeling icky sentiment comes with him.  I just matted onto some papers from using the same colours I used on the monster.


Thirdly, I used "nurse nora" which I think is a greeting farm stamp but I can't be sure.  Again, coloured with copics, cut out with nesties this time and I added a bit of ribbon which reminded me of the lines on machines from hospital dramas....


I need to work on a civil partnership card commission after dinner and a couple more birthday cards.

Catch you later.

Craftilicious x

Saturday 18 June 2011

3 in 1

This morning, I made 3 cards for one challenge.  So this afternoon I thought I'd switch it round and this time I've made one card for 3 challenges!


The theme at CAS-ual Fridays this week is colour blocking and I normally play their challenges on a Friday, but this week I was a little stumped as what to do, so thankfully the other two challenges I found enabled me to enter a card for this challenge too.  I'm glad that I've managed an entry as I haven't missed a week of their challenges as yet.

The design of the card came from this weeks Waltzingmouse Sketch Challenge - their anniversary one (congrats on 52 challenges ladies!) and so they challenge was to pick any sketch from the previous 51 and quote it.  I chose their 16th Challenge  (WMSC16) - you can see all the sketches you can pick from on this page - worth bookmarking for future inspiration I reckon ;-)  I used my favourite waltzingmouse stamp set - Back in the Saddle for the feature of the card - a Yee Haw sentiment on the aqua oval teamed up with the cool cowboy riding off the page.

The colours came from Color Cue - I normally like to pick my own colours for challenges but I needed the inspiration this week as solid blocks I find difficult.  Their colours are great and not ones I would ever have put together myself - Plum, Green, Aqua and Red.

Time to go and make tea before my OH comes back from work.

Craftilicious x

LIM Week 20 Take 3..........

OK, so I hadn't planned on doing a 3rd entry, particularly not so quickly, BUT, Mandi pointed out that my last card was a bit of a cheat as a strict Monogram should NOT be the first letter of the word but should replace the word.  I guess what I had done was more strictly an "illumination" rather than a monogram.  I felt like I should go and sit on the naughty step so here's my penance Miss ;-)   So, as I needed to make an anniversary card for my Mum to send to my cousin I decided to go down the monogram route again for this one.


I've used the same alphabet I used on my love card, but this time used the D which is decorated with daffodils as both my cousin and her husband's names begin with D.  Stamped in black and coloured with pencils again but this time I've "coloured" the white outline to the letters in glue and sprinkled over glimmer dust.   I've used a little wood block ampersand to join the two together (which now I've seen it on here perhaps I will go back and fill in with glitter to match the letters better) and stamped a simple Happy Anniversary (Elzybels set) with 3 yellow diamante underneath for sparkle and balance.

Ta ta for now..

Craftilicious

LIM Week 20 - Monogram - take 2

I said I'd be back........


This is my second card for this weeks LIM Monogram challenge - I know the ladies thought this one would be more difficult, but I LOVE monograms - did them for my GCSE in art and have loved them ever since.  I am drawn to deco and nouveau designs and that is why I snapped up this monogram style alphabet from the stamp man's aspects of design range a while back (it was on sale so I think it is now discontinued).  This is a tiny 3x3 inch card and I've kept it really simple to allow the monogram to sing.  I've simply coloured the flowers and leaves with pencils and added some tiny gems to the centers for added interest.  The rest of the letters to make up the word 'love' are from another of my Anna Griffin alphabets but the outline style matches the outline of the monogram.  I needed an anniversary card so chose the love theme.

Hope you like it.

Off to see if any more entries have appeared.

Craftilicious x

LIM Week 20 - Monogram

I really like the challenge at LIM this week - we have to create a card with a monogram which gives me the chance to use my favourite alphabet stamps from Anna Griffin.  I'm a huge Anna Griffin fan but don't often use her stuff as its not very LIM and I also find it VERY hard to cut her beautiful papers..........

Here is my first card for this week - I think there will be another before the day is out though :-)


I've gone for a very simple but striking layout using an "M" for Mother from one of Anna's wonderful alphabets, stamped in black onto gold pearl paper cut from one of my new spellbinders fancy tags.  I then drew around the outside of the same tag and cut it by hand to create a black frame to mount the die onto.  A little bit of stitched black and white ribbon behind was all that was needed to set it off.

Thanks for visiting - LIM is always where the majority of my blog traffic comes from which is why we all love it so much.  See you later with a different type of monogram.

Craftilicious x

Thursday 16 June 2011

St Luke's Mid Month Inspiration

As our challenge is only a monthly one, we've had a few comments from people saying they wanted to take part but it slipped their minds, so I've decided to do a mid-month inspiration post from my blog and the St Luke's Charity Card Challenge blog to remind you about our challenge before you run out of time to take part.


As I made a very girly card for this challenge earlier in the month, I thought I'd make something a bit more masculine this time.  I used this decoupage panel with a big yellow helicopter which I've had for ages so don't know where it's from (sorry).  It's a "non cut" decoupage sheet - my favourite as I'm not brilliant at cutting!  I decided I wanted it bigger on the card, so I made a brayered background with some clouds created with the resist technique cut out from post-its.  I matted it onto a yellow background to make it pop, stuck it onto a blue base card and then added a simple birthday sentiment.

So, I hope this has inspired you to "come and fly with us" - you've got until noon on 30th June and could win a brilliant bundle of ribbons and buttons if you're picked as our favourite card this month.  The challenge will have a prize every month from now on so do make sure you follow us to find out what you could win........


Thanks
Craftilicious x

Wednesday 15 June 2011

WOYWW

I forgot to take a photo of my desk last week so I didn't take part in WOYWW, but to be honest it wouldn't have looked any different to the one from the week before as I'd just created more cards amid the mess that was there!  This week I remembered to take a photo last night in readiness - go me!


I thought I'd show the whole wall with my new ikea "bars" now its finished (see all the room I have for more punches....)  The ones that don't hook (eksuccess style mostly) are on the top row in ikeas spice racks which are designed to hang from their bars.  The black tubs have tiny punches and long handled ones like my crop-a-dile.  On the desk itself you can see the start of my stamping storage system (empty cd cases) and a dewy-decimal style stamp log.  It's going to take a LONG time but I am going to categorize and cross reference ALL my stamps, so that I will be able to look up in the log under "wedding" and see at a glance what I have, and where they are.  The plan is then to categorise and store everything I buy as soon as I buy it (yeah right!)   At the front right is the new stash I bought at Stamp Magic (well some of it anyway....)  The cloth in the tidy tray was a trick I picked up a couple of weeks ago for cleaning your brayer - add one of those kitchen sponge-style cloths to the bottom and keep it damp, then simply roll your brayer over to get it clean, and keep another dry cloth to roll onto after to dry it out.  Much better than running to the bathroom between inkings :-)


This is the other side of my desk - the shelves are actually a kitchen cabinet minus the doors - these hold my copics, pencils and everyday tools along with plain 6x6 card and cricut cartridges.  I also have my new mini TV which we've had to link to sky as I can't get a digi-signal in the craft room.  The filling cabinet is covered with magnetic storage jars again from ikea, which are full of buttons and bows and other mini embellishments.  I'm planning on magnetising the front and covering it with my spellbinders dies.  Not much else on this side of the desk except my new stash of Clarity stamp DVDs that I picked up on Sunday and more stamps to go into cd cases.

I'll try to show you something more exciting and actually crafty next week.......

Thanks for visiting my desk - I'll be browsing shortly.

Craftilicious x

Tuesday 14 June 2011

Casual Friday's Tic Tac Toe 2

The challenge this week at CASual Fridays is to pick a line from their tic-tac-toe grid and use the elements from it on your card.


I made one card using the diagonal but I decided to pick another line and have a second go straight away.  This time I went for the top to bottom line - chipboard, ribbon and buttons.  This time with a blue theme, but the recycled theme continues - the patterned central ribbon is one of those annoying tags they insist on putting in clothes - serve no purpose in the garment, but are very pretty so I save them when I cut them out!  I added two more rows of matching blue ribbon above and below and stamped "happy" in teal ink onto the lower one.  The birthday that goes with it is embossed in a folder and stuck behind a chipboard frame which I coloured with a copic marker to match and then added a layer of glitter.  I stuck two complementary coloured buttons on top of each other, and used the same glitter to fill in the holes on the top button.  I think this my favourite of the two but then teal is my favourite colour :-D


Night all, Craftilicious x

CASual Friday Tic Tac Toe

The challenge this week at CASual Fridays is to pick a line from their tic-tac-toe grid and use the elements from it on your card.


For my first card I went with chipboard, dies or punch and twine on a black and white theme.  I started with a 3x3 inch square card, added a black strip across the centre which I punched the bottom of to create a scalloped border.  I added a little black and white damask (which is actually recycled from a hotel brochure!) and then added a piece of white card on top of that with 3 rows of black and white twine.  The dancing lady is a chipboard figure from a set I've had for ages, I mounted her onto black card to make her stand out more.  I finished with a tiny sentiment.


I'll be back shortly with my second entry....

Craftilicious x

Monday 13 June 2011

another in the frame

Just a quick post tonight with another entry for LIM's in the frame challenge.  We went to stamp magic yesterday in Doncaster and along with buying far too much new stuff, I spent quite a long time watching the very talented Barbara from Clarity stamps doing demo's - I think she pretty much went straight through from 10 am to 3 pm without so much as a cup of tea!!!  So I came home inspired to get my brayer out and this is the result....


Not sure where there stamps are from - had them a long time - I think I saw Dawn Bibby use them on QVC once but bought them elsewhere.  I stamped the image centrally on the card with stazon and then masked all the way around with post its and then used a kaleidoscope ink pad in Caribbean sea with my brayer to colour the background within the frame.  I added a few dots around the stars and dragonflies with sakura sparkle pens, and used the same to add some highlights to the flowers.

Very simple, and definitely very clean ;-)

Saturday 11 June 2011

LIM 19 - In the Frame

Good morning LIMettes - wasn't sure I'd get time to play this morning as we're heading over to St Lukes at 10am for the Summer Fair at which we're selling the cards that have been donated via our St Luke's Charity Cards Challenge Blog - this is an ongoing challenge and we'll be selling cards throughout the year to raise money so feel free to join in anytime - this month our challenge is "Come Fly with Me" you might win a ribbon girl bundle too.   However as soon as I saw the challenge this week (well I couldn't not look now could I??) and that it was 
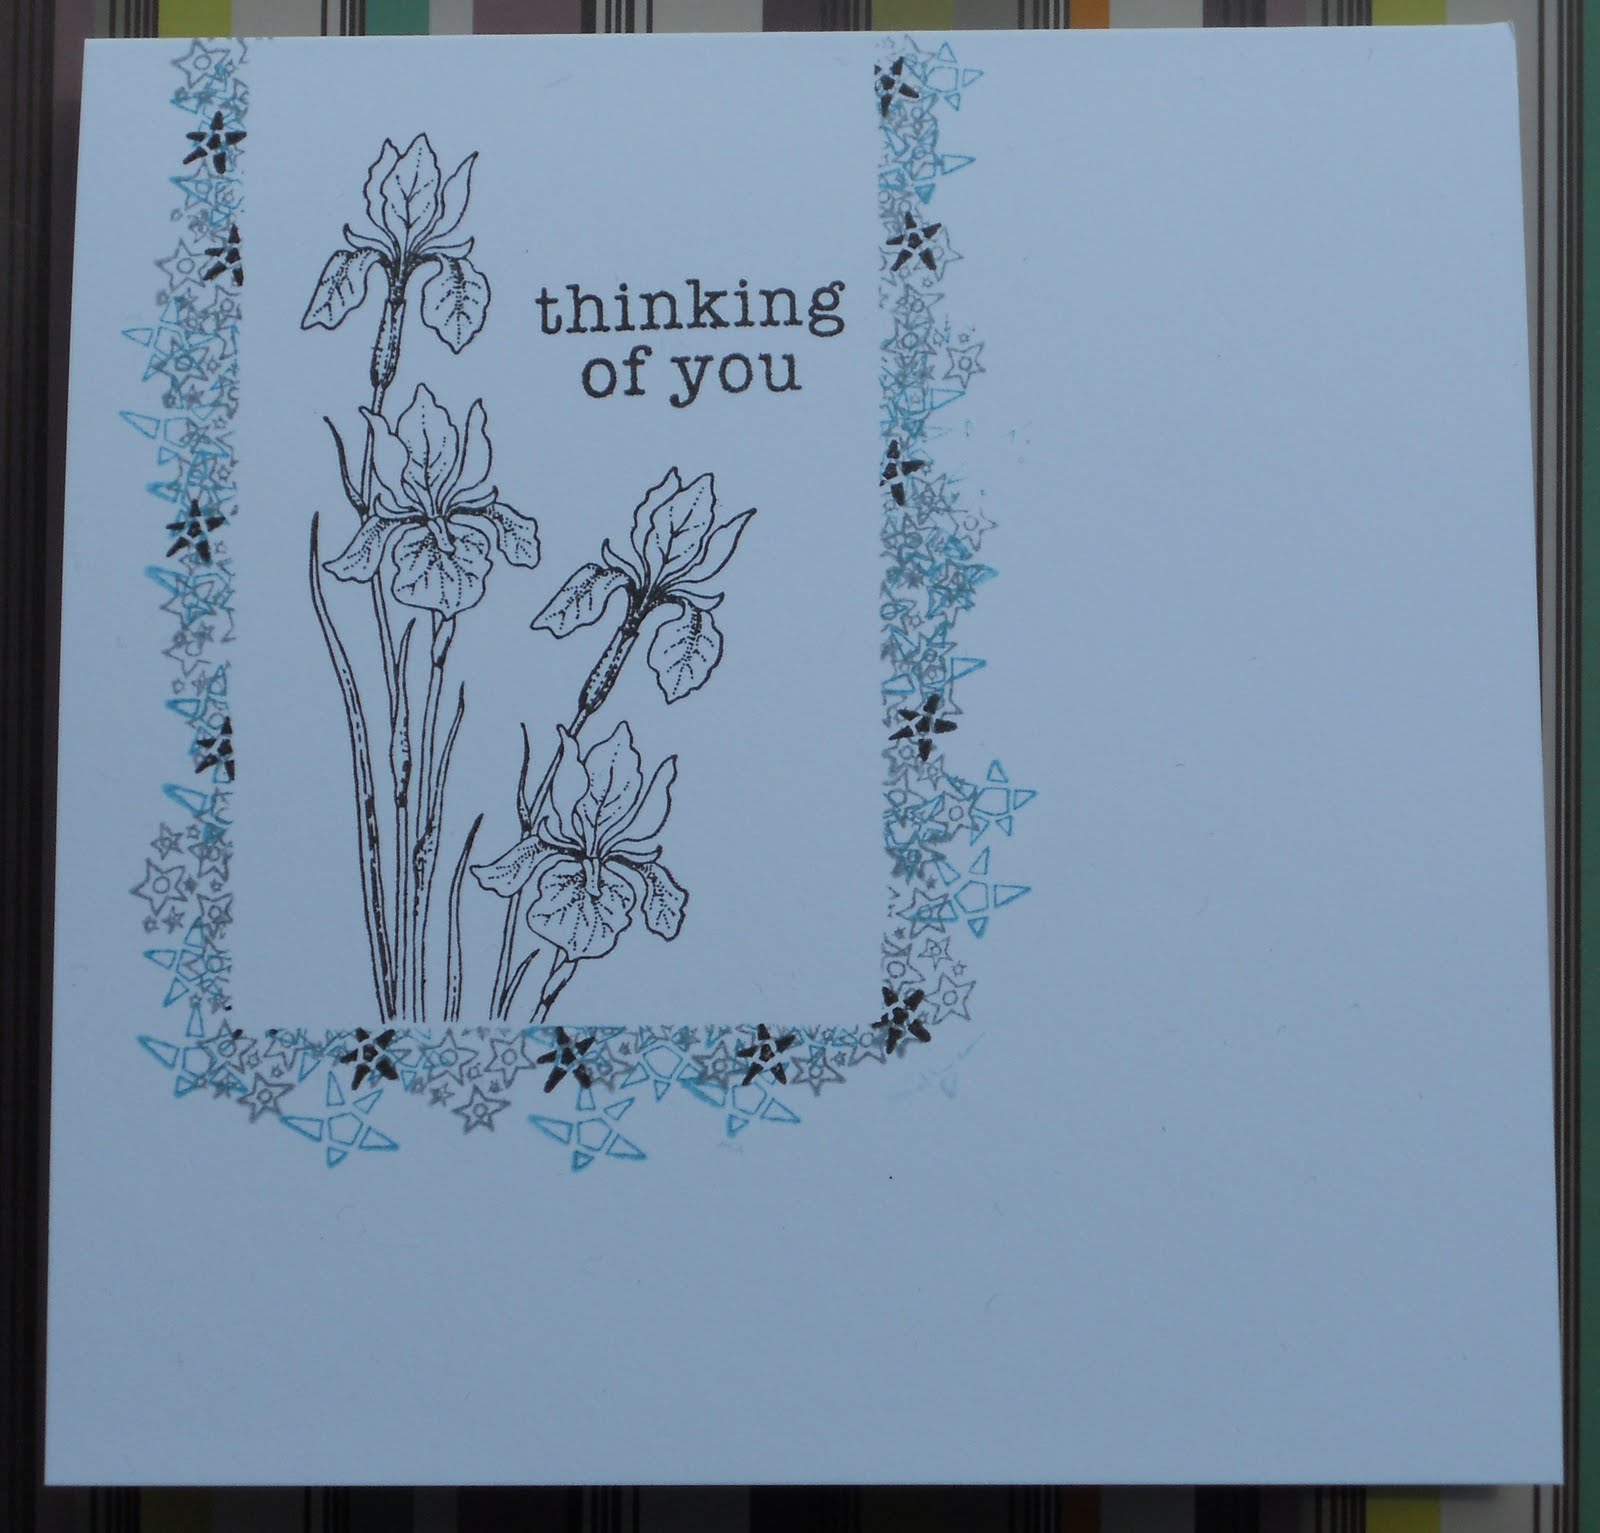
"in the frame" I knew instantly what I wanted to do and that it would be quick enough to play before I left, so here I am - with 2 cards, before 9am...

I'd seen this idea of making a frame from stamping on a scrapbook layout in this months craft stamper magazine and thought it would be brilliant on a card with tapestry stamps.  I have quite a few sets of these and don't use them enough, so when I saw this challenge - I knew I had to have a go!  This was my first attempt.  I used a couple of post-it notes to make my frame area then simply stamped the tapestry stamps around and over the edge of it in shades of blue, grey and black.  I removed the post-it and then you get a nice straight edged frame.  I added a black and white outline of an iris and a simple sentiment (chocolate baroque and hero arts respectively)


I liked it and was still waiting for the bath to finish running, so I made another, this time I used a DL card, made the frame larger and central, and used a softer pink, purple and bundled sage palette and used floral tapestry stamps for the frame.  I used the same inks on some Elzybels floral stamps for the central image and layered up the colours.  The framed sentiment is from the very first purchase I made from QVC about 8 years ago now.....


I'm off to Stamp Magic at Doncaster Dome tomorrow so I may well have lots of lovely new stash to play with so may have another go later this week.  Really must get in the bath now!

Fingers crossed the sun stays out........

Craftilicious x

Tuesday 7 June 2011

Kraftin Kimmie Cut it out...

I had to make a birthday card for my sister-in-law and was browsing around for some inspiration.  I noticed that Kraftin Kimmie have a paper-piecing challenge this week and paper-piecing is one of my favourite things to do even though I don't do it often enough.  This is the challenge link http://kraftinkimmiestamps.blogspot.com/2011/06/challenge-81-cut-it-out.html KK stamps really lend themselves to paper-piecing too and I had an new one that was just right for the person I am making it for.


I started with a sketch from Clean and Simple and whilst I went a bit further with it, it was a very good jumping off point in terms of inspiration, so I'll upload a link to their site despite the deviation.

I stamped the image onto DP (an old K&Co paper) first and cut out the dressing gown then stamped the image in full on white coated paper and coloured with copics.  I stuck the dressing gown in place and added a little shading with toner gray copics.  I then paper pieced the mug and hands to create another layer and again did a little more shading with copics.  The hair slides are paper pieced too.  I used the same DP to create a matching layer for the sketch, and mounted that onto a plain maroon cardstock to blend with the pattern into which I cut a decorative edge using my favourite MS pansy punch.  I added a "special sister topper" from a QVC kit I got quite a few years ago, and a sentiment I printed and finished with some white velvet ribbon and a pearl buckle to tie the two together.

I really enjoyed making this card and am very pleased with the results :-D

Craftilicious x

Monday 6 June 2011

Belated Happy Birthday

It was my fellow St Luke's DT member Deborah's birthday last week and I missed getting her card in the post in time for the big day, so I made a belated one and sent it a day late.  Hopefully it will have arrived by now so I should be safe to blog it.


The panel is an Elzybels stamp, coloured with distress ink in olive and edged with moss with some stickles on the flower centers.  The leaves in the background are another Elzybels set stamped directly onto the base card in moss.  The sentiment is from the snail set I used last week for my funny cards, and the gold butterflies are from my new stampin up emboslit folder.

Hope you had a good day Deborah.

Craftilicious x

Saturday 4 June 2011

LIM Week 18

Week 18 on Less is More and we're in week one of the "cycle" so it's a colour challenge and this time it's monochromatic which shouldn't be too much of a challenge, particularly after the last time round was "white on white" which I came to love after initially being terrified by it.  But today it just hasn't been happening for me.  I've felt a bit off all day so spent most of the morning just laying on the bed thinking of what to do and coming up with a big fat zero on the ideas front.  Not getting an entry up until mid-afternoon is very late for me....


After lunch I went back to the craft room and dug out a hero arts set of clear stamps which is full of flowers, butterflies and flourishes.  I selected 3 elements from it that I thought would work - a floral circle to colour, a dotty circle with a flourish, and a final flourish for a background.  Then I had to pick a colour.  I got a lovely prima pad from the show I went to last weekend which is all shades of pinks so I began with a flesh pink mottled sheet and stamped the dotty flourish with a richer pink ink - I like how inks change colour when stamped on coloured paper not white.  I picked a matching dotty paper from the pad with the same flesh coloured dots on a richer maroon background, cut a strip half the width of my card and stamped the flourish background in the same rich pink ink.  I stamped the final image a flower circle on white using a combo of the pink ink and black, then softly shaded the background with prisma pencils and blended to a soft pale finish.  The flowers were coloured with flesh tone pencils and a maroon for the leaves.  A little pink flesh stickles adds a bit a sparkle.  I decided to layer the circles off-centre for added interest. I then spent about 20 minutes deciding where to put the sentiment, which is from the same stamp set - I tried bottom right which looked OK, but not after I rounded the corners (I've started to put my sentiments on scrap so I can move them around the finished card as I've ruined so many putting them in the wrong place!) and centrally didn't work either under the image or on the bottom, so I plumped for the small space top right - what do you reckon?  Right decision?  I may not have left enough white space for a strictly CAS card (I'm sure Lady and Diva LIM will let me know!) but despite the complexity and difficulty in the thought process I think it's still quite clean and I'm really pleased with the finish results, particularly as I normally tend towards teals and greens as my preferred colour palette.

I've got to make a housewarming card, a 5 year old birthday and a sister birthday card today - hope the mojo comes back as I don't have time to spend 5 hours thinking about all of them!!!

See you later
Craftilicious

Friday 3 June 2011

CAS-ual Friday Sketch

This week's casual Friday is a sketch, normally I have no problem with the interpretation of a sketch, but today I was just clueless where to start - perhaps its the heat, or the G&T I've had to cool me down ;-)

I tried to cut a doily from my multi-shape waterlily punch - cut it in half, and it wasn't the right shape - more octagonal.  Searched through my stamps, nothing inspired me.  So I've been sitting for 2 hours, staring at a blank card, and moving around bits of paper to no avail.

In desperation, I went to my 12x12 papers to see if anything caught my eye, and then I found these 8x8 (yes I need a better storage system lol!) Paris papers and Eiffel Tower Die Cuts from Craftwork Cards that I'd forgotten I'd bought and "bing" off went the lightbulb of inspiration!!!


I cut a semi circle from the underground map sheet, cut a border using an EK Sucess acanthus punch from a black script sheet, and a matching strip under the semi circle.  I layered two of the die cut towers up on top of each other and added a simple sentiment strip.

Now I need a lie down and another G&T!

Craftilicious x

A thank you for an amazing person

This is a little card I'm sending to the amazing Claire Brennan over at Waltzingmouse Stamps to say a very special thank you to her for her tremendously generous donation of a prize for my charity card making challenge.


All you Waltzingmouse fans out there should keep an eye on the challenge blog over the next few months as Claire has amazingly sent me a SIX WHOLE SETS, yes you read that right folks 6 sets of her amazing stamps.  So, just to let you know how amazing you are Claire, my little thank you card is winging its way through the mail.

If you want to follow the challenge in readyness for the opportunity to win - then this is the link http://stlukescharitycardschallenge.blogspot.com/

All the best, Craftilicious x

Thursday 2 June 2011

Very Funny

My time to craft are looking for humorous entries to this weeks challenge, and I thought this little set of cards I wanted to make for St Luke's Hospice would fit the bill nicely!  I have been running a charity card making challenge blog for a couple of months now, in aid of St Luke's asking people to contribute the cards they make for the challenge to the hospice for them to sell.  We'll it's going really well - we've had over 300 cards already!  St Luke's are having their annual summer fete on 11 June and I'm having a stall at it to start selling the cards so this little set of 4 are going into the mix.


These humorous little images I picked up at my local craft store last year at the bargain price of £1 each and this is the first time I've inked them up.  I like the little lizard best, he reminds me of Randall from Monsters Inc but I did him in Sully's colours to make him a good guy!  All OL mini cards coloured with prisma pencils and sandsoder blending.

If you want to join in our challenge then pop on over to the site - the challenge for June is "flying high" so you need to feature something that flies on your card.   You have a whole month to play and we have a great prize for our favourite card and a nice winners badge for the runners up.

 Craftilicious x

Wednesday 1 June 2011

WOYWW 2nd Anniversary

I'm a bit late coming to this WOYWW thing - I started looking at it a couple of months ago when on of my DT (Ciara) from the St Luke's blog started to talk about it.  I've had a look a few weeks since, and there is definately something fun about having a look at the other desks out there and showing hubby that I'm not the only craftaholic out there.  So, I thought I'd join in tonight for the first time with a shot of my desk.


It's very messy - not sure on the protocol - I guess I should have at least cleared off the backing from the easy lift tape I've been using, but hey, I'm a messy crafter - perhaps one week I'll show you the floor....

In front of the rubbish and strips of paper awaiting return to the scrap drawer, there is the pile of new stamps I picked up at the craft show at Lincoln Showground on Sunday, along with teh new trimmer I got (bigger than the blue one at the back) which has a couple of half finished images on.  To the left of the stamps is a set of notecards I made using my new nestabilities tags also from the show.  The big kick needs to go away too - the only tidy thing on my desk, is not actually on my desk, but on the wall - I finally got my ikea kitchen poles put up to store all my punches on - there are 6 rows ready to be filled - but most are out of shot.

That's it for me tonight - hope I got my first WOYWW post right - Happy Anniversary to your regular WOYWWer's!

Craftilicious x

Come Fly With Me!

It's the first of the month again which means another new challenge over at St Luke's Charity Card Challenge and this month we'd like you to fly with us!  You can make any style of card you like, you just have to include something that flies on it - a bird, a plane, a fairy or in my case and angel....


This is a lovely image from Elzybels (no longer available to buy sadly) and its a cute little angel sprinkling wishes, peace and dreams as stardust from her cloud.  I coloured her in a soft muted palette and added lots of glamour dust and glitter and matted onto silver mirri.  I added a sentiment to the bottom, matted onto more mirri with a top and bottom border of stars using a Martha Stewart punch.  Simple, but hopefully effective.

So dig out your butterflies, birds, planes, balloons or anything else that flies and make a card for this months challenge - our favourite card will win a fabulous bundle of ribbons and buttons donated by Ciara - and there's a bit of blog-bling in the form of our winners badge for the runners up.  So pop on over to the blog to check out the challenge http://stlukescharitycardschallenge.blogspot.com/

We've had over 300 cards donated to the hospice for sale already so your support of this challenge really is making a difference - thanks so much for joining us for our challenge with charity at its heart.

Craftilicious x
Blogging tips