Showing posts with label waltzing mouse. Show all posts

Tuesday, 19 July 2011

More cake.....

Today I am playing along with the CR84FN Challenge which this week is to use yellow, pink and bright pink, which is not a colour combo I would normally be drawn to, but, quite by accident, I used pink and yellow together on my cake for the blog waltz at the weekend and I was pleased with the outcome.   So here I am again, with another cake, and more pink and yellow!


I'm also making this a second entry into this week's CAS-ual Friday's challenge - which is all about sweets and treats.  I'd ordered this stamp last Thursday before the challenge went live - must have been psychic so am so glad it arrived in time for me to play with it!  I hope this still classes as clean and simple enough for the challenge.

The stamp is a from the little peeps range by Stamping Bella and I've coloured it with copics.  Mounted simply onto pink, with a piece of seam binding ribbon sandwiched in between the layers.  The yellow die cut is a marrianne designs and I joined them together with a yellow cherry blossom.  The great sentiment is from the eat cake set by Waltzingmouse which I just can't seem to put away at the minute I love this set so much so sorry if you're bored of seeing it already!!!

Have a great day :-)

Craftilicious x

Sunday, 17 July 2011

My First Waltz....


This is the first time I've joined the waltz with waltzingmouse stamps - I adore their stamps and have seen the waltz but never really grasped what to do.  So I hope I've done it right!  The theme this month was birthdays and as its been very cake related on my blog this weekend, I went straight for the eat cake set that was part of the July release.  I stamped a rainbow row of candles, added a ribbon below and stamped happy birthday from the say it loud collection directly onto the ribbon.  I stamped the cake it yellow, added more candles in pink, and turned the cake stand upside down to form a plate (carefully inking to avoid the leg of the stand) and stamped the sentiment directly onto the cake.


If you want to find out more about the waltz and join in the next one on 17th August, then join the WM forum.

Edit - sorry this is posted late - I haven't grasped the new format for scheduling obviously :(

Craftilicious x

Wednesday, 29 June 2011

OLW

I found the one layer Wednesday inspiration photo last week a little difficult so I skipped it, but this weeks challenge to overlap without masking was intriguing and I managed to make something at the first attempt that I was really pleased with.


I started with a kraft card base and stamped a chrysanthemum from Waltzingmouse stamps in versamagic wheat in the bottom left corner.  I then stamped one of the new sentiments again from Waltzingmouse from the "say it loud" set in brilliance pearlescent chocolate.  I did decide to add a tiny pearl to the centre of the flower - hope this doesn't stop it being a one layer card....

I will upload this to my gallery on the waltzingmouse forum - they pick one card each week to be the "big cheese" - have a look here if you want to find out more about it and join in.

Craftilicious x

Sunday, 19 June 2011

A bunch of get well wishes

In addition to the anniversary card I made for her yesterday, my Mum also asked me to make her a couple of get well soon cards.

For the first one, I've returned to this weeks Waltzingmouse Sketch Challenge which this week lets you choose from any of their past sketches, so this time I have opted for WMSC37 but used the wonderful Back in the Saddle once more as this is just my favourite get well card stamp.


For the second card, I used this cute "sicky monster" from paper make-up.  I just love how ill he looks but can still make a cute card.  I coloured with copics, using a dotty technique on the towel to add texture.  The feeling icky sentiment comes with him.  I just matted onto some papers from using the same colours I used on the monster.


Thirdly, I used "nurse nora" which I think is a greeting farm stamp but I can't be sure.  Again, coloured with copics, cut out with nesties this time and I added a bit of ribbon which reminded me of the lines on machines from hospital dramas....


I need to work on a civil partnership card commission after dinner and a couple more birthday cards.

Catch you later.

Craftilicious x

Saturday, 18 June 2011

3 in 1

This morning, I made 3 cards for one challenge.  So this afternoon I thought I'd switch it round and this time I've made one card for 3 challenges!


The theme at CAS-ual Fridays this week is colour blocking and I normally play their challenges on a Friday, but this week I was a little stumped as what to do, so thankfully the other two challenges I found enabled me to enter a card for this challenge too.  I'm glad that I've managed an entry as I haven't missed a week of their challenges as yet.

The design of the card came from this weeks Waltzingmouse Sketch Challenge - their anniversary one (congrats on 52 challenges ladies!) and so they challenge was to pick any sketch from the previous 51 and quote it.  I chose their 16th Challenge  (WMSC16) - you can see all the sketches you can pick from on this page - worth bookmarking for future inspiration I reckon ;-)  I used my favourite waltzingmouse stamp set - Back in the Saddle for the feature of the card - a Yee Haw sentiment on the aqua oval teamed up with the cool cowboy riding off the page.

The colours came from Color Cue - I normally like to pick my own colours for challenges but I needed the inspiration this week as solid blocks I find difficult.  Their colours are great and not ones I would ever have put together myself - Plum, Green, Aqua and Red.

Time to go and make tea before my OH comes back from work.

Craftilicious x

Friday, 3 June 2011

A thank you for an amazing person

This is a little card I'm sending to the amazing Claire Brennan over at Waltzingmouse Stamps to say a very special thank you to her for her tremendously generous donation of a prize for my charity card making challenge.


All you Waltzingmouse fans out there should keep an eye on the challenge blog over the next few months as Claire has amazingly sent me a SIX WHOLE SETS, yes you read that right folks 6 sets of her amazing stamps.  So, just to let you know how amazing you are Claire, my little thank you card is winging its way through the mail.

If you want to follow the challenge in readyness for the opportunity to win - then this is the link http://stlukescharitycardschallenge.blogspot.com/

All the best, Craftilicious x

Monday, 16 May 2011

Waltzing Mouse Birthday ParTEA!

If you've been following my blog for a while, you'll see that I use Waltzing Mouse stamps quite a lot - Claire the owner/designer makes such wonderful timeless stamps that have hundreds of different applications - they really are just brilliant :-)   At the moment, Claire is celebrating Waltzing Mouse's 2nd Birthday and is offering a staggering prize of £200 worth of stamps (er yes please I hear you say - well hop on over to this page to find out how to play).  You have to use one of her templates - the tea bag is a great free download - and decorate it for a tea party.  This is my interpretation of the brief:


I cut the bag template from brown paper, and matted some teapot and cup paper onto the front.  I stamped one of the stamps from WM's Back in the Saddle set onto some more brown paper and printed my own text underneath to show that you are wanted for a parTEA!  (I know, bad pun but it made me laugh!)  The little character is a freebie stamp from this months craft stamper (great timing!) stamped onto white and coloured with copics and cut to fit the wanted frame.  I used a bit more DP for the tea bag string, and then cut out some cups and cupcakes from the damask decor cartridge on my cricut [sometimes you can find the strangest things hidden on the extra keys on your cartridges ;-)]  I added a 2 to the cake to show it was an invitation to parTEA with Claire and the Waltzing Mouse team.  Hope you like it.


I also decided to make a 2nd Birthday card to go with the invite and used this weeks sketch on the Waltzing Mouse Sketch Challenge site.  I used one of the stamps from WM's holiday labels set and stamped half of it along some white card to make my own custom stamped scalloped border.  I cut this out by hand.  I used some DP from the DCWV Linnen stack ( I then cut a mat using a nestie in white and matted this onto a teal pearl.  To continue the tea party theme I cut the whole damask shape which had the little cup as an extra layer that I used on the tea bag and coloured it in two shades of teal, adding a 2 to the teapot.  I used another stamp from the Back in the Saddle set to show it was for a birthday.  A little ruffle-folded teal ribbon over the top of the border and a few pearls were all that was needed for a little finishing touch.

Congratulations to Claire on Waltzing Mouse's 2nd Birthday - may there be many, many more birthday celebrations for us all to join in as your sucess grows :-)

See you all later - Craftilicious x

Saturday, 14 May 2011

LIM Week 15 Embossing - Take 2 plus disasters!

Back again.  Chrissie gave me some fantastic tips on how to avoid the dreaded black spots so I thought I'd give the challenge another go.

This time I used one of my new chocolate baroque stamps - I bought them because I liked that you got a solid and an outline of the same image - in this case, an iris.  I created a gold mirror background using a glue stick and some mixed colour flakes and stamped the solid version in stazon over the top.  I used stazon again to stamp the outline version, half on, half off the flakes.  I wiped over the card with talc and stamped a greeting in the corner with black ink and embossed it.  Still a few tiny dots but nothing that would ruin the card this time, phew (and thanks Chrissie - you and Mandi are so generous with your time and tips and I know us LIMettes really appreciate it).


I thought I'd share the two disasters now I've rescued them - no longer one layer so don't fit the challenge, but I am pleased with the rescued results so thought it was worth sharing them.  The first is dry embossed along the bottom with a cuttlebug edge folder decorated with lilac pearl dots.  I did stamp the sentiment directly onto the card, but I screwed up the alignment so had to mat and layer it twice to get it centralised (LIM fail but I like it now it's "fixed")


The second is actually the card I started with this morning, my new poppies from the same chocolate baroque set as the iris.  I stamped and embossed originally centrally onto a square card, but I had lot of ugly dots all around so I carefully cut it out (again now no longer LIM one layer but worth rescuing I felt as it is a gorgeously luscious image) and coloured with copics, polychoromos and a little glitter.  The sentiment strip is from craft candy.


Right, am off for a quick look at what everyone else has been doing before I go to collect my husband from work and make our paella.

Best wishes,   Craftilicious x x

Saturday, 30 April 2011

LIM Week 13 - Thank you

So, I did my first entry into this weeks LIM challenge - with a congratulations card - and I'm back again with a thank you (this is what happens when you're on holiday - lots of time to play!)


I've used the same lovely pale pink shimmer card as a base, I've used another of my favourite Waltzing Mouse Wild West stamps, which I've stamped onto white shimmer card in "eggplant" ink and cut with a nestie and mounted onto purple shimmer card.  I've then put a line of super-thin tape, and stuck on a row of two-tone (purple-green) flower sequins.  Super simple but I'm liking the clean lines.

Today is your last chance to enter the first ever St Luke's Charity Card Challenge - so pop on over quick with your floral entries - we'll be back tomorrow with a brand new challenge for May so come back again then too :-)

See you tomorrow with the new St Luke's Challenge which should get you all thinking!
Craftilicious x

Tuesday, 12 April 2011

Starry Birthday

Very quick post today with a card a made for my cousin's son's birthday this weekend.  No challenges this time, just a card because I made it :-)
 

The birthday boy is really into performing arts - so I decided on lots of stars for the background, which I stamped in shades of blue and red with a stamp from the WM way out west set (doesn't have to be cowboy!) and a bit of old dp with stars on too.  The image is a great Kenny K digi, coloured with copics and pencils.  I added some black glitter paper for matting and layering, and used the same behind a MS border punch for the sentiment.

Ta ta for now.
                      Craftilicious x

Saturday, 9 April 2011

Waltzing Mouse SOAP CASE Challenge

The very talented Ms Brennan, who designs all the wonderfully delicious stamps over at Waltzing Mouse, has had another cracking idea - inbetween releases her lovely design team are going to play with the previous months stamps to give us all lots of great inspiration and then at the end of the week, we have to pick our favourite to CASE in a new challenge.

It started last week, and the deadline to submit entries is in about 10 hours time....   The SOAP (stamp of approval parade) inspiration  had just so many wonderful projects, I really had a very hard time picking a favourite to case, but in the end, I settled on this AMAZING wall hanging project by Mona Pendleton - isn't it just beautiful?  Do go and visit Mona to find out all about it.


Now, I don't quite have Mona's skills for antiquing and the vintage look, so I decided to interpret it into a card rather than a wall hanging.  This is my CASE interpretation:


I started with a white base card, and cut a piece of kraft paper which has the same ripple effect as Mona's background (but it doesn't show up on the photo!) and I antiqued the edges with a green and brown distress ink.  I then used a garden swirly stamp set to add interest to the corners, stamping with a similar coloured lime green ink with dark green "highlights."  I added a couple of buterflies in brown from the same set.

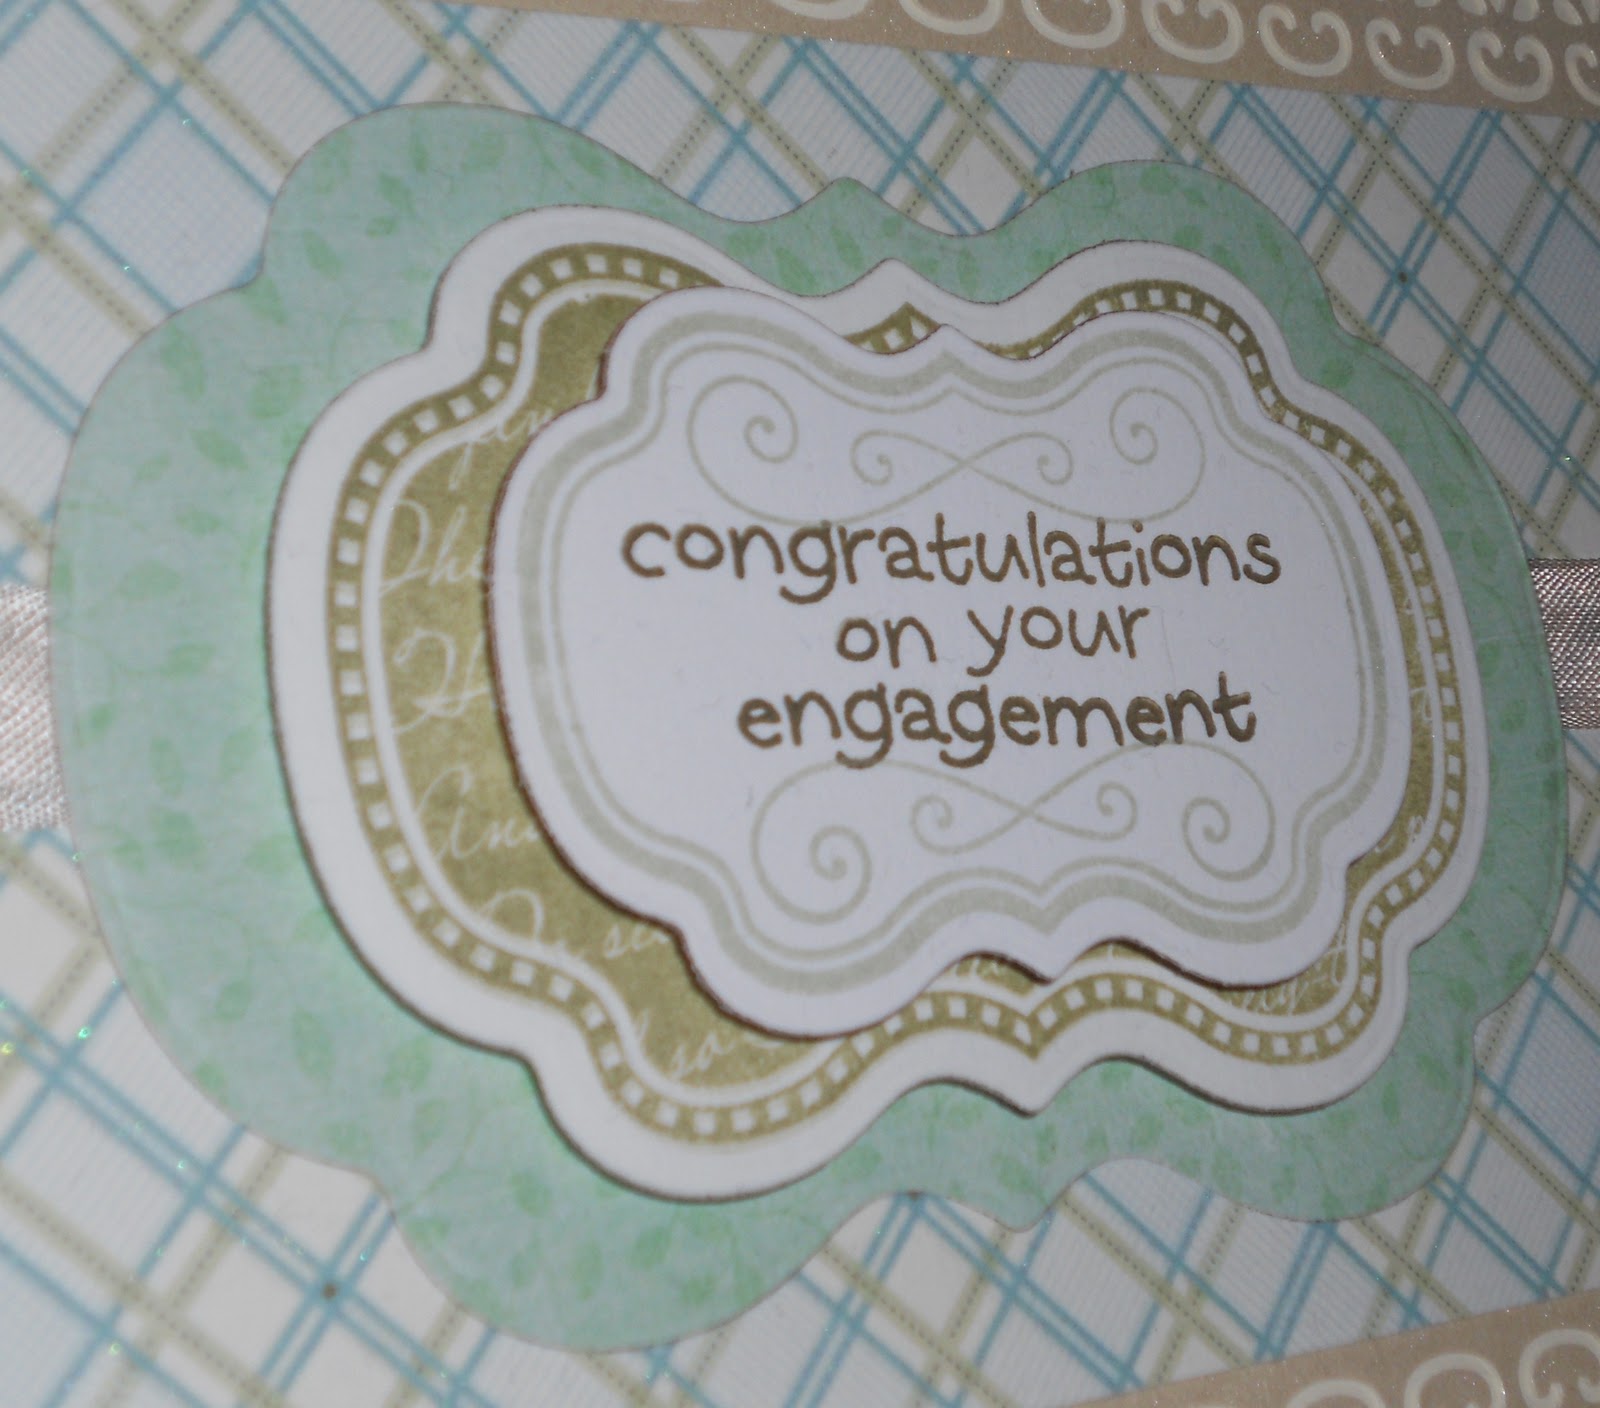
I then stamped one of my small stamps from the holiday lables 14 set from WM and in the lime green ink, then added a sentiment from Back in the saddle in the darker green and brown.  I stamped the next size up lable in lime green for the spotted pattern and edge it with brown.  The third layer is a DP from one of the new Prima packs - reflections.  I cut them all out with the matching nestie and layered up with foam pads.  I added some lace over the bottom layer which was white but I coloured with the ink pads.  I used the smallest stamp in the labels 14 set to cut out the tag onto which I stamped and embossed the cowboy boots, also from back in the saddle.  I then used some vintage seam binding ribbon to create a double bow with my bow easy (I honestly couldn't tie a bow without it!) and dangled the tag from the center, to which I then added a nice white rose.  I colour tinted another flower with the lime ink and added a clear gem to the center to provide a little balance to the right hand side.

It's taken a couple of hours to put together but I really loved making it and am thrilled with the results.  Hope you like it.

Enjoy the rest of your evening
                                                Craftilicious x

Thursday, 7 April 2011

clean and simple twine...

I haven't done much crafting this week as I've been a bit ill and also because my craft room currently looks like this while we TRY to organise it:


This is new kitchen cabinet awaiting a worksurface, occupying a tiny corner in my very cramped, and multi-purpose craft room come back bedroom (we took a sofa bed out of this corner believe it or not as it mostly just served as somewhere to put the ironing and my need for somewhere for my growing stamp collection trumped the ironing which can now go in the attic to be forgotton!) I'll show you afters, when its finished, but it might be a long wait.............


I did see something in craft stamper this month though that gave me an idea to play in the sketch challenge at http://cleanandsimplestamping.blogspot.com/2011/03/134.html  I cut some circles from my smallest nestie and covered them in d/s tape and coiled garden twine from the centre out (they used bakers twine in craft stamper but I thought this would be more textural).  I put a new craft-candy dot in the centre of each, and mounted on a woodgrain background (waltzing mouse way out west set again) with a green mount to match the craft candy dots.  The sentiment is from There She Goes.


 I took my colour inspiration from this weeks create for fun http://cr84fncolorchallenge.blogspot.com/2011/04/cr84fn22.html

Saturday, 2 April 2011

the cakes can wait.....

OK, now I know I have a problem!  Back with a second entry for LIM in under an hour - I think we need a support group for addicts - LIMA?  Less is More Anonymous???  I do have other stuff to do, but I need to put stuff away on my desk before I can do my mothers day cards and I was so keen to make this card that I decided to just do it - I can make cakes tonight as my husband will be back from work late as he is at a comic convention in Birmingham.


I used the same Waltzing Mouse set as for my first entry.  I stamped 3 rows of the background text in black, and 3 rows of the star background in Rhubarb.  I stamped the matching sentiment, which I think gives the card a more feminine feel so I cut it with a nestie label and used one of my polychormos pencils to shade the border on the shape (easy to follow the indented edge with a nice sharp pencil - pens "leak" over the line).  I added a 6mm sheer red ribbon to the top of the text, and then used a ribbon punch and thread a 2mm red ribbon through the sentiment.  I hope I left enough white space for it still be CAS.

Right, I REALLY AM going to go and get on with stuff I HAVE to do now ;-)

Happy Crafting - Craftilicious x

Tuesday, 15 March 2011

Less is More Week 6 Take Two....

I really wasn't happy with my first card for LIM challenge this week.  This off the edge thing really had me thinking - I've been laying in bed, running all my stamps through me head and trying to think of something else to do that hasn't been done by someone else already.

I was toying with the idea of colouring, but none of the stamps I had seemed to work off the edge, so here I am again with more black ink......


It is on kraft though so at least its not another black and white number!  I did play with putting the sentiment in red, but the balance just didn't sit right with me.  I'll try to think in colour for the next challenge I promise...

This is from the new Waltzing Mouse set called Back in the Saddle.  I stamped on scrap with momento black ink to get a pale image and stamped it off the edge of the card.  I then stamped the same image again without stamping on scrap for the middle image, and then for the third image I used versafine to get a darker black.  I was trying to get the effect of the horse galloping across the card. I think with the sentiment it would make a great invite for a stag party or boys birthday.  

Check out the challenge blog here http://simplylessismoore.blogspot.com/

I'm happier with this card than my first - I do like how the LIM challenges are making me think more about different styles of card I wouldn't normally think of making (the symmetry quirk I have would never had allowed me to go off the edge of the card for example)  I really appreciate the tips from Mandi and Chrissie too - totally agree that the first card for this challenge didn't need the extra squiggle by the sentiment - so this time I resisted the urge to "add" anything too much at all :-)

However if this hadn't been a "one layer" challenge I may have been tempted to add a row of gemstone stars under the sentiment as below - what do you think?


STILL no winner came forward for my blog candy, so I will draw it again later, so followers please check back later to see if you won - let's hope it's 3rd draw lucky ;-)

Thanks for stopping by again.
                                              Craftilicious x

Friday, 11 March 2011

Simply Less is More Week 5 #2

I really loved playing with the Waltzing Mouse stamps I used to make the engagement card the other night.  I've had the stamps a while but didn't have the matching spellbinders die to cut them out with so haven't really played with them much til now and I thought a pared down version would be another good entry into this weeks LIM challenge.  Rather than engagement this time, I thought a different sentiment coupled with the lovely label shapes would make a really elegant Mother's Day card and went for a floral theme as that is the gift my Mum always wants for Mother's Day - a house full of flowers!

Here's the link to the challenge site  http://simplylessismoore.blogspot.com/2011/03/week-5-colour-pastel-colours.html


I started with a swirly stamped layer, in sage versamagic, and stamped a sentiment in the middle in the same colour I cut this out by hand rather than using my nestie to make it just slightly smaller than the nested layer behind it.  This layer was cut from a soft green with little leaves all over to match the sentiment.  I then used a floral embossing folder on some white card to again add to the floral theme and popped a very sheer sage green ribbon around it, and tied a little bow on the bow easy.   I think this is my favourite CAS card to date.

Thanks for taking a look :-)
                                           Craftilicious x

Wednesday, 9 March 2011

Engagement Card

My husbands mate recently proposed to his girlfriend whilst on holiday in Australia, and he told us last week when the came home.  Hubby asked me to make an engagement card for him to take when they meet up again on Friday.  I wanted something classy and elegant (I think it will appeal to the lady, rather than the bloke, but then most cards do don't they!) and this is what I came up with.


I used a set of spellbinder compatible lable stamps from Waltzing Mouse as nothing says elegant more than one of Claire's lables I don't think, and layered them up (might take another photo later as the layers don't show too well) and stamped them in shades of sage and olive Versamagic inks.  The central sentiment is from an Elybels words set.   The final shaped layer is from wild asparagus from my minds eye.  I backed the whole thing onto a lovely paper from DCWV's Linnen matt stack which pulls all the colours together, and then added a little vintage seam ribbon in cream.  A MS punch onto some cream shimmer card adds a final touch of glamour to the last layer.

ED - here's a side shot to show the layers a little better.


I am entering the following challenges with this card:

http://waltzingmousesketchchallenge.blogspot.com/2011/03/challenge-37march-5-2011.html  although the sketch is squares - I think from looking at some of the other DT cards - as long as there are layers, any shape counts....

http://anythingchallenge.blogspot.com/2011/03/die-cuts-challenge.html - Die Cuts - there is quite a few die cut layers going on here.

http://shellysimagesblog.blogspot.com/2011/03/ttt-challenge-3311-layers-layers-lots.html - lots of layers - well I count at least 5...

Thanks for stopping by today.

                                          Craftilicious x

Thursday, 30 December 2010

Book Group Christmas Dinner 2010

I started this post much earlier in the month, but have been down for a couple of weeks with a chest infection (early unwanted christmas gift!)  It was our annual Christmas dinner for bookgroup in early December and all the ladies bought me this gorgeous Christmas table centre as a thank you for hosting book group and feeding them throughout the year.  Isn't it beautiful?  I just love the colour combination of the lime green orchids, the red roses and the gold leaves.  Thanks ladies :-)  (It even stayed fresh for Christmas day!)

I always make the ladies something crafty, either to put in a cracker or as a table decoration that they can take home with them.  This year I made paper ornaments using my delightful new stamps from Waltzing Mouse which fit perfectly in the traditional ornament nestability.  I love these vintage style ornament stamps and I stamped 5 to make each decoration into a sort of bag to hold some candy canes and the second hand-made gift of a badge. 


I saw this sentiment on something earlier in the year and thought it would make a great badge - appropriately worded for a group of busy readers....  I rolled out some sculpy, stamped the sentiment into using an Elzybels alphabet stamp.  I covered with glossy accents once baked and added christmas tinsel glitter to the edge.


Dinner itself is always the traditional turkey with all the trimmings, but one of our ladies turned veggie this year, so I had to come up with a vegetarian option for her and I have to say, I wanted to eat it myself so I thought I'd share it with you.

To begin with I peeled and cubed a small butternut squash and pan roasted the cubes along with diced onion, and diced courgette.  I added cumin and a little alfez lemon stir fry paste for warmth and flavour.  I dry roasted some cashew nuts and then blitzed half of them with half a pack of pistachios - I wanted to leave some for texture and crunch but wanted the ground up nuts to form a mortar to hold the dish together.  Finally I stirred through the remaining nuts, a pack of cubed feta, lemon zest and lots of fresh parsley. I would have added a few diced apricots ideally but my vegetarian friend doesn't like dried fruit.  The resulting mixture can be seen below.


I arranged 6 feuille de brique sheets so that they overlapped to form a rectangle, brushing each with butter to make them stick together.  If you can't find feuille de brique, filo would be a prefectly good substitute, but I would make sure I used more so that it was double thickness everywhere as the brique sheets are stronger and less likely to tear than filo.  I put the filling in the middle, rolled and put seam side down on a baking sheet.  I brushed the top again with butter and sprinkled with sesame seeds and baked in a hot oven for 15 minutes until warm throughout and crispy on the outside.  It went down a treat with the vegetarian guest and was also pretty decent cold for lunch the next day. 

Blogging tips