Sunday 27 October 2013

Let it snow....

It's Sunday which means my day to blog over at Make the Day Special and as the much of the UK is braced for storms tonight, my thoughts turned to winter and I decided to play my Mama Elephant Polar Pals again but this time I set them in the snow...


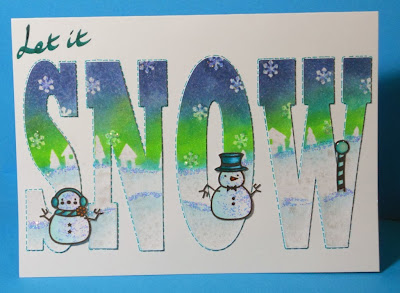
I used my Silhouette Cameo to cut the word snow in large capital letters from some white cardstock but I left them on the mat while I worked on creating my scene across them.   Firstly I used the smallest snowflake from Lawn Fawn's Critters in the Snow to emboss some falling snow at the top of the letters.  I used a memory box die to create a mask and then using distress inks to create a sky adding an aurora borealis with neon green from from Hero Arts.   I created snowy hills in the foreground with more distress inks and some pearl spritz.  At this point the letters came off the sheet and onto the card before being edged with a stitched line.

Then it was time to add my pals - I stamped them onto more white card, coloured them with copics and glitter, before fussy cutting and adding to the card.   I finished by handwriting "let it" in the corner with a teal calligraphy pen.

It's a fun technique and you can do it with any word you fancy, just create your scene before moving the letters and then make sure the gaps stay the same when transferring to your project.

Friday 25 October 2013

PTI Blog Hop

I'm feeling pretty eugh today - dizzy and sick - so I'm not feeling up to crafting much but I wanted to play along with the PTI blog hop and as the task is to make 5 gift tags, I managed to play along in under 10 minutes!   I now have more tags than cards ready for Christmas so will have to try and make some quick cards too.....


I simply used some plain kraft tags I bought in the January sales from Paperchase (I love their sales and always stock up - these were 50p for 10!) and stamped the tree from Holiday Cheer in lettuce and used the small dots to stamp the baubles in red.  The sentiment is from the same set.

Here's the link if you want to join the hop  http://nicholeheady.typepad.com/capture_the_moment/2013/10/october-2013-blog-hop.html


Tuesday 22 October 2013

It's beginning to look a lot like Christmas....

Well, I can't put it off any longer - less than 10 weeks to go means I've got to get going on Christmas card production - I'm planning on making a few simple designs this year and this could well be one of them so thanks very much to CASE This Sketch for the inspiration!   http://casethissketch.blogspot.co.uk/2013/10/case-this-sketch-challenge-50.html


I just went very simple with the large snowflake from Hero Arts stamped and embossed in white onto a pearl slate base card.  The sentiment which is also Hero Arts was embossed in blue opaque WOW powder onto vellum and attached with some glue dots hidden behind some dots from Stampin Up.

Here's the sketch if you want to play along.


That's all for today - off to the cinema for the press-preview of Thor this pre-evening - can't wait for a couple of hours of bigger than life size Chris Hemsworth ;-)

Sunday 20 October 2013

The Elephants are here!

So it's my day to try and offer a little inspiration to you all over on the Make The Day Special blog and today I'm playing with Mama Elephant stamps as MtDS are the ONLY UK stockist of them and they've just landed in the shop this week!   I love these stamps, the designs are fresh and funky and they stamp beautifully!   The hardest job I had this week was deciding which of my new sets to make a card with but in the end the penguins won the toss......


Only I decided to not go traditionally Christmas with them - I thought they looked a little like they were pointing at each other in that way kids do when they're blaming each other so I paired them with a sentiment from Say What to give it a fun twist.

I stamped the stitched hill a few times in grey and then stood the penguins on the hill and coloured them with copics but now realise I put the yellow in the wrong place for an emperor penguin - I need to watch more David Attenborough programmes lol!   They're still cute though ;-)


Saturday 19 October 2013

PJ's and Trees

It's a couple of my favourite challenges today - Less is More and the Waltzingmouse PJ Party and luckily I've managed to combine the PJ Party sketch with the tree theme from Less Is More to come up with this.


I stamped the large teardrop tree from Tiny Trees in Starfruit ink from Stampin Up, added the branches in brown and let it dry before embossing the flurry of stars in blue glitter over the top.   It was then die cut from a circle of card which was edged with dashes from a green-gold glitter pen.  I added a strip of blue paper for the banner and edged the whole thing with more dash lines.

This is the sketch - you have a week if you want to play along with this one.


There are 3 other challenges for the PJ party - two for Halloween which I've not managed, but the 3rd is all about Art Deco and I love that so had to make a card.  Challenge 3 - Art Deco - Black and white and POP


For my pop I went with gold and used a soft gold base card adding a black and white deco panel with the new background stamp.  I die cut a fancy label and embossed a sentiment from Putting on the Ritz in gold and mounted it with a couple of gold gems.  I added fancy photo corners to finish - http://waltzingmouse.blogspot.co.uk/2013/10/wms-october-pajama-party.html

And while I'm here - I should also remind you that if you're a Waltzingmouse fan, then the new Fanatics challenge started this morning so you have another sketch you can play with http://waltzingmousefanaticschallenge.blogspot.co.uk/2013/10/challenge-4-sketch.html


Aim High Kid!

It's Waltzingmouse Fanatics challenge time again this morning and we have a fabulous sketch for you and I decided to take it to the sky....


I kept the sketch rotation but changed the focal shape a little into the form of the lovely hot air balloon from Half Pint Heroines which I paper-pieced with patterned paper and lots of glitter!  To form the wave shape in the sketch I stamped and embossed the clouds from the same set and sponged some white ink inside to give them a soft cloudy feel.  The sentiment is also from the same set.


As well as our challenge, my card also fits the theme at Crazy for CAS which is to make a card for a child http://micassucas.blogspot.co.uk/2013/10/challenge-29-make-card-for-child.html  and at Crafting When We Can which is to make it sparkle  http://craftingwhenwecanchallenges.blogspot.co.uk/2013/10/challenge-55-make-it-sparkle.html


Friday 18 October 2013

Inlaid Snowflake

I love the inlaid die cut technique so I was very much inspired to play along in this week's MUSE challenge but whilst I stuck to the layout and stripes on the original I twisted the colours up using the Paper Players colours (although my dark blue isn't quite right as I don't have that colour) and I decided to get all Christmassy with snowflakes.....


I used one of the dies from the Swedish Ice Star set from Marianne Design and die cut it from some pool party card.  I stamped some stripes (Clearly Besotted) using the darker ink onto a strip of white narrower than my base card and die cut the snowflake again (keeping the little bitty triangles this time so I could piece them back in to the gaps in the snowflake centre.  I added a little snowflake sequin for a tiny hint of bling and a sentiment from Waltzingmouse.

For the base card I stamped and embossed (as it turns out with pretty rubbish clear powder!) some snowflakes from Verve stamps and then sponged the two inks over and blended them together.  I really wanted them to stay white but despite getting good coverage the embossing really didn't resist the ink very well at all but I do quite like the soft effect I've been left with so I decided to pretend that was the look I was going for all along ;-)

Here are the challenges I was inspired by:


http://musecardclub.blogspot.co.uk/2013/10/muse-challenge-39.html

http://thepaperplayers.blogspot.co.uk/2013/10/pp167-jaydees-color-challenge.html

Wednesday 16 October 2013

Clearly Autumnal

I had a play with the new challenge at Clearly Besotted over the weekend, but today has been the first day I've had chance to blog it.  http://www.stampingsharing.blogspot.co.uk/2013/10/clearly-besotted-challenge-5-colour.html

The challenge was to be inspired by the autumnal palette below and the colours as well as the flowers led me down the watercolour route but I went with lilies as I'd not inked them up before.

I started with a piece of cream watercolour paper and stamped and embossed the lilies with Stampin Up's really cool grey embossing powder - I love that there is a mat grey now as sometimes you don't want silver and white's not right either.  Here the grey fit the palette perfectly.  Next I embossed the vase in gold over the stems of the lilies.   I set about the easy task of water colouring then - the embossing prevents you going outside the lines ;-)   I used a few shades of luminarte shimmer watercolour paints.   I used the same shades to colour a strip of the watercolour paper ombre style before stamping a sentiment onto it in black.  Simply finished with a scallop die cut strip of black card before mounting onto a kraft base card.


I'm keeping a watchful eye on the blog for news of restocks as lots of Stephanie's brilliant new stamps sold out within 18 hours of going on sale this weekend!  Way to go Stephanie - may your venture go from strength to strength but can you quadruple your stock levels next time please ;-)


Tuesday 15 October 2013

Feel the Force

One of my husband's close friends had a birthday this week so I was tasked with creating a card and there's only one place to go for a card him and that's "a long time ago in a galaxy far, far away".....


It was pretty simple really - I did him a storm trooper last year, but this year we went with Luke Skywalkers light saber.  I found a decent image online and imported into the silhouette and used the trace facility to get the shape correct.  It was then a case of simply cutting the outline from white card and colouring it with copics and metallic promakers.  For the actual light part I used a strip of glitter card and added copic ink and a touch more glitter in the form of stickles.  Before sticking to the black card base I added a "glow" using green perfect pearls.   I finished with some green faux stitching using a sakura green glitter pen.

I'll link this up to this week's CASual Friday's challenge which is to use real or faux stitching
http://cas-ualfridays.blogspot.co.uk/2013/10/cfc117.html

Monday 14 October 2013

Ritzy sketch


It's time for the Clean and Simple team's take on this month's sketch at House of Cards today and you can see I turned the sketch to fit my image this time.


As the sketch was quite busy, I decided to go monochrome as that's an easy way to keep a design CAS where you're faced with something that could easily go down a non-CAS route.   I embossed a piece of plain white card with the walrus and carpenter folder from couture creations and cut it into 4 on the diagonal.  I stamped a frame from Waltzingmouse's Putting on the Ritz set onto some more white card, adding the semi circular stamps to the frame, and a sentiment in the middle and heat embossed them all in silver.  I added a couple of square gems to enhance the art deco feel.

All that was needed to put it all together was to trim down the embossed panels so I could leave a split between them to match the sketch and mount the panel in the centre.  Simples.

Can't wait to see what CAS goodness you bring to the party this week http://houseofcardschallenge.blogspot.co.uk/


Sunday 13 October 2013

Black and Gold

For my weekly post over at Make the Day Special today I'm playing with my favourite Avery Elle set again - these rounded diamonds are so versatile - today I've used just two stamps to make a modern flower.


Now normally I'm really not a gold girl - I tend towards silver - but gold is this season's metallic apparently so I thought I'd give it a go and I decided to try embossing the leaf like diamond in gold onto black patterned paper.  I've done a close up shot to show the paper but it doesn't show up brilliantly.  It's a black on black floral (Prima)  and I think embossing on subtle patterns like this can give a very classy look.


I also used the little line stamp from the set in two different ways - I embossed it directly onto the corners of the card base to draw your eye into my flower and I also embossed it onto vellum and fussy cut it to create my stamen layer.  All finished with a little bling in the corners and big blingy crystal (kars) in the centre - I love these they're like crushed glass and come in a couple of sizes and lots of colours.  I think I'll be using the clear alot for Christmas ;-)


Friday 11 October 2013

Twenty One

I needed a special 21st Birthday card and the inspiration photo from Pinspired this week gave me an idea for a rainbow themed sparkly celebration that would be perfect for the recipient!


I cut the words twenty one out of a piece of thick white card on my silhouette cameo and placed it on my card base.  I lightly drew around the letters using the front panel as a stencil so I could see where they would be on the base card.  I then went to town with my sequin collection!  I covered the whole area of the the words with an even layer of pinflair gel which is my preferred glue for this technique as it holds the sequins and stays wet a decent length of time for "faffing"  I covered over each letter with a different colour of the rainbow just like the eye makeup and left it to dry.

I stamped one of the fabby Uptown Girls "Opal the Optimist" from Stamping Bella onto copic card and coloured here in before fussy cutting her out.  I stamped her matching sentiment directly onto the front panel and then glued Opal into place.   I used a thick layer of pinfalir gel around the edge of the panel to adhere it to the base so there was a little dimension to give the sequins room to shimmer!


Here's the inspiration photo and link to the challenge - http://pinspiredchallenges.blogspot.co.uk/2013/10/pinspired-challenge-19.html

I'm also going to link it up to the anything goes birthday challenge - http://seizethebirthday.blogspot.co.uk/2013/10/seize-birthday-with-colors-of-fall.html

Thursday 10 October 2013

Holiday Sparkle


Just popping in today with a Christmas card - it may be a bit early - but actually I made this one months ago for a call from Paper Crafts magazine for a feature called "Sequins are the new rhinestones" and I was lucky enough to get it picked up.  Particularly as it now turns out that this issue will be the final ever issue of the magazine to be printed as it moves to a monthly digital format from January.   Here's my card on the page but if you're not a subscriber you can also get a sneaky peek of more of the magazine by following this link http://www.papercraftsmag.com/articles/Paper_Crafts_November_December_2013_Sneak_Peek there is lots of festive goodness to feast your eyes on in this issue!


Tuesday 8 October 2013

Moody Monday Sketch

No don't panic, it is Tuesday - but today I'm combining a couple of challenges - the Monday Mood Board for Wplus9 stamps http://stampawaywithme.blogspot.co.uk/2013/09/monday-mood-board-21.html along with the sketch from CAS(E) this sketch http://casethissketch.blogspot.co.uk/2013/10/case-this-sketch-48.html (see bottom of the blog for the challenge photos) and this is what the two of them together conjured up in my head.


I saw it as another perfect excuse to get out my Fresh Cut Florals set cos I just LOVE it  (can't wait to get my hands on the new winter release so I can mix and match the two - stampy heaven!)   I decided to heaviest on the blues as that was the focal colour on the mood board so did blue flowers at the top and bottom and added some red and yellow ones in the centre.  The sentiment was stamped in grey and I used a grey glitter pen to do the dotted border.  Finished with a few gems and some stickles for a touch of bling.


Sunday 6 October 2013

Warm Winter Wishes

It's my day over at Make the Day Special again and I thought I take the opportunity to finally made a start on my Christmas cards and I started with Winter Fox from Lawn Fawn (although this little guy could work equally well for a winter birthday too).


He may only be a little stamp but with a little decoupage and some paper piecing he can pack a real punch!  He's coloured with copics and layered with gel for dimension and his white tipped tail is given a fluffy look with some white puff paint.   I cut him out with a label nestie using the out of the frame technique - I forget the number as I just think of it as the bean can label.  A little glittery steam on his hot chocolate was all that was needed to finish off the front so I could turn my attention to the inside.


I used the smaller labels with the same paper and dotted lines and inked up the sentiment with reds and oranges to match Mr Fox on the outside.


That's all for me today but don't forget you still have a little over 24 hours to link up a card to our World Card Making Day Blog Hop for the chance to win another fabulous Lawn Fawn set http://makethedayspecialcards.blogspot.co.uk/2013/10/world-card-making-day-blog-hop.html


Saturday 5 October 2013

White Christmas

If you're looking for my Make The Day Special World Card Making Day blog hop post, then scroll on down and click here and don't forget to join us on the hop for a chance to win a Lawn Fawn stamp set http://makethedayspecialcards.blogspot.co.uk/

But now, as I'm taking full advantage of the fact that today is the day we're supposed to sit and play all day and ignoring the mess of housework around me, I thought I'd do my 3rd post of the day and join in with the White on White Christmas challenge at Less is More  http://simplylessismoore.blogspot.co.uk/2013/10/colour-challenge-week-140.html    The first time White on White came up for me was a couple of years ago on LIM and I nearly cried as I was clueless how to go about it, but after being inspired by the gallery that week I had a go and now I do it often as I love the look so today I made a couple of cards.


For this one I die cut frostyville wreath from memory box from some white glitter card and added a few gems plus one big snowflake gem (Chloes Creative Crafts)which has come out a bit black on the photo and stamped a sentiment from Penny Black in silver in the centre.


I stuck with the white glitter card again but this time did a smaller card with a pretty swirly deer from Tattered Lace jumping over a grey sentiment on top of a snowy hill - very quick and simple.

These also fit the current challenge at KIS http://kis-challenge.blogspot.co.uk/2013/10/keep-it-simple-24-all-is-white-oktober.html

Hope you're all enjoying World Card Making Day as much as I am ;-)

Make the Day Special Blog Hop


In the spirit of World Cardmaking Day today, the DT over at Make the Day Special decided to have a little blog hop and if you join in and make a card with us today then you can win the lovely Critters Down Under set from Lawn Fawn as seen above :-D    You should have come to me via the lovely Lydia so if you missed her, hop on back.

For my card, I decided to pull out an old favourite Boob Tubes - this was actually the first Papersmooches set I ever bought and I still use it loads as it's very useful, particulary for masculine cards.


I stamped the 4 TVs onto some scrap copic colouring card and then stamped each one again onto a different wood veneer (they're actually papers designed for dolls houses) and paper pieced them all cutting out the screen.  I coloured the screen of each with a different grey copics and covered them with glossy accents.  To be a little different with my layout I decided to arrange them near the edge and cut around them to get a funky border on the front.

For the sentiment, I made my own using an old alphabet set - I think this is quite a fun sentiment to go with the funky old TVs and to add to the vintage theme I decide to get messy with some spritzing.

As the challenge at Papersmooches Sparks this week is an anything goes challenge, I'm going to link this  up to that too - http://papersmoochessparks.blogspot.co.uk/2013/09/sept-30-october-6th-anything-goes.html

So I hope you're finding a little time to get crafty today - someone declared it a special day for us so the least we can do is have a little play ;-)   Just point your nearest and dearest at the World Card Making day page and tell them the housework can wait as you've got cards to make!

I'm the last person on the hop today but don't forget to hop back to Make the Day Special to join the hop for your chance to win the Lawn Fawn stamp -  http://makethedayspecialcards.blogspot.co.uk/  -  and if you're a Lawn Fawn fan then check out the Pre-Order page as you've only got until Monday to place your order for their new goodies.  


Halloween Fanatics

It's time for our third challenge over at Waltzingmouse Fanatics today and given that we're into October we thought we'd give you all the chance to get a head start on Halloween and pull out all your new release sets if you ordered them  http://waltzingmousefanaticschallenge.blogspot.co.uk/

Now I'm not the biggest fan of Halloween - nothing against it and I do love a good pumpkin - but it's just not very big around where I live so before this new release I didn't actually own any of the Halloween sets so I planned a project using Claire's wonderful little freebie poem which I thought would be great to give to my great nieces and nephews.


I embossed Halloween Treats from the Say It Loud Winter Holiday set onto some orange card and added a super cute bat I cut on the cameo.   I printed the poem on some copy paper, die cut it with a tag and then used an ink duster to add a little purple and grey ink for a spooky feel.  I filled some glassine bags with my bat poop and then simply stapled it all together.  Quick and easy Halloween treats!

However, when I saw the new release, I was very drawn to The Count - I do have a thing about vampires as I'm an avid reader of the Anita Blake books by Laurell K Hamilton so I made an exception and bought a couple of the sets this year and made a little card.


I stamped him in versafine black for a very strong silhouette in the foreground and then masked him so I could add the spooky ruin from All Hallows Eve behind him in grey.  I went for this set for this very image as it reminded me of my all time favourite painting which hangs in the Walker Art Gallery in Liverpool - it's a Gothic ruin just like this and the painting is so huge I can sit in front of it for hours and just imagine myself stepping into it.   Anyway, enough waffle - back to the card.  I added just a hint of red on his collar and the top of his walking stick and matched that in to the sentiment so it looked like it was scrawled in blood - perhaps it needs a few drips to finish it off.......

I do hope that's got your blood flowing (lol) and that you'll hop on over to the challenge site and play along with us this week http://waltzingmousefanaticschallenge.blogspot.co.uk/ and to get a bit more inspiration don't forget to visit my team mate Deborah


Wednesday 2 October 2013

Pandamonium

I haven't played along with the There She Goes Challenge for a few weeks - I even missed all the birthday challenges - sorry guys!   I'm enjoying the stamp bingo though so made a determined effort to play along this week in their "decorate the inside" challenge.   http://tsgclearstamps.blogspot.co.uk/2013/09/tsg227-decorate-inside.html


I decided to use the Pandamonium set and thought the two kids together with the sentiment would be a good card to send to a mum learning to cope with more than one baby....

So this was what I thought would be an appropriate inside:


I just stamped him with the sentiment and then did some scribble lines to match the front but leaving plenty of space to write.

I used the sketch from Retro sketches this week for my design http://retrosketches.blogspot.co.uk/2013/09/retrosketches-83.html  these angular cards seem to be very of the moment....


Tuesday 1 October 2013

Autumn Wreath


As there are 5 weeks again this month - we have an extra challenge for your at House of Cards and this week you are free to use which ever style you want - you just have to be inspired by this lovely autumnal table.  Each day a different team will be sharing inspiration in their style and today it's the CAS Team's turn so my clean and simple interpretation of the photo is above.


I am going to enter this into Di's Sunday Snippets as every leaf was cut from scraps from my "itty bitty" box (you know the box full of bits that you really should throw away cos they are soooo little but you keep them anyhow - and look you can use them for itty bitty die cuts!)

This card was simplicity itself - I selected the smaller leaf from the Love Quotes Dies and 6 shades of card scraps taking my colour inspiration from the photo above and cut 3 in each colour.  I drew around a circle die in the middle of my kraft card base lightly with pencil and stamped the gorgeous flourished sentiment from Waltzingmouse (Big Day Today) in the centre before attaching the leaves with pin flair glue following the pencil line and tucking each under the last as I went around.  Simples.  A few dots of stickles and liquid pearls was all it needed for a final finishing autumnal touch.

Head on over to the House of Cards blog to see what my teamies have done with this photo and also see what the other non-CAS teams have done throughout the week.

Blogging tips