It's colour week at Less is More and as luck has it their "yellow" challenge matches in with two other colour challenges I wanted to play in so I've combined the three as both Annabelle Stamps and Our Creative Corner want us to use kraft, lemon and white.
Chevrons and zig-zags are everywhere in papercrafting at the moment so for once in my life I'm "on trend" lol! I used a sheet of double sided DP from My Minds Eye "on the bright side" 6x6 pad and hand cut the chevron side for the white and lemon upright strip. I used a dienamics die to create the horizontal strip from the other side of the chevron paper which is a soft yellow with a tiny dot and some black for contrast. I finished with a felt flower I made with a paper quilling technique, a simple sentiment from Waltzingmouse and a few random lemon gems.
Yellow is normally a colour I avoid in card making but this is such a sunny cheerful card (on a dreary day where I'm hiding inside from the 38,000 football fans about to descend on Hillsborough) that I must remember to use it more.

Showing posts with label annabelle stamps. Show all posts
Showing posts with label annabelle stamps. Show all posts
Saturday, 5 May 2012


Saturday, 18 February 2012
Dies, colours, love, lace and backgrounds
Well, much later coming to play with the LIMettes today as I've been out shopping with my Aunt who had a cataract operation this week and isn't allowed to carry. A nice afternoon of card making was required to recover, but I did get carried away which means tonight's mutton curry is now off the menu as I should have started it an hour ago!
Anyhow, this is going to be a big post as I made 3 cards, all using die cuts which is the theme this week at Less is More http://simplylessismoore.blogspot.com/2012/02/week-55-theme.html but I have combined a couple of them with other challenges.
The first one is very simple - a pink base card, with a embossed panel simply stamped with a greeting from Waltzingmouse. There are two die cut elements on this card, the leaves are stampin up (and came with some stamps) and the felt flower is created using a dynamics die from MFT. I rolled it around a diamante left over from my tiara making days.

The second card is a simple little one on the theme of "love and lace" which is our challenge over at my charity card making challenge for St Luke's Hospice - do check it out if you haven't already - we have a lovely set of La Blanche stamps as a prize this month. http://stlukescharitycardschallenge.blogspot.com/ I stuck rows of sheer ribbon to a square of card a cut it with an old sizzix die (called heart lace), popped out the centre, inked the edges and stuck into onto a vellum layer which was matted onto silver cut with a lace-like nestie.

My final die cut was the one that took the hour I didn't really have ;-) This is a technique I learnt on Jennifer McGuire's recent Clean and Simple online class (you can still take it and it was a fab class).

From this photo it may not look that exciting, but if you look at the close up below you can see the hidden technique which is to layer up your die cut shapes on top of each other to create intricate die cut with chipboard like dimension.

For this card I used the lovely colours at CR84FN as my starting point - chartreuse, grey and lavender and die cut one lavender butterfly and 5 white ones, carefully glued on top of each other. I then made a background for the grey base using a damask stamp from Hero Arts with pear tart ink (as close as I could get to chartreuse). Annabelle stamps want you to "say it with background stamps" this week, so I am entering this card into their challenge too. I added a double layer of sheer ribbon and a raised ribbon sentiment (Elzybells) and hey presto, my first Mother's Day card finished.
Thanks for sticking with me if you read this far - better go and dig some fish fingers out of the freezer now - do you think DH will spot the difference?????
Anyhow, this is going to be a big post as I made 3 cards, all using die cuts which is the theme this week at Less is More http://simplylessismoore.blogspot.com/2012/02/week-55-theme.html but I have combined a couple of them with other challenges.
The first one is very simple - a pink base card, with a embossed panel simply stamped with a greeting from Waltzingmouse. There are two die cut elements on this card, the leaves are stampin up (and came with some stamps) and the felt flower is created using a dynamics die from MFT. I rolled it around a diamante left over from my tiara making days.

The second card is a simple little one on the theme of "love and lace" which is our challenge over at my charity card making challenge for St Luke's Hospice - do check it out if you haven't already - we have a lovely set of La Blanche stamps as a prize this month. http://stlukescharitycardschallenge.blogspot.com/ I stuck rows of sheer ribbon to a square of card a cut it with an old sizzix die (called heart lace), popped out the centre, inked the edges and stuck into onto a vellum layer which was matted onto silver cut with a lace-like nestie.
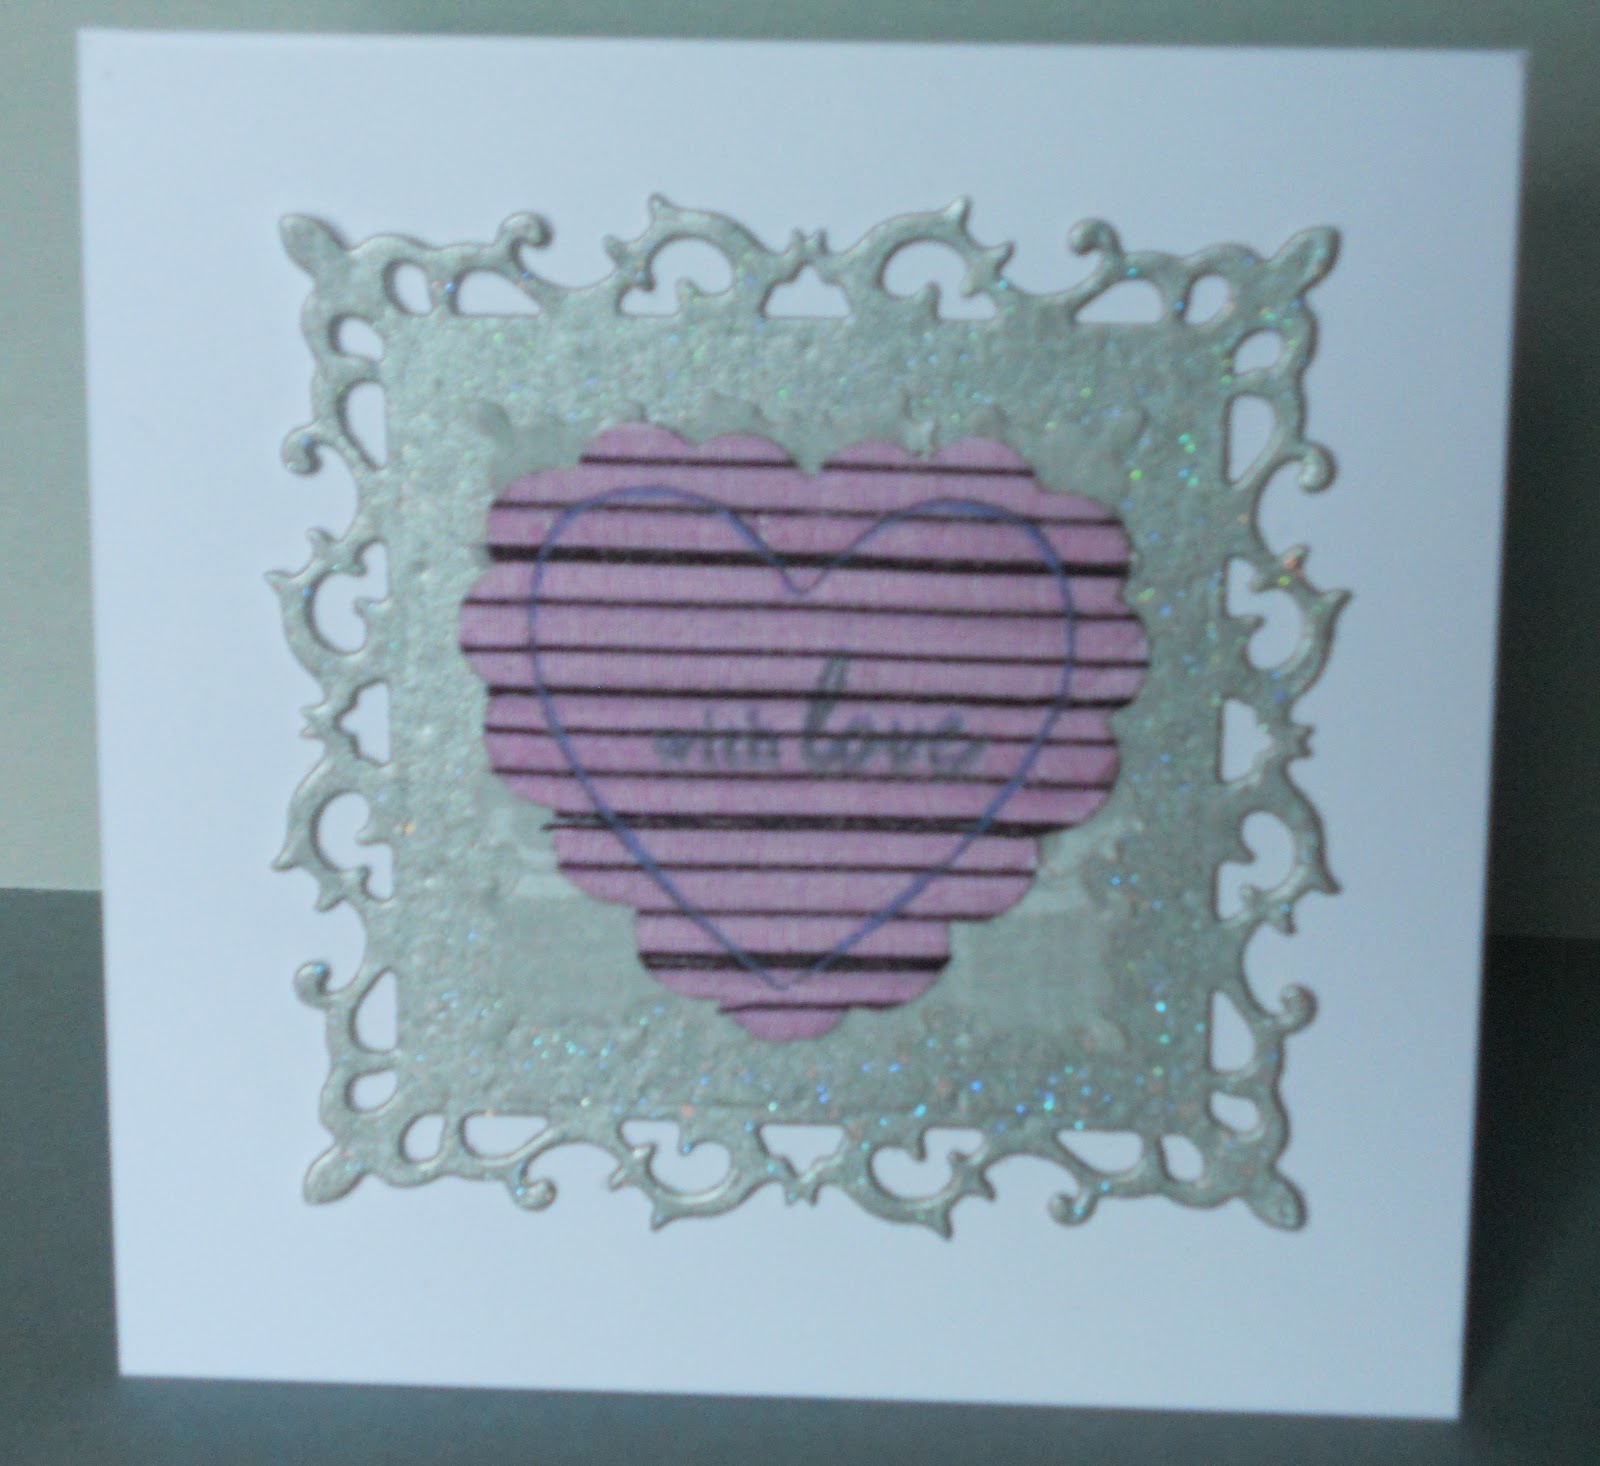
My final die cut was the one that took the hour I didn't really have ;-) This is a technique I learnt on Jennifer McGuire's recent Clean and Simple online class (you can still take it and it was a fab class).

From this photo it may not look that exciting, but if you look at the close up below you can see the hidden technique which is to layer up your die cut shapes on top of each other to create intricate die cut with chipboard like dimension.

For this card I used the lovely colours at CR84FN as my starting point - chartreuse, grey and lavender and die cut one lavender butterfly and 5 white ones, carefully glued on top of each other. I then made a background for the grey base using a damask stamp from Hero Arts with pear tart ink (as close as I could get to chartreuse). Annabelle stamps want you to "say it with background stamps" this week, so I am entering this card into their challenge too. I added a double layer of sheer ribbon and a raised ribbon sentiment (Elzybells) and hey presto, my first Mother's Day card finished.
Thanks for sticking with me if you read this far - better go and dig some fish fingers out of the freezer now - do you think DH will spot the difference?????
Saturday, 12 November 2011
Tag you're it!
This weeks challenge at CASual Friday is to make a clean and simple tag or a card with a tag on it. I don't really make tags - this is my first - and I'm not really thrilled with it but am not sure I can do anything better so it will have to "do" for my entry this week.

I used the colours from this weeks Annabelle stamps challenge which are to say it with "lime, black and white" as my starting point and took a lime tag from a pack I bought a couple of years ago from paperchase. I then used one of the fabulous birthday pressies from my OH - this gorgeous new stamp and die set from Hero Arts/Sizzix and stamped and embossed the trees and snowflakes directly onto the tag with white detail ep. I stamped the reindeer in black on white card and cut him out with the matching die - I used a black gel pen to highlight some of the details on him. The sentiment is from the same set and is embossed in black glitter ep.
Here are the links to the challenges if you want to play too.
http://cas-ualfridays.blogspot.com/2011/11/cfc28.html
http://annabellestamps.blogspot.com/2011/11/say-it-inlime-black-white.html
Craftilicious x
Saturday, 1 October 2011
The eyes have it!
Good afternoon bloggers and happy world cardmaking day!

I haven't actually managed to do a lot of card making on world cardmaking day - it's unseasonally hot in the UK - 29 in Sheffield today so I've been out and about but I have managed to do a little craft shopping and make a card for today's LIM challenge. This week its a colour challenge and we have to make a card the colour of our eyes and below is a very scary looking shot of one of my eyes which are mostly blue with a hint of grey and beige at their centre.


I've used the lovely sketch at Anabelle stamps as the deisgn to go with the blue of my eye and as I've been taking the great online techniques class by Jennifer McGuire, I've put into practice a couple of the new techniques I've learnt - faux suede and kiss resist embossing.

For the outer circles I stamped an elzybels flower with versamark and an elzybels text with grey distress ink and kissed the two together. I stamped the flowers onto glossy paper and once dry applied broken china distress ink all over and buffed off to reveal the resist. For the central one I embossed a square of glossy paper with a floral folder and sanded the raised elements with a sanding block carefully. I inked it all over with broken china and the two different textures of cardstock absorb the ink differently giving you the faux suede look. I finished with a matching floral ribbon and matching gems as per the sketch.
I'm only on lesson 3 of 12 of the techniques class but I have to say I have learnt so much already and it is totally worth the mere $19 price tag. I hope to get a little time tomorrow to do lesson 4!
Don't forget too as its the first of the month we have a new challenge over at St Luke's Charity Cards Challenge - we want to see masculine cards and have this amazing prize from Craftie Charlie up for grabs for the best card this month.

Catch you later.......
Tara (aka Craftilicious) x
Friday, 9 September 2011
Falling to pieces
It's been all quiet on the blogging front for me this week as I had a little procedure in hospital on Wednesday that didn't go well and left me feeling rather sore, so when I saw todays' CASual Fridays challenge - Falling to Pieces - it seemed quite apt, as I have been falling to pieces somewhat for the last couple of days!
However I did get a very nice pick me up, as when I felt well enough to sit up and have a look at the laptop this afternoon, I discovered that was the August prize winner over on Less is More
 Here's hoping that this is the start of a good weekend and that things start to get back to normal around here.
As the CASual Friday challenge seemed apt, but not too complex while I'm still feeling a bit icky, I decided to have a go at making a card for it and this is it.

I stamped the leaf from waltzingmouse 3 times onto some my minds eye paper using brown ink. I cut them out and layered them onto a piece of the same my minds eye paper but this time from a 12x12 pad so the leaves were bigger and brighter, with brown card behind to tie it together. I added 3 orange gems from Anabelle stamps (they were actually the prize I won on their challenge a few weeks back) and finished with a sentiment in brown, also from waltzingmouse stamps.
Right, am off for another lie down now.
Craftilicious x
However I did get a very nice pick me up, as when I felt well enough to sit up and have a look at the laptop this afternoon, I discovered that was the August prize winner over on Less is More

As the CASual Friday challenge seemed apt, but not too complex while I'm still feeling a bit icky, I decided to have a go at making a card for it and this is it.

I stamped the leaf from waltzingmouse 3 times onto some my minds eye paper using brown ink. I cut them out and layered them onto a piece of the same my minds eye paper but this time from a 12x12 pad so the leaves were bigger and brighter, with brown card behind to tie it together. I added 3 orange gems from Anabelle stamps (they were actually the prize I won on their challenge a few weeks back) and finished with a sentiment in brown, also from waltzingmouse stamps.
Right, am off for another lie down now.
Craftilicious x
Friday, 19 August 2011
Another winner!
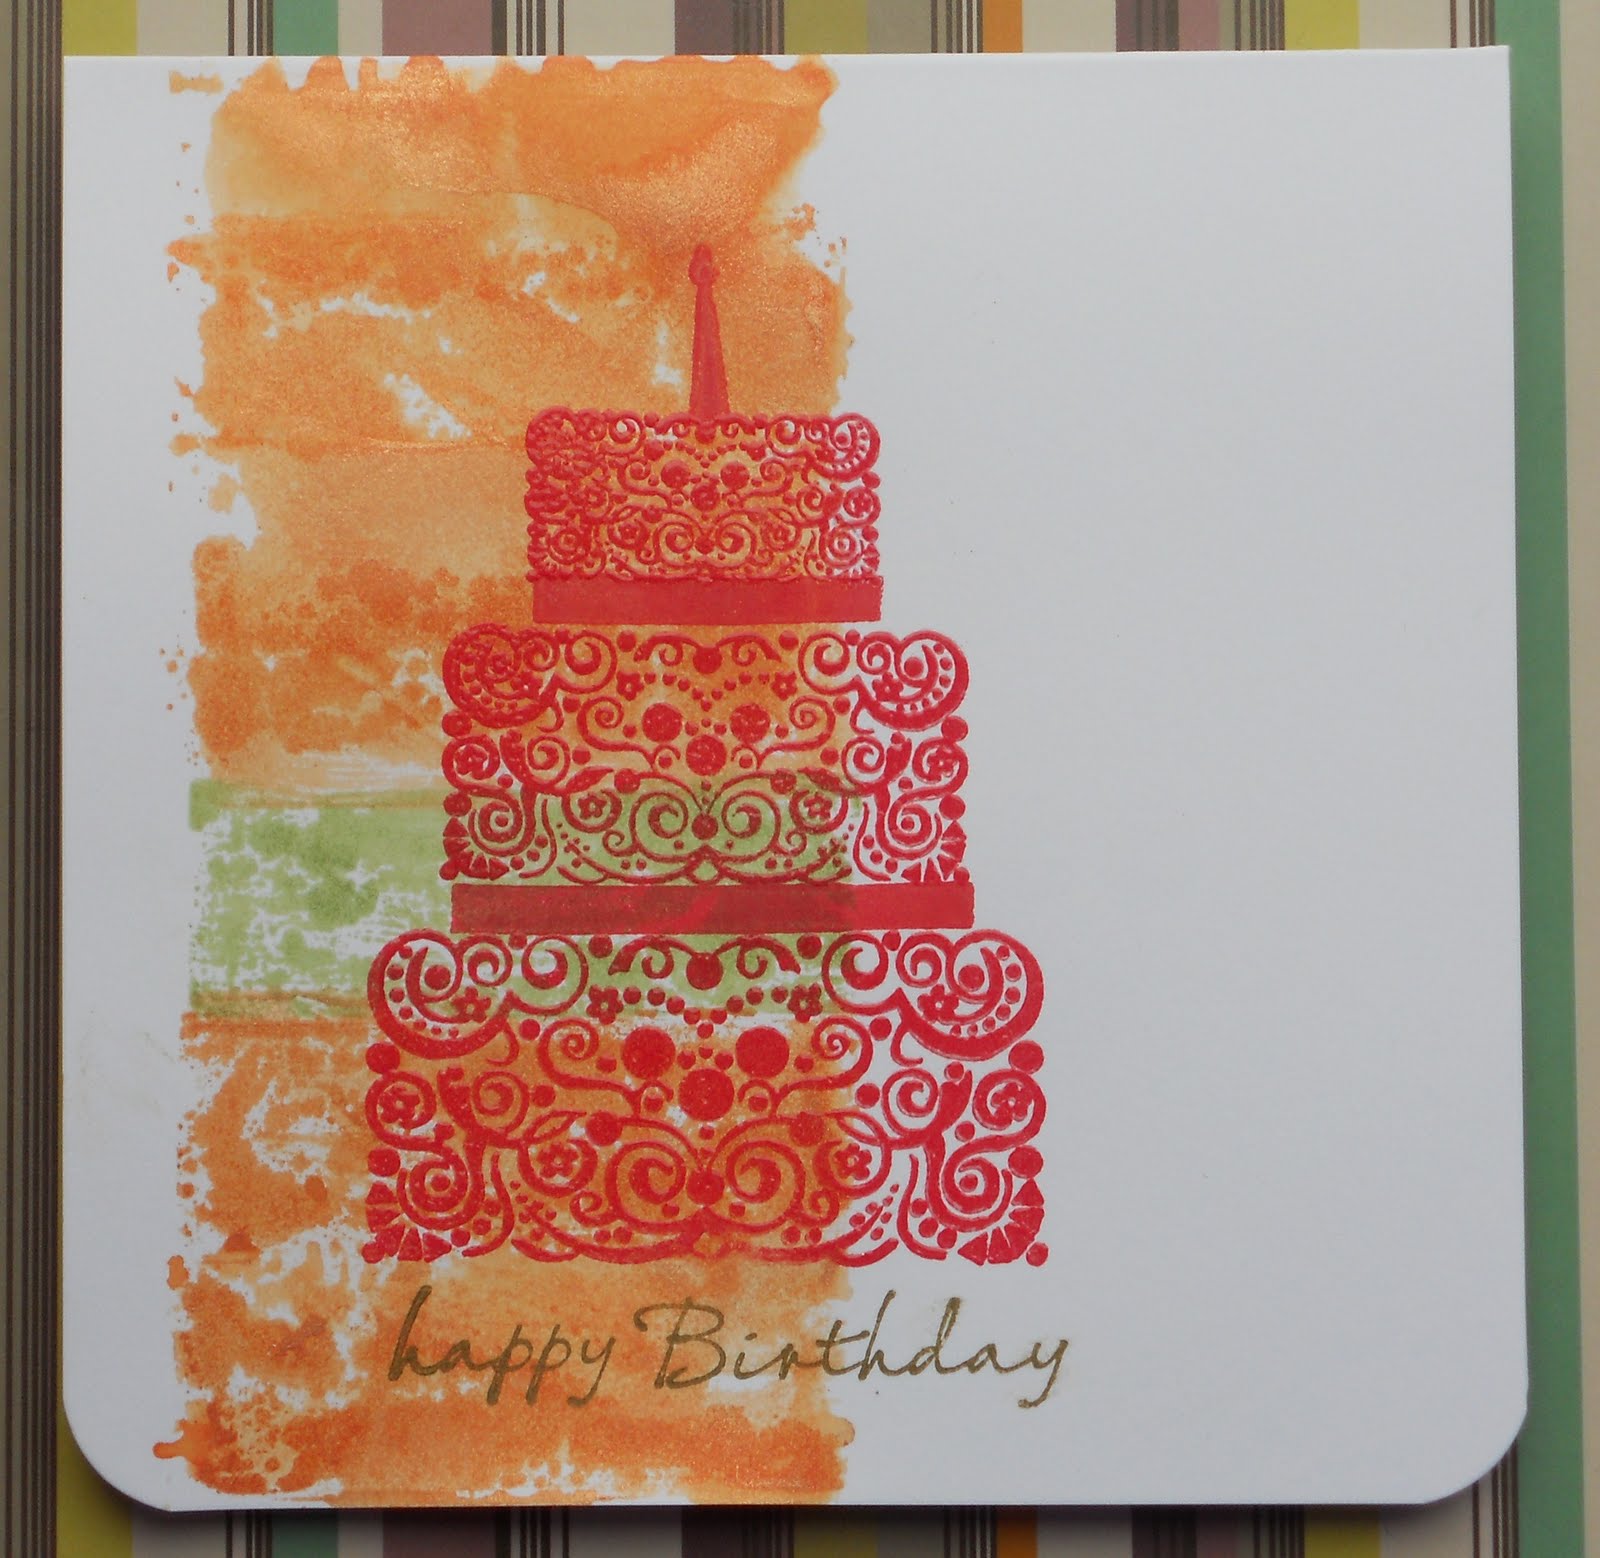
I've just found out that my cake card from last week was chosen as the winner on Annabelle Stamps Challenge

What a great start to the weekend :-D
What a great start to the weekend :-D
Saturday, 13 August 2011
CAS-ual Inky Cake Colours
I'm doing a triple challenge with this card - using the sketch from CAS-ual Friday, the use a new to you inky technique challenge from Less is More, and the colours from annabelle stamps colour challenge which are orange, raspberry and olive.

For the inky technique, I used twinkling H2O's to create the pearly background. I painted them with a waterbrush onto a brand new rubber eraser and stamped the orange leaving a gap for the green. I then stamped the cake onto and off centre in raspberry ink and embossed with clear gloss. I stamped the ribbon and candle in the same ink but without embossing. The olive greeting is from Waltzingmouse.
I think I cursed the weather with the hot colours though as the blue sky has gone and we're back to grey so I think I may go and make more Christmas cards.....
Craftilicious x
Sunday, 22 May 2011
CAS-ual LIM Blingy Butterfly Sketch...
So yesterday, I had this idea to use a new embossing folder to create another entry into this weeks LIM challenge which is all about butterflies. The folder is called "flutterby" so was a perfect choice, but I wanted to try to add colour to it. It turns out, that this is a technique which although looks simple, really, really isn't - and here are 4 of my disasters to prove it!

At first I tried to put ink into the depressions, wiping off any that got on the flat bit of the folder, thereby leaving the background white (well lemon pearl in this case) and just having the embossing coloured. Too much ink to wipe off, meant I wiped it all off nearly and what was left was too wet - hence - a disaster (top right)! So I thought, ink the sticky up bits and have debossed colour - that had to be more simple and effective - er no - top left. Right, just emboss without ink, and then use an ink duster to "gently" rub the colour over the embossing once finished - apparently I wasn't gentle enough (bottom left). Perhaps a brayer over the flat bits to colour the background then and have white embossing? Better but still not quite good enough and this (bottom right) was my second attempt at the same technique. At this point, I gave up on fancy ink techniques, embossed the lemon pearl as normal and coloured the embossing with copics - technique fine - colouring rubbish!!!! Anyhow - I made it into a damn card anyway as I was fed up with my reject pile and here it is (I kept seeing the bottom as corn - hence the overuse of yellow!)

So, I needed a better picture to load into the LIM gallery. I remembered a sketch challenge I wanted to play in over at Annabelle stamps http://annabellestamps.blogspot.com/2011/04/absc037.html so I used this as the basis for another entry. I used another butterfly embossing folder (I think I have more of these than any one crafter could ever need!) and layered it up to fit the sketch, adding a there she goes sentiment, some ribbon and a dufex butterfly. The dots in the sketch became gems, which also makes it a second entry for this weeks CAS-ual Friday blingy challenge - 3 in 1 - much better than my earlier disasters.

That's it for me and crafting this week - I'm going to spend my time tidying up the mess I made instead of making any more messes!!!
Craftilicious x
Wednesday, 26 January 2011
You're Special To Me - Double Challenge
I found another new blog challenge this week over at Annabelle Stamps - and discovered that as well as their weekly challenges, they do a monthly sketch challenge, and its possible to combine the two. I liked the idea of this weeks challenge, as it was to "say it with emboss resist" and I haven't used my embossing powders in an age. I used one of the gorgeous sentiments from Stempelglede and embossed it with clear matt powder. As I was also going to use the monthly sketch from the same blog as the basis for the card, I stamped it into the centre of a nestie circle, leaving the nestie in place, and then used two shades of distress inks (bundled sage and crushed olive) to blend a background whilst maintaining a white border. I mounted onto another nestie, some gorgeous glittered paper from the laundry line stack from My Minds Eye and added a flower and a few gems to match the shape of the sketch.

Its turned out to be my favourite card of the year so far.......
The challenges are - Annabelle Stamps January Sketch Challenge and Annabelle Stamps Say It With Emboss Resist

Its turned out to be my favourite card of the year so far.......
The challenges are - Annabelle Stamps January Sketch Challenge and Annabelle Stamps Say It With Emboss Resist
Subscribe to:
Posts (Atom)