Sunday, 23 October 2016

Shaker Bauble

I managed to have a quick play with a card for this week's Less is More challenge which is to use acetate or vellum so I've used the new acetate shaker cups from MFT to create a fun shaker bauble.


I used some papers from Echo Park's new Deck the Halls Paper pad and cut two circles, cutting a second circle out of one of them to create a frame to conceal the edge of the shaker cup.  I added some sequins and beads and then sealed the circles adding a gold ornament top die cut to turn the circles into a bauble.

Finished with some strips of paper and glitter paper and a sentiment from Mama Elephant.  I think I'll make a set of these from all the different papers in the pad as they come together quite quickly and everyone loves a shaker!


Saturday, 10 September 2016

One Layer Florals

The Less is More challenge this week is to create a one layer card featuring your favourite flower.  This was a bit of a challenge for me as I don't really have a favourite flower - I like lots of them the key thing is I like them all in one colour so I went with that.  My hubby knows better than to send me red roses - if its going to be roses they have to be yellow, same goes for tulips, gerberas - as long as they're yellow (or pale green as I think green flowers are weird and interesting) then I will like them (unless they're sunflowers, I don't like sunflowers for some reason I can't explain)   Anyhow, enough for my waffling - on with the card!


I used the new layering set from Altenew called Remember This which pairs with their previously released Beautiful Day from where the larger leaves in the corner are taken.  I decided to go for grey leaves rather than green as I love grey and yellow as a colour combo and I wanted to try out the Altenew grey inks.  The outline stamping is done with the darkest shade (including the flowers) and then the colouring in is done with the paler two.   The yellows are MFT dye inks in lemon chiffon, sunshine and pineapple.  I added a tiny bit of pencil shading in ochre and brown.  I used my finger to hint at colour behind the flowers to suggest they are part of a bigger bush by dotting some yellow around - in hindsight that may have been better blended out more but hey ho its dry now!


Sunday, 28 August 2016

My World

I have an entry for this week's LIM challenge which is to use peel offs or stickers somewhere on your CAS card.  This may have turned out to not have enough empty space but I think it is still generally CAS.


I used a new set from Altenew called Big World which stamps the globe in 3 layers and I die cut it with a circle die.  I used a spinner disc so the world does spin to match the sentiment which is embossed in white.  I used a white pencil and a clear wink of stella to create the glow around the world.

For my sticker element, I used some peel offs and die cut the stars from the "waste" around them.  I finished with a few dots from a gel pen to complete the galaxy.

Thanks for stopping by.

Tara

Friday, 19 August 2016

Cryptic Christmas

I've got a super quick, super last minute entry to this week's Less is More Challenge as I had a last minute idea for a Cryptic Christmas card using their theme http://simplylessismoore.blogspot.co.uk/2016/08/week-289-one-layer.html


I decided to leave it exactly as is with no sentiment as I "hope" its self explanatory!   The hen stamp is from an old Waltzingmouse stamp set.

That's all for now, need to link it up before it closes!

Tara

Monday, 1 August 2016

Geometrically Challenged

We've got a new challenge starting today over at Seven Hill's Crafts with a £15 prize to be won.  The theme is geometry and this is my inspiration card for the challenge.


I was inspired by copper and how it changes colour as it gets verdigris so simply used one stamp set Tribal Chic from Lil' Inker Designs with 4 shades of teal  MFT inks to create an ombre geometric pattern with Copper embossed accents.  The stamp set is really fun as it has lots of strips you can mix and match to make endless patterns and some little extra elements like a single triangle which I used to bring the pattern to a point before embossing one of the sentiments from the set in copper to tie it all together.


Tuesday, 26 July 2016

Julia's 10K Subscriber Blog Hop


Welcome to the penultimate stop on the blog hope celebrating Julia reaching 10,000 YouTube Subscribers.  As a valued member of my DT over at Seven Hills Crafts I had to support her in this awesome achievement!    As such I have donated a great prize package worth around £45 including stamps from Lawn Fawn, PaperSmooches and Wplus9, a great die from Concord and 9th and a Simple Stories washi tape pack.


You should have come to me from Stephanie Klauck but if you have only just joined the hop then make sure you go back to Julia's page and start the hop as there are LOTS of prizes to be won so make sure you don't miss anyone out.   Here's the full list of hoppers:


For my card I decided to make a fun card to remind Julia how awesome she is and I thought a pancake flipping chef was just the way to do it!


I used Recipe for Happiness from MFT and coloured the chef with copics before fussy cutting and cropping off his fingers (ouch) so his hand worked for holding the pan.   I used the Surf and Turf dies and spin and slide discs to make my flippin' pancake which I just cut by hand from kraft and used a few pencils to shade it. Unlike when I try to flip pancakes in real life he always catches it too ;-)

That's all from me - hope you liked my fun interactive card.  The final step on the hop is Yoonson Hur so hop on over and check out her fabulous project.

Thanks for visiting - Happy Hopping!

Tara


Sunday, 24 July 2016

Ninja birthday

I don't get nearly as much time to craft for fund as I'd like these days but as it's my hubby's birthday today I did need to make him a card and as I made it with scraps of leftover card I thought I'd play along with one of my old favourite challenges and link up to Pixie's Sunday Snippets challenge - long time since I made it into the playground girls - can I have a go on the swings please???


I dug out an old Birdie Brown stamp from when she designed for the now closed There She Goes stamps - this one is perfect for my hubby who is a huge fan of all things Japanese and martial arts.  I decided to add a second sentiment so made it an open flap front card using an MFT blueprints die so I could hide the secret second layer inside but still on the outside!


I used a stitched hill die with another scrap from my snippets box and curved the sentiment from Clearly Besotted's Laugh Out Loud stamp set around it.

Happy Birthday darling - sorry about the dig about your age but you will ALWAYS be older than me!


Sunday, 17 July 2016

Repetition

The challenge at Less is More this week is to have something repeated on your card.  I thought this was the perfect theme for a new stamp set I just got so went to town with a rainbow of colours and just one of the images from the set.


Perfect for the mini heatwave we are supposed to be getting this week too!   The stamp is from the 3rd Birthday release from Newton's Nook and is called Party Pops and there are 6 different lollies to choose from but to keep it CAS I stuck to the one style and just changed the colours each time.  You add the stick to your lolly of choice.  I added the sentiment directly over the top to keep is super-CAS.

Hope you all get the sunshine this week.

Tara


Saturday, 11 June 2016

Layers of Flamingo

The challenge at LIM this week is to add splatters to a one layer card and I decided to add mine to a "layered" flamingo as we finally got the new Hero Arts release and I couldn't wait to ink up the flamingo!


I stamped the 3 layers of the flamingo in 3 shades of pink ink from MFT and added a little pencil shading to his legs. I love the bold black beak - he really comes alive when you stamp that final little detail.  I added the puddle stamps around his legs and then did a quick colour wash over the top to soften them and then stamped them again.  I stamped the greenery before the colour wash ensuring I went over the bottoms with the wash to make them look like watery plants.   I finished by adding a sentiment from the stamp set and adding my splatters by stamping the brightest of my pinks onto a block and adding water so I could drop so splatters with a brush.  I thought it looked a little like he was shaking off some water after a dip!


Sunday, 29 May 2016

Konichiwa!

It's weeks since I managed to find time to play along with my favourite challenge but I managed to squeeze in a quick take on their sketch this week.  http://simplylessismoore.blogspot.co.uk/2016/05/week-278-sketch.html


I used the adorable new stamp set from Avery Elle called Konichiwa which I just love as you can change up the geisha with all her facial options.  I used the tiny flower in the set to change her kimono too - using a post-it to stamp some over the edges of the fabric to make it look more realistic.  I stamped the cherry blossom onto the pink card which forms the basis of the sketch and shaded with a white pencil.  Adding my sentiment onto a strip of blue to tie in the blue flowers on the kimono which have a glitter finish with a wink of stella brush pen which really doesn't show up in photos!

Thanks for stopping by - actually I should say Arigato!

Saturday, 9 April 2016

Playing with Geometry

I totally missed the last couple of challenges at LIM so was determined to play this week.  The challenge is a one layer card featuring a geometric pattern.   http://simplylessismoore.blogspot.co.uk/2016/04/week-271-one-layer-card.html  

I decided to create my pattern by hand just by scoring some diagonal lines on my scoring board.


After scoring the lines I simply stamped a sentiment and some flowers in gold ink using the Happy Wishes stamp from Wplus9.  I added some liquid pearl dots in chocolate to the flower centers to finish.  Simples.


Thursday, 24 March 2016

Outside your window

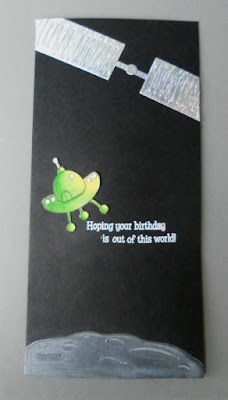
I had a bit of a journey for my entry into the Less is More challenge this week - it's about the view from your window.   The view from my window is not great so I wasn't inspired to play, but then we watched the documentary about Heston's space food and I thought, hey Tim Peak has the best view from his window so I'm borrowing his!


I decided I wanted to include the space station, and going back to windows, I thought one of the dies from Mama Elephant's Window Watching kinda looked like the solar panels - so I cut them in silver and added a strip and a circle and it's almost believable!

The sentiment, moon and alien space ship all come from one of my all time favourite sets 'Out Of This World' from the now defunct There She Goes.  I embossed the moon using white pearl from Hero Arts that got a translucent feel on the black and added some white ink with my finger and some depth using a white pencil.   The alien space ship was coloured with copics and pencils and fussy cut.

Thanks for visiting.
Tara

Saturday, 12 March 2016

Making a Statement Sentiment

I've had lots of fun this morning with teeny-weeny-tiny stamps and used them to make a big bold statement sentiment for this week's Less is More Challenge.  http://simplylessismoore.blogspot.co.uk/2016/03/week-267-one-layer-sentiment.html


Firstly I cut the word hello from some scrap thin card (I think the dies are an old memory box set but I can't remember) and temporarily adhered it to my base card.   Then I went to town with 5 of the tiny stamps from the Bountiful Blessings set from Mama Elephant (2 leaves, 2 flowers and a heart) with 5 shades of ink, stamping them through the stencilled word.   The trick to this technique is to ensure you overlap the edges in as many places as you can so your eye will then fill in the gaps to create the outline to the word.   To give it a more 3D effect, I used two shades of grey pencil to create a soft shadow on one side of the letters.   I framed the word using the same two pencils to create a shaded line at the top and bottom of the card.

Hope you like it.   Thanks for stopping by.


Saturday, 5 March 2016

Citrus Birds

I've managed a few minutes to play along with this week's LIM challenge today so I give you a pair of citrus birds!  http://simplylessismoore.blogspot.co.uk/2016/03/colour-week-citrus.html


I stamped the two birds from MFT's Tweet Friends into an embossed stitched circle on a one layer card and coloured them with zig colour brush pens in lemons and limes with a hint of oranges to cover all the citrus shades.   I hand drew the wire for them to stand on and the notes they are tweeting to each other.  Sentiment is from the same set.


Tuesday, 23 February 2016

Farewell to Waltzingmouse Stamps

Deborah Frings and I have opened the old Waltzingmouse Fanatics blog to do a final farewell hop for Claire following her heartbreaking decision to close her fabulous store.   http://waltzingmousefanaticschallenge.blogspot.co.uk/2016/02/waltzingmouse-stamps-farewell-hop.html   Waltzingmouse were the first stamps I bought online and it was love at first purchase and I've been #foreverawaltzingmousefanatic since that very fist purchase.

So here is my celebration of all things Waltzingmouse - this could have been a very long post as I had so many options to choose from but I've been brutal in the edit!

This is one of my favourite cards - I used the snowflake die in the background for embossed texture and then did a paper- and wood-pieced robin to go on top.   He does give me the Warm Fuzzies like all Claire's stamps do!


One area in which I think Claire always excelled where other stamp companies often fail (or at best ignore!) is in masculine themed products.   Her products were always so easy to make cards for guys with which is an area I know many of us struggle with.  This is one of my favourites.


I was totally THRILLED to be on the Waltzingmouse blog as part of their "friendly feature" back in 2013  http://waltzingmouse.blogspot.co.uk/2013/07/july-friendly-featuretara-caldwell.html   Here is the doll inside the doll card I made for it.
 

I was also lucky enough to be pubished in Paper Crafts magazine in the same year with MY ALL TIME FAVOURITE Waltzingmouse stamp set - that cowboy set just makes me happy everytime I see it!


I couldn't resist making a little something new with my Waltzingmouse supplies - this one is just for you Claire -  I will miss you!


I used Camellia plus Compact Sentiments Part 2 - Claire always had the perfect sentiment for every occassion!  Simply stamped and embossed and watercoloured (roughly!) with Gansai Tambei paints.

Do join in the hop and share your love of the mouse!  http://waltzingmousefanaticschallenge.blogspot.co.uk/2016/02/waltzingmouse-stamps-farewell-hop.html

Tara
x


Saturday, 6 February 2016

Happy 5th Birthday Less is More!

I'm really thrilled to have been asked to join in with the birthday celebrations at Less is More today - the challenge is 5 years old!   Can you believe it?  Time sure does fly when you're crafting every Saturday morning!    Checking the challenge is the first thing I do every Saturday.......    Thanks so much for inviting me to play along ladies.

So, the challenge today is White on White with a hint of black, gold or silver.   I love the cleanness of a white on white card and knew as soon as they gave me the challenge details that I wanted to play with the lovely new layering die from Concord and 9th, they really do have some of the most interesting dies on the market.   This one is Layers of Love and it would be just perfect for wedding invites!


I started with a square base card and trimmed 2 squares of 300gsm white card just slightly smaller than the base card.  I die cut the two different hearts from the centres - one on each card to get the layers which were simply stuck to the base card with foam tape.

My hint of gold comes from a gold foiled word die (Wplus9 Flower Doodles) foiled using stick-it adhesive and therefore no need of a laminator!   To match the gold I added some tiny gold gems into the holes in the floral layer.

As usual - white cards are a pig to photograph - it does look much more beautiful irl!

Hope you're inspired to join in the fun - there are even prizes up for grabs so what are you waiting for?!?!?

Saturday, 23 January 2016

Silhouettes

I'm playing with the challenge at Less is More today and they are looking for CAS cards with silhouettes.  I had a few ideas but couldn't find everything I was looking for but a dig through my old stash did stir up some unused stock so I've made 3 cards!  http://simplylessismoore.blogspot.co.uk/2016/01/week-260-recipe.html

I started with a set I think is by Craft Work cards but its from before I labelled things!  Simply stamped the cage on a tiny 3x3 card and stamped the silhouette bird inside it.  The sentiment is by Elzybells.

Then I found this old car - no idea who its by.  Did a little distress inking with some water splatters and stamped the car over top.  The sentiment is kaisercraft I think.


Finally I faked a silhouette using a Little Claire Christmas cats set and stamping it and colouring it in with a sharpie before cutting it out.  Did some more distress inking and trimmed a window frame with a craft knife (cos I did the inking first and my die was too small to cover it!)  Added a moon with picket fence dauber and some stickles for a glow.  The sentiment is Elzybells again.


 Thanks for visiting.

Tara


Sunday, 10 January 2016

New Seven Hills Blog Challenge

We've launched the new blog for my store today with our first monthly craft challenge for 2016 ahead of the new store opening tomorrow (fingers crossed)

All you have to do is make a project on ANY theme, using AT LEAST 3 colours from ONE of the 3 colour palettes below and there is a £15 prize for the winning project.  http://sevenhillscrafts.blogspot.co.uk/


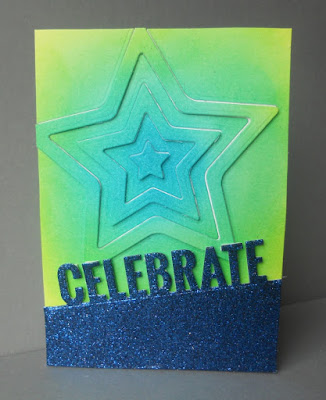
For my project I was totally inspired by this card by Laura Bassen.   I loved the "innie and outie" die cutting technique as it adds lots of interest really easily!


I started with a panel of 300gsm card stock and did some ink blending (not as well as Ms Bassen unfortunately but ink blending is her super power!) using shades of blue and green distress inks.  I then die cut them using some nested star dies.  The panel "waste" was then adhered to the base card and you just work to the middle adding foam behind alternate stars.

The sentiment panel was die cut from glitter card using an MFT accent it celebration die set and was popped up on foam to add to the dimension.

It's a really fun technique so I will be looking for other nested shapes to play with!

Hope you're inspired to come and play along with us.

Tara

Monday, 4 January 2016

Spreading a little love....

I've been waiting in vain for some decent light to take a shot of this card I made on Saturday for the latest LIM challenge which is to use neutral colours, but it looks like Sheffield is never going to emerge from under the grey skies so this is the best I can do.  http://simplylessismoore.blogspot.co.uk/2016/01/week-257-colour.html


I used a super cute stamp from Stamping Bella's new "stuffies" range - this is one is ellie loves phant and I just think it is totally adorable and it is such fun to colour.  To keep with the theme of the challenge I used nothing but cool and warm greys and am really pleased with how the colouring came out.   I framed it using a MFT die and added a sentiment from Mama Elephant as it filled the frame better than the "I love you" that comes with the stamp.   I added a few grey die cut hearts to link the two together - they are by Paper Smooches.

Right - back to work - I have lots to do on getting our new store site up and running this week!

Thanks for visiting
Tara

Blogging tips