Saturday, 27 June 2015

Let's Procaffeinate!

I'm back quicker with this week's LIM challenge which is based on a sketch but I just released I got it upside down!   That'll teach me to have the challenge open whilst I'm designing my entry!   http://simplylessismoore.blogspot.co.uk/2015/06/week-230-sketch.html
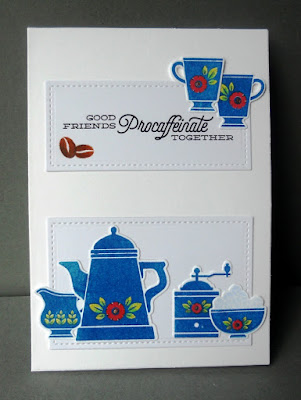

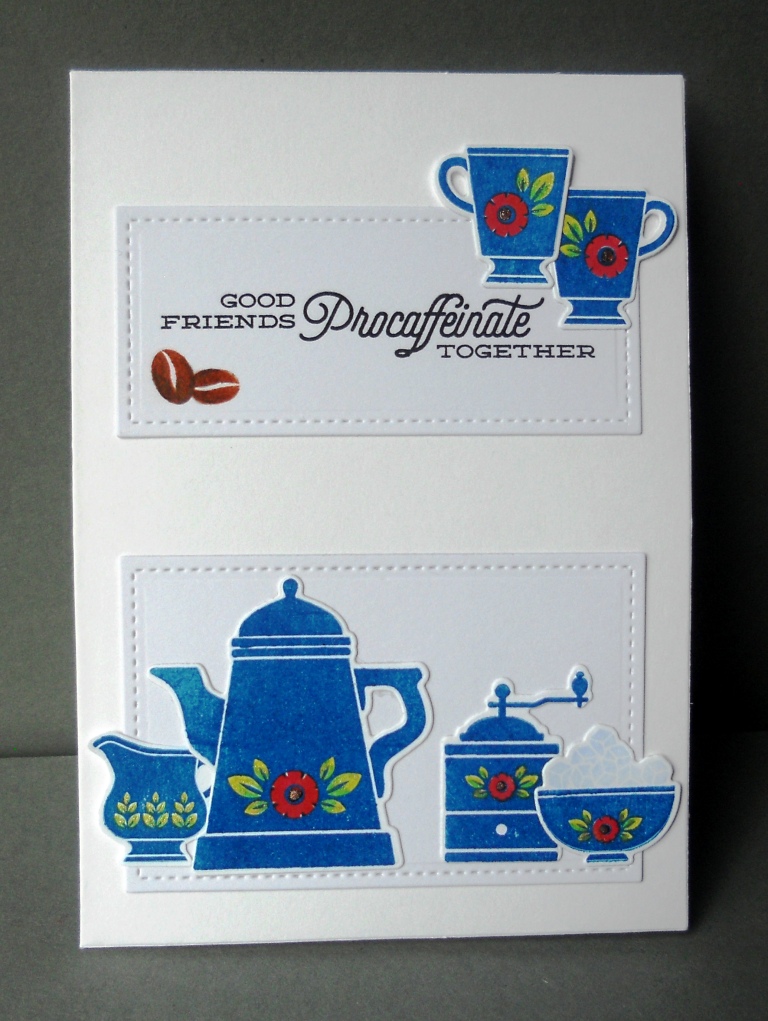
I used Coffee Set stamps and matching dies from Waltzingmouse Stamps.   I love this set as it makes me think of canal barges and the lovely artwork that they are often decorated with.  Simple stamping, die cutting and then layering the elements over some die cut stitched rectangles from Lawn Fawn (I used the same die but cut one panel narrower by moving the die half through cutting)

Right, time to make dinner....

Friday, 26 June 2015

Hey You!

I'm very late to the Less is More party this week - the challenge closes in a few hours.  I did have a play on Saturday with stencils and marbelling ink but I just made a big ole mess!  So I had another go last night and here's my card for the stencilling theme combined with the current sketch at CASe this sketch


I used a memory box stencil called "shine" but instead of going for the classic yellow I decided to take the grunge route and went with grey card stock and inked through the stencil with versamark and scattered it with clear, grey and silver powders for a random look to the embossing.

The balloons are Lawn Fawn dies cut from vellum and coloured with yellow copics - grey and yellow is one of my fave colour combos of all time.

The gorgeous sentiment is from the latest release at Waltzingmouse and its called Best Day stamped in stazon so it will stay over the vellum and embossing powder.

Thanks for visiting.

Sunday, 14 June 2015

Hidden Starfish

It's PJ Party time over at Waltzingmouse Stamps and you all know how much I love WMS right?  Well time was I would have made a card for all 4 challenges but time is short these days but I usually manage to squeeze one challenge in and I made it this month too.


When I do these challenges, I only ever use Waltzingmouse stamps on them, so having read that, are you all scratching your heads and wondering if you missed a starfish stamp?   Well no, you didn't - this came about by accident.   I was testing out ombre inkpads and needed a solid stamp but the ones on my desk happened to be Kaboom so I just turned the dotted star over and inked up the back and when I stamped it I realised it looked like a starfish with it's lovely wobbly edges.  So I inked it up again in red stamped it on to kraft, added brown around the edges and stamped it on top again and then cleaned it before turning it over to stamp the front with the dots in white over the top as real starfish are a bit knobbly.  I drew the face in with a sharpie before coating in glossy accents.

The sentiment is from My Island and I inked it red and then added the brown over the edges for that too tone suntan look ;-)   I finished with a hand drawn border and some tiny stars in the corners from Kaboom.

You've got 24 hours to play along if you want to join in http://waltzingmouse.blogspot.co.uk/2015/06/welcome-to-june-pj-party.html

Saturday, 13 June 2015

Home Down Under

One of my blogging buddies has recently moved down under and I needed to make her a new home card so I was very happy when I saw today's Less is More theme!  http://simplylessismoore.blogspot.co.uk/2015/06/week-228-one-layer-card.html


She's waiting to pick up her dog from quarantine so I knew the set I wanted to use as it features the perfect doggie along with lots of bits and bobs to decorate the house and garden  - This Awesome House by Winnie and Walter.  I did a little masking to add the topiary by the front door, used glossy accents on the glass to keep the white space and then just did some soft water colouring with distress markers.

Thanks for coming up with the perfectly timed challenge ladies!


Saturday, 30 May 2015

Gladys the Superhero

I've been falling back in love with my copics recently, mostly because I now have Sandy Allnock's hex chart which has revolutionised my colouring - it makes it soooo much easier to get colours to blend when you can see which ones are next to each other by shade rather than trying to work out the complex numbering scheme!

So I've had my pens out today to play in Less Is More's 2 or 4 legs theme http://simplylessismoore.blogspot.co.uk/2015/05/lucky-dip-week-226.html and now let me introduce you to Seniorita Gladys by Stamping Bella - I just LOVE her!


She is simply coloured with copics  - I gave her a slight blue rinse as she reminds me of my Nannan!  I deliberately had her cape just hanging over the edge of the card to add a little interest to an otherwise plain card.  To balance out all the red I highlighted the yellow by adding a matching strip of card to the left hand side.   Isn't she rocking those starry pants lol!

Catch you later :-)
Thanks for visiting

Tara

Saturday, 23 May 2015

Metal Cakes

No I've not gone mad making inedible cakes - I'm just combing a couple of challenges - the photo inspiration at Fusion http://fusioncardchallenge.blogspot.co.uk/2015/05/fusion-wedding-belles.html
with the theme of "add metal" at Less is more http://simplylessismoore.blogspot.co.uk/2015/05/week-225-recipe.html


I used the new Gardenia Blooms Journal stamp from Neat and Tangled and did some soft watercolouring with distress markers (focussing on fossilised amber the new shade) after embossing the whole image in white.  A quick trim with scissors and its the perfect panel to pop on a card.  I added my metal in the form of a die cut word using Clearly Besotted's birthday die and some soft craft metal backed with stick-it could just be glued straight down with no mess!  The wishes is from Wplus9, stamped and overwritten with a shimmer pen to match the metal.

This was the inspiration photo that kicked it all off for me.


Friday, 15 May 2015

PJ Party for the fellas

The theme of this month's Waltzingmouse PJ Party is all about the boys and I had huge plans to play with every challenge this month as Claire's guy stamps are second to none!   However, time and tide and all that, I have only managed to squeeze in one little card - this was going to be full of movement, but I had to revise that plan too :(


I used a little super hero from Simon Says Stamps as my character and fussy cut him out and stuck him on a strip of acetate to add a little movement (he was going to be on a pull tab to fly across the card) but now he just flaps a bit!  I added a city for him to fly over using Super from Avery Elle and then came the point of the challenge - the Waltzingmouse goodies.  In this case I used Kaboom to add the zooms under his feet, the star bursts in the sky and the double sentiment.  To add the comic book style dots to the blue star behind BAM I used the star that comes in the kaboom set - I have asked Claire for some full backgrounds so we can do full on comic book panels - fingers crossed they make it to the top of the wish list ;-)

Right back to doing all the things that get in the way of card making!


Tuesday, 12 May 2015

Angular Water

Hello out there if you're still with me - it's been a while.....

Today I am playing in a couple of challenges which I have managed to combine - the photo inspiration at Paper Smooches Sparks with Less is More's one layer water....


The photo made me think of angular waves so I stamped a few fish, coloured with copics and coated with glossy accents to create a resist before I stamped my waves over the top.  All the stamps are by Paper Smooches - Borderlicious, Briny Blue and Happy Birthday - the latter I used to create my sentiment borrowing half from one of the ones in the set and pairing it with the word in Briny Blue.

Here's the photo that inspired me.


Sunday, 3 May 2015

One bird, 4 ways

I'm blogging over at my store today, and have done more birds using the same stamp as yesterday.


Here's a link to the blog post for all the details.  http://makethedayspecialcards.blogspot.co.uk/2015/05/one-bird-four-ways.html


Saturday, 2 May 2015

Blue Tit of Friendship

I've been itching to ink up this lovely little birdie from WPlus9 since it was released a few weeks ago but I've not had time.  I have plans for it tomorrow on my store blog but I thought I'd get a head start by making an entry for this week's colour challenge from LIM too http://simplylessismoore.blogspot.co.uk/2015/05/week-222-colour.html


The challenge was to use opposite colours on the colour wheel so I went with blue and yellow and turned the bird into a blue tit.  I hope I can be forgiven the little hint of brown on the branch as he needed something to perch on.   He is lovely and simple to colour, even if you aren't a brilliant painter (I know cos I'm not an expert!)  I just used distress markers and some white acrylic paint.  I fussy cut him out and then extended the lines on the branch so I could pop him in a little die cut frame (Lil' Inker Designs Stitched Circle die) and I added a little blue distress ink around the edges of the frame to drawn your eye into the middle.  The sentiment is from Mama Elephant's Origami set and I just curved it on my block to match the frame before stamping it.


Wednesday, 22 April 2015

Up and Away

I'm a bit later than normal to the LIM party this week - I messed up my card so started again!  The theme is up and away which gave me the perfect excuse to break out some new balloon dies and to pair them with one of my all time favourite stamps - I think it came out super cute.  http://simplylessismoore.blogspot.co.uk/2015/04/week-220-theme.html


The balloons were die cut from a sheet of card covered with stick-it thin sheet glue so I could foil them with rainbow foil before die cutting.  The letters are die cut from the balloons automatically so I can add those to another project later.   I added some sewing cotton around the balloons and tied them together around my favourite panda's arm so it looks like he is being carried up and away as per the theme.  Adding a couple of comic book style "zooms" under this feet shows he's moving pretty fast too!


Wednesday, 15 April 2015

PJ Party

I wanted to play along in the PJ Party at Waltzingmouse as its been a while but I didn't have much time so just managed to play with the bedtime sketch.  http://waltzingmouse.blogspot.co.uk/2015/04/april-pj-party-on-14th-youre-invited.html


Ultra quick post as time is short - but the stamps are Waltzingmouse.  Dies are other brands.   I had to deviate from the sketch to fit the sentiment in - hope that its still OK.


Sunday, 12 April 2015

Showering you with love

The LIM challenge this week - one layer splatters - gave me the perfect excuse to break out my new stamps from Wplus9's latest release - Love Showers - was made for this challenge!   It also fits this weeks' "shower" challenge at Addicted to CAS


I started with the umbrella and stamped it with Mama Elephant Winter ink and embossed it.  I arranged the sentiments around it and stamped those in black and then added the hearts with Mama Elephant Lollipop and clear embossed those too.

For my splatters I used a tumbled glass marker on an acrylic block and added a little water so I could get some spritzing action using a toothbrush from some fine dots and a paintbrush for some slightly larger ones.

Thanks for stopping by.

Tara

Sunday, 5 April 2015

Mostly Black

The LIM challenge this week is quite an intriguing one - we often do all white cards but how about giving mostly black a try?  http://simplylessismoore.blogspot.co.uk/2015/04/colour-challenge-week-218.html

I was going to try a full on goth version of clear embossing on black card which would probably go down well with any emo teenagers in your life but then I had a light bulb moment - quite literally!


The hardest bit was getting a decent photo - who knew photographing black was so hard - even daylight washes all the detail away so this is the best I can do.

I used the great Lights Out stamp and die set from Mama Elephant and stamped the light bulb onto a scrap of yellow patterned paper - I love adding tiny bits of pattern in really CAS cards and embossed the element in white into the middle.  I then just cut the screw mount part of the bulb from gold card rather than stamping it as I wanted the shine.  To create the glow behind the bulb I embossed the centre of a Vintage Ornament from Waltzingmouse in yellow on the base and then hung the bulb on top with some yellow chord to keep my colour palette minimal and popped it up on dimensional foam.

I finished with one of the great sentiments embossed in white.   I really like the different and dramatic look you get from black cards so am going to be doing some more - thanks for the inspiration ladies!

Happy Easter and thanks for visiting.

Friday, 3 April 2015

Take 3 Challenges

I'm taking advantage of the extra day off work to make a last minute entry to the Less is More challenge as I've been too busy to play for a couple of weeks.   The challenge which ends today is to combine 3 previous challenges and I chose:

Challenge 26 - Feeling Fruity
Challenge 37 - Cocktails
and Challenge 114 - Lime and Black


I combined a SSS glasses set with Reverse Confetti's Fresh n Fruity as I love the sassy sentiment!

Hope you're all have a great Easter break.


Sunday, 15 March 2015

Easter Bunnies

I've not had time lately to join in with Virginia's View challenge but as the challenge is a year old this month I thought I'd try.   This is the project I made for my store's blog today and it fit's the challenge theme of embossing so I'm linking it up to the challenge which has some fab entries already  http://virginiasviewchallenge.blogspot.co.uk/2015/03/virginias-view-challenge-13_1.html


For my project I wanted to play with some ideas for easter decorations using Avery Elle's adorable Easter Blessings stamp set as it is currently my most favourite stamp to colour.  I found this little egg shaped bud vase and the egg on Amazon and they are both made of papier-mâché so I gave them a couple of coats of white acrylic to make them a suitable base to add the image.

I stamped the image onto white tissue paper and embossed it in gold (on the non-shiny side or it doesn't work for colouring - I found that out the hard way!) and then used my polychromos pencils to colour it in with bright virbrant spring colours which cheered me up in the grey weather we're having in the UK.

Then to attach them to the objects I simply trimmed around the whole image leaving just a tiny border and applied tombow glue to the back (not to much and be quick but gentle so it doesn't tear) and applied them to the objects.  The bud vase is easy as its flat, but the egg is a little trickier but as long as you apply the centre first and gently press the edges out after it goes on pretty good and I know these will make a lovely table centre decoration at Easter.  I may even get some smaller eggs and cut out portions of the image to decorate them and hang them from a white branch....

Hope you're having a lovely weekend and Happy Mother's Day to all the mums out there.

Tara

Saturday, 14 March 2015

Hoppy Cake Bunny

It's LIM day again and it's One Layer Week and this month they want a one layer card featuring an animal which gave me the perfect opportunity to ink up one of my new stamps that arrived last week from my mate Elaine's store Quixotic Paperie which is where I get all my Stamping Bella goodies.   She is having a massive Spring Sale this weekend so perfect opportunity to do a little shopping!


This image is from the Hoppy Poppy Collection which is soooo cute!  I simply stamped and then coloured with polychromos pencils which blend with no bleeding on one layer cards.   Should have got my stampamajig out for the sentiment though - never mind I like quirky angles!

Right off to work on some Easter projects for my store blog tomorrow.

Catch you later.

Saturday, 28 February 2015

This makes me Happy!

I love the theme at Less is More this week - it's simply to make something that makes you happy and to say why.  http://simplylessismoore.blogspot.co.uk/2015/02/week-213-this-makes-me-happy.html

Well recently with a full-time job and and running a craft store in my "spare time" I've found little time for crafting, so at the moment making ANY card at all makes me very happy!   However, I decided to take it a little further than that making a card from a stamp brand whose images always make me happy when I colour them and a technique that I find both happy and relaxing.


This images makes me really happy as it reminds me how I never want to wear 80s fashion again!!!  I stamped Farrah (Stamping Bella) onto copic colouring card and then rifled through my scraps draw for suitable paper to stamp all her clothes onto as the technique that makes me happiest is paper-piecing - I really love the look of it and cutting all those fiddly bits like the shoes!   I coloured her body and hair and tights with copics and then set about dressing her up with her paper clothes - just like those dress up dolls I had as a kid in the 80s!  The radio is copic coloured and paper-pieced on top.  I added a little shading to the paper-piecing with copics too.

To create the frame I used a Lawn Fawn stitched rectangle but made it narrower using the technique Chrissie has shared on LIM several times.  The sentiment is an old one by Personal Impressions trimmed with a Lawn Fawn stitched circle.  All mounted onto a new Avery Elle card base.

Thanks for visiting :-D


Sunday, 22 February 2015

Wings

The challenge this week at Less is More is "wings"  http://simplylessismoore.blogspot.co.uk/2015/02/week-212-wings.html   There were already a lot of birds and insects in the gallery so I opted for something mechanical!


This is an as yet unreleased set from Avery Elle which will be on sale on Friday.  As I managed to get them early it will be on sale in my UK store at the same time as it gets released Stateside along with the rest of their release which is a stunning one.  There are so many sets I want myself!

This is called Fly By and comes with other sky writing sentiments which are such fun.  I heat embossed that in white and added some frosted lace stickles.  The clouds are outlines which I coloured in using grey and white ink with a cotton bud to get a fluffy feeling and added some stickles to the top too.  The plane is paper pieced using Avery Elle's Happy pad which is also out on Friday.

Catch you later!


Saturday, 14 February 2015

One Layer Love

It's a handy theme at Less is More this week as I woke up this morning to find a valentines card on my pillow as my husband is away today and had said he wasn't doing a card.  Whoops!  Luckily he won't be back whilst late so I had time to make one for him....


It is one layer week at Less is More, so you'd think die cuts were a no-go, but with a liner on the inside, you can do embedded die cuts on a one layer card and nest them back in to the finished card.  In this case I used some copics to add shading first.  The hearts banner die is by Lil' Inker Designs.

The little excited penguins and matching sentiment are from Mama Elephant's love quotes and I watercoloured them lightly with distress markers and a paintbursh.

Here's the challenge link if you want to play along.  http://simplylessismoore.blogspot.co.uk/2015/02/one-layer-challenge-week-211.html

Blogging tips