I persisted with my idea and eventually managed to get something that was close enough to the vision in my head to be happy enough to post. It's not my strongest card ever, but I do like the strong colours and simple layout.
Sunday, 30 October 2011
Fairy Dell
It's taken me ages to make this card - as soon as I saw the inspiration photo at For Your Inspiration I knew exactly what I wanted to do as I was so drawn to the colours in the photo, but the vision in my head just wasn't translating to paper. This is the image - isn't it stunning - I wish I could find a forest like that to walk though..........
I persisted with my idea and eventually managed to get something that was close enough to the vision in my head to be happy enough to post. It's not my strongest card ever, but I do like the strong colours and simple layout.
I stamped and embossed the fairy silhouette stamp onto thick white card and coloured with a mixture of inks and cosmic shimmer paints - I think there would definately be fairies hidden in the undergrowth in such a colourful forest!!! I cut it out and mounted it onto a small card and finished with a simple fairy sentiment. Here's the link to the challenge if you want to play along - but be quick you only have a couple of days! http://foryourinspirationchallenges.blogspot.com/2011/10/fyi-challenge-16.html Do check back later in the week as I am going to be their Guest Designer for the next challenge and I can't say too much other than it's another fabulous inspiration photo they have in store for you!
I persisted with my idea and eventually managed to get something that was close enough to the vision in my head to be happy enough to post. It's not my strongest card ever, but I do like the strong colours and simple layout.
Saturday, 29 October 2011
Seeing stars.......
This week's LIM is all about stars, and I knew exactly what I wanted to do as soon as I saw the title as I love the sentiment stamp I've used.
I stamped the sentiment which is from Paper Make Up available form Quixotic Paperie in the UK and I embossed it on white card with pewter EP which has a subtle sparkle. I added a little glimmer dust to the stars and added 3 acrylic stars underneath. The bottom of both the sentiment panel and the silver mat were cut with a Martha Stewart punch. Sorry about my reflected hands in the mirri card - no matter what I tried I couldn't get rid of my reflection in the photo!
Catch you all later.
Friday, 28 October 2011
CASual Sketch
I've not been feeling well today so I've not really been up to crafting, but as I made the VIP club over at CAS-aul Fridays last week, I wanted to play along again. :-D
This week they have a sketch which is a lovely clean and simple design open for interpretation. I decided to make a Christmas card for my stash as I have bought a lot of holiday stamps recently and haven't used many.
I started with a 3 inch red square, added a green striped mat and lovely Christmas ribbon. The bauble is from the new Waltzingmouse release and is embossed onto silver mirri card with red ep and green for the sentiment from the same set. They were cut with the matching nestie. Clean, simple and quick so I may make more when I'm feeling better.
Craftilicious x
Thursday, 27 October 2011
I've been showCASed!
Just a very quick post to say that I am honoured to have been showCASed in last week's Less is More Cocktails challenge with my "screwdriver" cocktail card. Thanks to the Diva and Lady of LIM for picking me and giving me the much coveted blog badge ;-)
Been a busy week with lots of evenings out but hopefully I'll get time to make something new to share this evening.
x
Been a busy week with lots of evenings out but hopefully I'll get time to make something new to share this evening.
x
Tuesday, 25 October 2011
Monster Birthday!
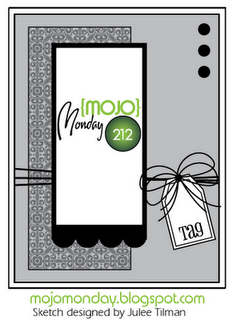
I needed a card for a five year old boys birthday this week and decided to give it a spooky theme as I love this image.
For the layout, I used the great sketch from this week's Mojo Monday - so I am entering my card into their challenge too.
http://mojomonday.blogspot.com/2011/10/mojo-monday-212.html
Thanks for visiting ;-)
The image is a digi from Polycraft from their Halloween set (I've cut off the pumpkin he was carrying to make it more generic for a birthday rather than Halloween) I still think he is spooky enough to meet their challenge this week though so am entering my card http://pollycraftchallengeblog.blogspot.com/2011/10/challenge-116-spooky-goings-on-mary-j.html He is very green, but little boys like all things green and slimey don't they!
http://mojomonday.blogspot.com/2011/10/mojo-monday-212.html
Thanks for visiting ;-)
Sunday, 23 October 2011
Partially embossed snowflakes
I've been out a Stamp Magic all day so not much time for blogging but I wanted to do a quick post tonight to beat the deadline on the There She Goes challenge which is to make a card only using partial images.
I used some stamps from their snowflake set and stamped and embossed them onto some small white squares deliberately letting them fall over the edges so on the majority I used only the partial image. I inked them once embossed with distress inks and spritz them with perfect pearls shimmer. I rounded the outer corner on each and mounted them onto white snippet dry embossed with snowflakes. I mounted onto a blue snippet, on a black square card and finished with one of the sentiments from the set.
I am entering the following challenges with this card:
Partial images - http://tsgclearstamps.blogspot.com/2011/10/there-she-goes-again-tsg126-partial.html
Holiday embossing - http://crazy4challenges.blogspot.com/2011/10/crazy-4-challenges-c4c109.html
Unused holiday stash - http://abcchristmaschallenge.blogspot.com/2011/10/u-is-for-unused-stash.html - neither the folder nor the stamps have been used before.
Winter theme with sentiment http://audsentimentschallengeblog.blogspot.com/2011/10/challenge-39-and-winner-of-38.html
Night all - thanks for stopping by
Craftilicious x
Saturday, 22 October 2011
Less is More with Dotty Mice
It's Saturday which means my favourite weekly challenge - Less is More and also the weekly sketch challenge from my favourite stamp store - Waltzingmouse
I don't always get to play along with the sketch challenge but this week I think it combines beautifully with this week's Less is More challenge with is to use Polka Dots.
I started with a 12cm square card blank and cut a 10 cm square white panel which I embossed with swiss dots and rounded two opposite corners. I cut a Christmas ornament using a nestie and put the resulting shape through the same folder - I coloured each dot with a darker shade of red copic and covered each with glossy accents. I added a small stamp from the new Seasonal Remedies set to the bauble and cut that out and glossed too and attached the bauble with twine and dimensional foam. I coloured a craftwork cards sentiment with the same copic and again covered it with glossy accents and finished it with 3 holly leaves from the Festive Foliage set.
I have quite a few cards I need to make but am running out of time today as I've been scaring myself silly trying to use a pressure cooker which has now been christened Hissing Henry! I'm off now to make a pie with the contents and then get ready for Stamp Magic in Doncaster tomorrow.
Craftilicious x
Friday, 21 October 2011
Colourful CASual Friday
The challenge at CASual Fridays this week is a simple one - they just want you to colour an image on your clean and simple card. Our niece and her family have just moved into a new house today so I needed to make a house warming card and I decided to make one for this challenge.
I've used the lovely cottage set from Waltzingmouse and stamped it 3 times onto a landscape 7 x 5 card to create a row of houses with some falling off the end of the card. I stamped the house again on some blending card and coloured it with copics, and then I did the same with the separate central portion stamp which I layered up with dimensional foam. I added the topiary pots from the same set which are also cut out and stuck on. I deliberately only coloured the central house to make it pop and I like the line drawing effect of the uncoloured ones. The sentiment is also from the same set.
http://cas-ualfridays.blogspot.com/2011/10/cfc25.html
Off to the post office now to get it posted.
Craftilicious x
Wednesday, 19 October 2011
A very Tiddly evening
Firstly, Christy is looking for some fall inspired projects to possibly feature on her site and I had a great idea to use one of her images in a slightly different way. I used Fairy Fae catches a star but I fussy cut her out once coloured with copics, and then cut some leaves from an old My Minds Eye paper and had her catching leaves instead of stars. I kept to rich autumnal shades of browns, oranges and yellows with just a hint of the remnants of summer greens. I kept her wings really neutral with pale copics and showed their transparency by colouring the dress where it would show underneath. I painted some perfect pearls over the top for shimmer and added some glimmer dust for extra sparkle ;-) I really like how she came out and I think a fairy would like to catch all the lovely colourful leaves as she skips through the forest. Here's the link the challenge if you want to create a fall project too http://tiddlyinks.blogspot.com/2011/10/tiddly-tuesday-new-fall-images-and.html I'm also going to enter her into Flutterby Wednesday as this week their challenge is anything goes - as long as it has wings naturally!
I then decided to colour up this cute little spell casting witch for the current Tiddly Inks Challenge - Halloween is Coming. Regular blog readers will know that Halloween isn't a big thing over in the UK and we don't really send cards for it, so I don't tend to make Halloween projects, BUT, I do have a huge weakness for witches and wizards, so I've gone for a spooky feel but made it for a birthday - hope it still counts!
Again, I coloured her with copics but then overcoloured with lots of shades of stickles glitter. I used purple and black distress inks to create a dark background and misted the whole project heavily with perfect pearls in water and dried it with my heat gun - this gives it the spooky feel and in real live has left the image looking like it was drawn on leather not paper - can't get a good shot of it by camera though -sorry :( I think the spell she's casting is for a magical birthday - not anything sinister - she's too cute!
I am entering the following challenges with her:
http://tiddlyinkschallenge.blogspot.com/2011/10/challenge-69-halloween-is-coming.html
http://onestopcraftchallenge.blogspot.com/2011/10/week-153-halloween.html
http://abc-challenge.blogspot.com/2011/10/b-for-boo.html
Thanks for visiting :-D
Craftilicious x
Tuesday, 18 October 2011
Tea for Two!
I had a little splurge on copic sketch pens last week and got all the "0000" ultra pale shades and wanted to take them for a test drive... The perfect image for which I felt was this delightful fairy in a teacup by the very talented Mo Manning - all her images are just wonderful to colour.
Coloured with copics with a hint of perfect perals on the wings. I cut up some cubes of background papers and made a grid and did some faux stitching with a black fineliner.
I'm entering this into the current challenge on Mo's challenge site whcih is "inspired by a song" - this card has been inspired by the song "Tea for Two" - some for me and some for the little fairy in the teacup. http://mosdigitalchallenge.blogspot.com/2011/10/challenge-104-inspired-by-song.html
Monday, 17 October 2011
Thankful Waltz....
It's waltz day over at Waltzingmouse Stamps, and this month's theme is "Gratitude/Thanksgiving". I decided to go with the just the one word "thanks" from one of my favourite sets - I love the big flourishy sentiments from Say it Loud, they stand alone and make fantastic cards.
I started with a kraft card base, made some paper ribbons and curled them slightly at the bottom using some DP from K&Co and embossed a strip of brown paper with dots. I stamped the thanks onto some pearlised card which had been cut with a nestie with black ink and finished with some funky red pompom ribbon.
Enjoy the waltz - can't wait until my stamps from the new release arrive and I can play with those too ;-)
Sunday, 16 October 2011
Floral Colouring Challenge
There are some new markers coming onto the market - TouchTwin markers and they have started a new blog with colouring challenges where you can win them - until January you can play along using any markers so I'm playing along today with my copics. From January we'll have to play with their markers so fingers crossed I win some ;-) Here's the link to the challenge if you want to play along http://touchtwinchallenges.blogspot.com/2011/10/ttc03-touch-twin-challenge-florals-part.html
I've used this lovely Dog Rose digi stamp I won through the Less is More blog from A Passion for Stamps and have coloured it with copics as follows:
Hips - R08, R46, R89 plus glossy accents
Flower - R85, R83, V0000, Y38, Y08
Leaves and Stems - YG21, YG25, BG78, YG97, YG63
The sentiment is PTI and I finished with some kraft paper distressed with victorian velvet and a little green ribbon. All the papers are from my leftovers box so I'm putting this card into Jule's snippet challenge this week - conquering our snippets mountain one week at a time....
Night all......
Saturday, 15 October 2011
More Cocktails
I'm loving this mornings challenge at Less is More - I do love a cocktail ;-) This time I thought I'd take a more obtuse angle rather just featuring a cocktail glass - so here I am with my interpretation of two cards based on two different cocktails - see if you can work them out....
My second card is a Christmas one - Magnum from Ladybug Crafts stamped on kraft and coloured with pencils. The cocktail here is an oldie but a goodie - a Snowball - advocaat, lime and lemonade - I was always allowed a very weak one with my Nannan on New Years Eve and thought it was the height of sophistication - well you would when you were 8 or so wouldn't you ;-)
I think that's exhausted my cocktail stamp ideas and I have to go and make tea as we're out early tonight at the Sheffield Comedy Festival - I may even partake in a cocktail while I'm there!
Catch you later ;-)
My first card I think would make an ideal little thank you to the handyman in your life when he's putting up your selves in the craft room - mine has a job to do tomorrow so will get this when he's finished! It's a tiny 3" square and the stamp is a personal impressions from a tool set. The cocktail inspiration comes from the name - a screwdriver is basically the fancy name for vodka and orange.......
My second card is a Christmas one - Magnum from Ladybug Crafts stamped on kraft and coloured with pencils. The cocktail here is an oldie but a goodie - a Snowball - advocaat, lime and lemonade - I was always allowed a very weak one with my Nannan on New Years Eve and thought it was the height of sophistication - well you would when you were 8 or so wouldn't you ;-)
I think that's exhausted my cocktail stamp ideas and I have to go and make tea as we're out early tonight at the Sheffield Comedy Festival - I may even partake in a cocktail while I'm there!
Catch you later ;-)
LIM Cocktails
Good morning LIMettes - time for our favourite weekly challenge again - and I'm loving the cocktail theme this week! It's an appropriate theme as Less is More applies to the art of cocktail making as well as card making - all the great cocktails are the simple ones.
The ladies shared a little game to find out what your cocktail personality is - this is mine:
| You Are Made Of Silliness, Pizzazz, and Giddiness |
2 parts Pizzazz 1 part Giddiness And a Splash of Happiness Finish off with an olive |
Blogthings: Our Quizzes Weren't Written By Bored 12 Year Olds
For my card, I have used my brand new stamps from Stamping Bella - her new range of "Uptown Girls" which are just perfect images for me to make cards for all my girlfriends as we do love a cocktail! Stamping Bella is a Canadian Company if you've not come across them before with a fabulous range of stamps (not just images for colouring) but I get mine in the UK from Quixotic Paperie and these stamps landed here just this week and I got mine yesterday so the timing of today's challenge is perfect!
This one is called "Madison has a Margarita" but I decided she'd be having a cosmo so changed the colour of the cocktail appropriately. She is coloured mostly with copics - I have a new range of colours as there was a really good offer on so I had a little splurge! I did do a little shading on top with pencils and sansoder. I added a pink spotted matt which is from a Bo Bunny scrap from my snippets drawer and I used the same to matt the sentiment which comes with the stamp (I know Chrissie already used the same sentiment, but this is destined to be a retirement card for a friend next week so it had to have this sentiment on it!) The little pink flat back gems were a little freebie with my stamps - Elaine the owner always includes a little something as a thank you which I think is a lovely touch.
Right, time to see what cocktails everyone else has come up with.
Catch you later
Friday, 14 October 2011
CASual Witches
This week's challenge at CAS-ual Fridays is to make a Halloween card without using any orange. Well, Halloween isn't such a big deal in the UK so I don't have any use for Halloween cards per say, but I do love witches - so I'm hoping my witch themed card still counts and I haven't missed this challenge since it started.
I've used this cute little digi image that was a great freebie from Michelle Perkett Studios and coloured her copics and cut her out and popped her up on dimensional pads but - it's not showing up on the photo - the problem with flash photography and nighttime blogging! I printed the sentiment and just cut it really close and finished with a couple of strips of paper to pull out the colours from the witches clothing.
Here's the link to the challenge if you want to play along - http://cas-ualfridays.blogspot.com/2011/10/cfc24.html
Thanks for visiting tonight - have a good weekend.
Craftilicious x
St Luke's Take 2 - News Flash!
For this card I stuck to 3 colours - kraft, red-brown and black. I like the simple retro effect. The TV set was coloured with copics direct onto kraft and glossy accents provided the shiny screen. I split the sentiment and image up for added interest as I like the strong black matt for masculine cards.
I am entering this into the anything goes challenge at http://onestopcraftchallenge.blogspot.com/2011/10/week-152-anything-goes.html
Thanks for stopping by x
Wednesday, 12 October 2011
Not scary but cute witch
I've not managed to make much this week, by mojo has definitely gone on holiday of late - I guess it doesn't like the cold and damp weather....
There are a lot of Halloween challenges around at the moment though and I have a super cute little swiss pixie Brigitta witch stamp that has never seen ink so I was determined to play with her. When I saw this weeks colours at ColourQ I knew how I wanted to colour her - the grey, black, tangerine tango and crushed curry they have are just perfect for her
Cooking it up with Katie gave me the inspiration for the layout - they wanted to see colouring - well my image is coloured with copics - and they also wanted to see circles and paper curling, so I cut a couple of circles in mustard and grey with nesties and distressed and curled the edges. I used some papermania black, white and grey spotted paper and some orange striped paper to finish the layout - I do like to mix spots and stripes.
As well as the two challenges that inspired my card design, I am entering the following Halloween themed challenges too:
http://cupcakecraftchallenges.blogspot.com/2011/10/cupcake-163-halloween.html
http://cutie-sunday.blogspot.com/2011/10/cutie-sunday-151-09102011.html
http://7kidschallengeblog.blogspot.com/2011/10/challenge-32-happy-halloween.html
Thanks for visiting
:-D
Sunday, 9 October 2011
Smile
This week's CAS-ual Friday's challenge is a little different - there is a blog hop in aid of Julie Ranae who has had some terrible problems resulting in the loss of her two front teeth and is now faced with a HUGE dental bill to get her smile back. As well as the usual challenge there is a blog hop with $2500 worth or prizes up for grabs and on every blog there is a donation button to donate a little to help Julie get here smile back - which I've done - just a few dollars but every dollar counts. I am so glad to be in the UK with access to subsidised dental treatment - I think your smile is very important for your confidence and sense of well being.
They want us to make a card using the phrase above as inspiration and this is what I came up with:
I've used a 7 x 5 kraft card base with some blue paper and faux stitching. I've then used some pieces from an old HOTP quick cards kit with the addition of a few buttons. The U was actually on a brown square but I decided it looked better cut out. That's it from me today I think as my mojo seems to have gone on holiday with the tidy up fairy.....
Check out the start of the blog hop here http://cas-ualfridays.blogspot.com/2011/10/cfc23-operation-julies-smile.html
Craftilicious x
Saturday, 8 October 2011
Transparent Clothing
So I've opted for this great punk image from Tiddly Inks. To get the transparent effect I drew the continuation of her legs under the skirt with a momento liner pen and then used very pale copic blues, with, thanks to the great tips from Carole of Brum, an overlay of white pencil in places.
Other than skin tones I stuck to just blue and black for this image and I really like the effect - she's called Pinky though so one day I really must colour her in pink!
One Layer Hearts
Well its Saturday again - hurrah - even if it is grim outside and I'm trapped in the house all weekend due to parking issues and local sporting events - I don't care as I can play all day in my craft room.
As its Saturday I've started with my favourite challenge of the week - Less Is More - which as it's the second Saturday of the month is one layer week and it must feature hearts.
I've made a couple of cards - first off a very simple teeny-tiny card with my Chemistry set from There She Goes as I just love it at the moment. Stamped in black, and coloured the hearts with lady bug momento ink using a waterbrush and a couple of copics for the cork and bottle.
For my second card, I've used some of my new found inky techniques. I have to say the online class I'm doing is one the of the most useful things I've ever done and its really helping me get over my inky phobia - now if someone can tell me how to get the damn stuff off my fingers (or better still how not to get it on there in the first place!) I'd be very happy!!!
For this card I masked off a strip with post-its, stamped a solid heart using pearl ink and pulled it away quickly to get a stippled effect and some texture - I embossed it with clear gloss ep. I overlapped a text heart and embossed with ultrafine silver ep. The hearts are from a set by Srappy Cat. I added a white pearl sentiment from Verve and embossed that with clear gloss too. I sponged deep mahogany and scattered straw ink over everything roughly with a make-up sponge - this is the trick I learnt - don't worry about how smooth you get the ink - simply over-spritz it when finished with water or pearlised water. I used pearlised (made myself using blond moments powder in a tim holz mini spritz with water). I wiped the ink off the embossed areas whilst the ink was wet then dried the whole thing with my heat gun and hey presto - smooth inky finish the easy way!
Time for some lunch and the off to see who else is playing today.
Subscribe to:
Posts (Atom)