Saturday, 31 May 2014

Go with all your heart

The challenge at Less is More this week is to use more than one stamp http://simplylessismoore.blogspot.co.uk/2014/05/lucky-dip-week-174.html and that gave me the perfect excuse to ink up one of the new Mama Elephant sets that have just arrived at Make the Day Special Stamp Store today.....


I love this set - Sightseeing - the big bridge is so versatile - I can see it making funky borders next ;-)   There is definitely more than 1 stamp on this card- the bus, the bridge, the sign and wheels on the bus, the flags, the stripes on the flags and the sentiment are all separate stamps.  The road is washi tape.   I used Avery Elle pigment inks which are back in stock too.


Sunday, 25 May 2014

Flowers, Frames and Stars

It's my day over on my Store's blog today and we have big news to share as we have becoemm the first UK stockist of Lil Inkers stamps and dies http://makethedayspecialcards.blogspot.co.uk/2014/05/big-news.html


I'm celebrating their arrival by using them for this weeks die cut challenge at Less is More http://simplylessismoore.blogspot.co.uk/2014/05/week-173-we-have-recipe.html

I used the gorgeous Frames and Flowers Die to make 2 cards - you get 3 frames from the one die with the signature stitching we all love Lil Inker's for :-D   This is a super set as you also get some flower and leaf dies so I die cut some leaves from patterned paper and one of the flowers from felt and used those to decorate the frame.  I used a little washi for decoration and then used one of the great sentiments from Shiny Happy Sentiments to finish it off - simple but effective.


I'm going to enter this one into this weeks' CASology challenge too as the cue word is FLOWER.  http://casology.blogspot.co.uk/2014/05/week-96-flower.html

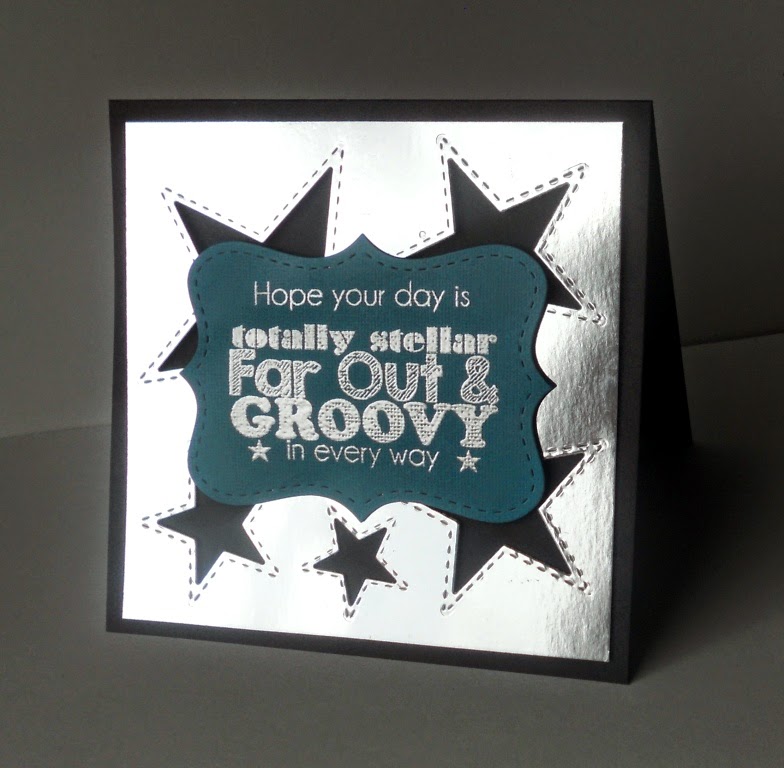
You can go masculine with the centre of the frame - I used another sentiment from Shiny Happy Sentiments and embossed it in silver.  I then used another set of dies - the really lovely Stitched Stars but I decided to go for the negative space as you get the lovely stitching around that too so it makes an AMAZING background.  I arranged them on my silver mirri matt and die cut them a couple of times until I filled the whole matt and then simply popped the sentiment panel on top.


Hope you're all enjoying the bank holiday weekend :-D


Sunday, 18 May 2014

My Hero

See I promised you less flowers and less watercolour today - well there are no flowers but there is still a tiny but of watercolouring going on....

It's my day on the Make the Day Special Store Blog and I'm using one of our newly arrived stamps from SugarPea Deisngs.  There are lots of great new characters to choose from, but as my husband works in a Comic shop then I had to go for this little dude first (complete with accurate colouring on his Flash t-shirt or I would never hear the end of it......)


Isn't he fun!   He was coloured with copics and cut out so I could mount him over the panel of buildings which is a sheet of DP from "man made" by Trimcraft that I cut a skyline from.  A little blue washed sky and an embossed sentiment for him to stand on like a girder finish this simple card.  The sentiment made up from the words in the set - there are lots of separate words and phrases so there are endless possibilities with this one!

Right time to leave the craft room and make the most of the sunshine.


Saturday, 17 May 2014

Deja Vu

You may be forgiven for thinking you are seeing double day as the card I have is very similar to the last on I shared, but when I saw the theme at LIM today was flowers, I just couldn't resist having another go at the same kind of card but I did do a different floral arrangement!  http://simplylessismoore.blogspot.co.uk/2014/05/week-172-theme.html


I really love the "flooding" the background with colour and letting it spill beyond the embossing.  It makes the whole watercolouring thing a hell of a lot more manageable for me!

Right - I promise I'll share something less floral and watercoloury tomorrow.......


Thursday, 15 May 2014

Watercolour Flowers

I've been following the latest watercolour class at Online Card Classes this week but I've been struggling with it as a medium and really didn't think it was going to be for me.  However, I finally found a technique that works for me - and it's totally against my normal need for control and everything I ever learnt about colouring - going outside the lines!


I was inspired by the current challenge from Clearly Besotted - http://stampingsharing.blogspot.co.uk/2014/05/clearly-besotted-challenge-11-colour.html which is these gorgeous set of colours and I used some blooms from Fresh Flowers and a sentiment from Fabulous Fuchias.   I simply embossed the flowers in white and then coloured them in with a mix of pan water colours and luminarte shimmer watercolours but on the first layer I made the colours very light and loose and let them flood outside the lines - I know shock horror right!  I added hints of the 3 main colours around and about to get a soft background and balanced feel and then when it was dry I went back to the images and added a couple more layers of detail.  I finished with some strips of card and washi for balance.   I have to say it is just about my favourite card ever.......


Tuesday, 13 May 2014

Playing with Watercolour

Like many of the crafters I know, I'm taking part in the current Watercolour classes at Online Card Classes.   It's not a strong medium for me - I find the free form nature of it too loose - I like control!  However I have had a bit of a go.......

Firstly I used a quick and easy technique to enter this weeks's LIM challenge - I've not played in a while due to being busy with the store but I really miss it so will try harder to participate.


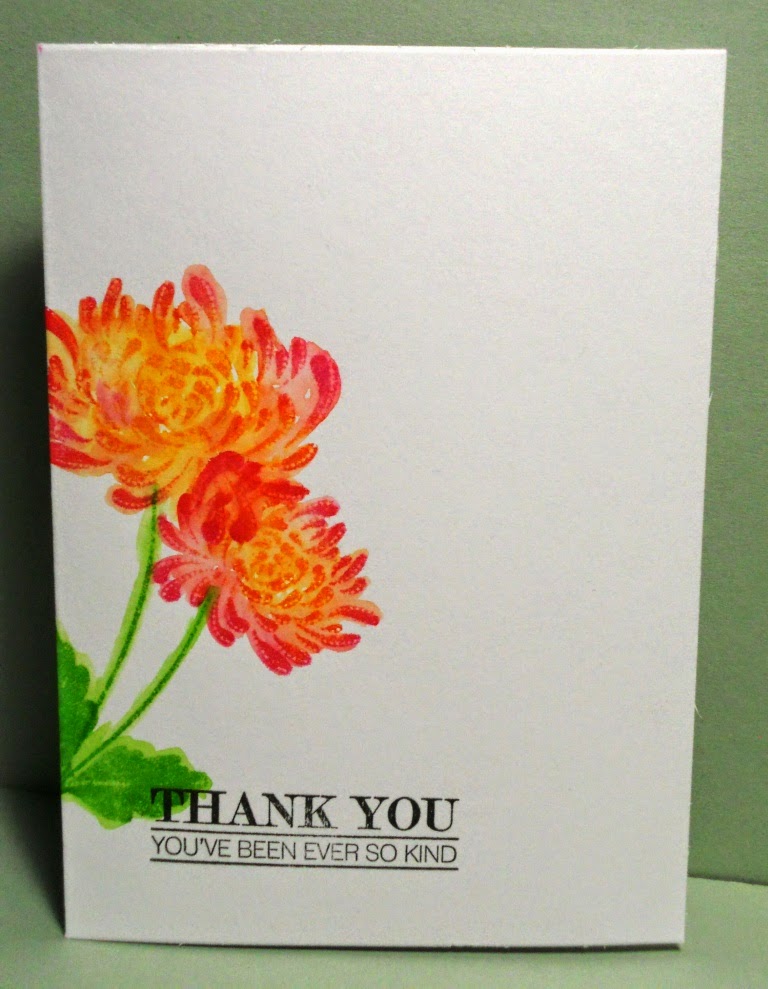
The challenge this week was a one-layer thank you.  I used PTI stamps and distress inks and softened the stamping for a faux watercolour look.   Not earth shattering, but not bad for a first attempt.

For my second attempt I used my newly arrived Clearly Besotted blossom stamps and the same technique with a little splattering over top to suggest the blossom drifting off in the wind.


I thought I'd enter this into the current watercolour challenge at KIS  http://kis-challenge.blogspot.co.uk/2014/05/keep-it-simple-39-watercolor.html


Saturday, 3 May 2014

Waltzingmouse Parrots

We have a fabulous new colour theme at Waltzingmouse Fanatics this fortnight based on some bright parrots  http://waltzingmousefanaticschallenge.blogspot.co.uk/2014/05/challenge-17-colours.html


I was drawn to the purple and orange so decided to take artistic licence with the apple blossom in this seed packet design and I know it's mostly white or pink but we can paint it any colour we like now can't we that's the fun of stamping!   I wanted to do a little watercolouring ahead of the online class I'm taking from Monday so I can see if I've improved by the end of the class ;-)

I added a sentiment from "Frame It" on a green banner to finish it off and bring in more of the colours.

Do pop along and join in the challenge  http://waltzingmousefanaticschallenge.blogspot.co.uk/2014/05/challenge-17-colours.html


Tuesday, 22 April 2014

Washi, bridges and sushi........

...Yeah not the obvious things to combine on a card, but I promise you it makes perfect sense to me!  A friend recently got a new job as a programmer for a company that makes software to do with bridge engineering so here I combined mathematical washi tape, with a die cut bridge and a sushi eating, happy dancing penguin who is "soy" happy for the recipient just as we are ;-)    See I told you it made sense!


The adorable little dancing penguin is from SugarPea Designs and is available in the UK now from Make the Day Special Stamp Store along with a lot of super cute friends.   I just coloured him with markers and fussy cut him out and stamped a matching sentiment onto card I coloured to match his bandanna.  The bridge is cut on my cameo.

I'm going to enter this into the Paper Players challenge this week which is all about washi tape  http://thepaperplayers.blogspot.co.uk/2014/04/challenge-192-cas-challenge-from-nance.html

Saturday, 19 April 2014

Feathery Birthday

We have a new challenge this week on the Waltzingmouse Fanatics challenge and it's a really simple sketch that can be layered or simple.


I used the gorgeous peacock feather from the Funky Feathers set and stamped it with a couple of shades of ink before painting the centres with luminarte shimmer paint and stamping the dark blue centre over the top when dry.  I used the matching cut file to cut the feathers on my silhouette machine and cut a mat just larger in gold using a feature on the machine to make an outline larger than the original shape.   I decided a simple strip of dark blue card would set of the images well and paired it with a sentiment from Compact Sentiments using the same blue ink to finish.

Do pop on over to the blog and have a go at the challenge - we even have a set of stamps to give away as a prize this weekend.   http://waltzingmousefanaticschallenge.blogspot.co.uk/


Sunday, 13 April 2014

Wait for it

It's my day to inspire over at Make the Day Special Stamp Store where we bring you all the best of the US craft brands without the dreaded import costs....   Today I am playing with one of our newer brands CASual Friday stamps who have some fabulous sentiment based stamps and when I saw the new "Wait for it" set I knew I had to play with it.  If you're not a "How I Met Your Mother" fan, then this card may be somewhat lost on you, but if like me you're a fan then I don't think I have to say much more...


I started with a black DL base card and cut a white panel from which I die cut some chevrons allowing the black base to show through.  Apart from the sentiment the only other decoration was some chevron and dotty washi tape.  For the sentiment I split the word LEGENDARY to make space for the "wait for it" to go in between in a nod to Barney Stinson.  I think this is a fun card for a guy and there are lots of great sentiments in the set.


Saturday, 12 April 2014

Inspired by Lilacs

So being stuck in looking after a patient recovering from surgery does have its advantages - I made another card today!

I decided to play in the current Clearly Besotted challenge which is "Spring" and my first thought of spring was Lilacs - I love when the trees come into bud.  I look the colours of lilacs and came up with this.


I die cut the rose die and embossed it with ranger verdigris powder.  I die cut it again from cardstock in lilac and darker purple and pieced the bits into the embossed version before covering them in glossy accents to give it a faux enamel look.  I finished with a very handy sentiment for when you miss a birthday like I did today.....

http://www.stampingsharing.blogspot.co.uk/2014/04/clearly-besotted-challenge-10-spring.html

Friday, 11 April 2014

I made stuff!

I'm stuck at home with my husband who had surgery yesterday but the upside is I actually found time to make a couple of cards whilst he slept this afternoon.

Firstly I needed a sympathy card for a friend who is going through her second close family bereavement this year so I wanted something brighter and cheerier than the normal sympathy card as she needs a little light her in life just now.  I thought the MUSE card this week was the perfect jumping off point.  http://musecardclub.blogspot.co.uk/2014/04/muse-challenge-62.html


I used Water Blooms from Mama Elephant and paired it with a sentiment from Avery Elle with a tiny red butterfly from Stampin Up to signify life after the darkness.

I also wanted to play with this week's LIM challenge as I've missed a few and turquoise is one of my favourite colours http://simplylessismoore.blogspot.co.uk/2014/04/colour-week-166.html


I used the lots of circles stamp from SSS and used all teal and turquoise inks I have and stamped them within a masked off circle in the centre of the card.   I decided a simple die cut sentiment was all that was needed to finish it off and as gold pairs so well with turquoise I die cut "friend" by Papersmooches from gold mirri card.  

Right better get back to the patient.....

Saturday, 5 April 2014

Mixed Messages

Our challenge this fortnight at Waltzingmouse Fanatics is all about getting more from your sentiments.  Clare makes some fabulous sentiment stamps and if you look at all the different sets there is heaps of potential to combine sentiments from different sets to make something extra special from them so that's what we want the fanatics to do - use at least 2 sentiments from 2 different stamps sets.   I used more than 2 and came up with this bleeding heart.......


I took lots of love related sentiments and stamped them into a heart I created by inking through a die cut heart frame.  The sets I used were:

  • My Heart
  • Compact Sentiments Part 2
  • Compact Sentiments
  • Country Labels 14
  • Say it Loud (all year sentiments)

I decided I wanted to go a little grungy - not my normal style but I gave it a good shot!  I spritzed my heart with water and did a little spritzing around the edges with a distress marker and my hand spritz tool.  I stamped some splatters from "Splat that" and then sprayed some copper shimmer over the top.  I finished with the arrows from one of the hearts in My Heart making it fit my bigger heart with masking.

Right - over to you - let's see you getting sentimental!

http://waltzingmousefanaticschallenge.blogspot.co.uk/2014/04/challenge-15-mixed-messages.html


Wednesday, 2 April 2014

Prize Challenge Tag

We're launching the first of our monthly challenges over at Make the Day Special Stamp Store today so if you're a fan of US stamp brands and want to get your hands on £15 to spend in store then check out the blog for details of how to join in http://makethedayspecialcards.blogspot.co.uk/2014/04/monthly-prize-challenges-start-today.html

As we're starting easy with "anything goes" I decide to do something a little different and make a tag rather than a card....


To make the die cut happy all pink and jolly I went mad with washi tape and selected all the ones I had with pink in them (it seems I have quite a few!!!) and stuck them down in a random order with some overlapping and simply die cut the word using one of the happy trio dies from Wplus9.   I think this is a super quick and easy way to add a lot of interest to a simple project.

The rest of stamping is done with the companion stamp set - whole lotta happy - I added words (some over the washi) in black and pink and then added some of the stars in the same colours to draw the eye to the top of the tag.  I'm not normally a pink girl but I do like the new inks from Avery Elle and was drawn to the raspberry one - probably because I love raspberries but I guess I shouldn't try eating the ink lol!

You've got 3 whole weeks to play in the challenge and the only rule is that your project must feature one product we sell so I do hope you'll join us......     http://makethedayspecialcards.blogspot.co.uk/2014/04/monthly-prize-challenges-start-today.html


Friday, 28 March 2014

Retro Mother's Day

I needed to make another Mother's Day card and I loved the sketch at Retro Sketches this week so used that to make one.  http://retrosketches.blogspot.co.uk/2014/03/retrosketches-107.html


I die cut a peony from striped paper letting it hang over the edge.  I cut it again from red spotted paper and pieced the petals into the outline and then removed the outline to leave white space.  Finished with a sentiment from the Crafts Meow.


Tuesday, 25 March 2014

Ombre Die Cuts

Today I wanted to play along with Avery Elle's current challenge which is ombre/gradient which seemed like the perfect opportunity to test out their new inks which I have to say I really like!


I took a fairly simplistic approach and used 3 tonal inks - celery, lemongrass and mimosa and as they are lovely juicy pigment inks I used the direct to paper technique starting from the lightest and working down to the darkest ink


Then to create something interesting with the ombre paper I made I took the hello word die and die cut it.  I cut the same word again twice in white and layered them up behind the ombre for dimension.  To add a little interest I die cut it once more from black card but this one I offset just slightly to add to the dimensional quality.  One of the sentiments from the companion stamp set was all that was required to finish it off.

Sunday, 23 March 2014

It's nearly Mother's Day....

I've suddenly realised that next Sunday is Mother's Day here in the UK and that I'd better get a wriggle on with my card making for it so today my make is the first of my cards - this one will be for my Godmother.   I was inspired by the colours at ColorQ this week http://colourq.blogspot.co.uk/2014/03/colourq-challenge-233.html


I started with the gorgeous new Spring Wreath Die from Wplus9 but I wanted the flowers I put on it to be more of a statement that the little blooms that come with the die so I added flowers using Papersmooches Flowers Dies.   To give some texture and a rich feel to the card I die cut all my elements from felt.  The sentiment in the centre is also from Wplus9 - the little Mother's Day Bouquet set which I stamped using the awesome new inks from Avery Elle - this one is Fog - a warm mid-grey.   After stamping the sentiment, I ran the panel through a woodgrain folder for more texture before adding the wreath and flowers and accenting them all with a tiny pearl centre.

The challenge at Papersmooches this week is Anything Goes so I'm linking up to their challenge too http://papersmoochessparks.blogspot.co.uk/2014/03/march-16-22-anything-goes-wk3-challenge.html


Saturday, 22 March 2014

Waltzingmouse Gift Cards

It's time for another challenge at Waltzingmouse Fanatics today and this fortnight we're playing with a lovely collection of soft blues and yellow - perfect for spring. I needed to make a gift card for my Mother's birthday for next month and I thought this would be the perfect challenge for it and this is what I came up with.


I used the lovely lace image from French Country, stamped in teal and then coloured in with copics - I love colouring patterns like this.  I then stamped a couple of sentiments - one from Gift Card It and one from Frame It to form a border above and below on the soft grey-pearl card base.

Then on the inside, I made the actual gift card itself using the Gift Card It Die set with some yellow DP and soft blue inks stamping more parts of the Gift Card It stamp set.  We get Mum a magazine subscription each year so this is the perfect way to give her something tangible to open on the day itself.


Hope that's inspired you to play along - numbers were low last challenge and we'd really like to get them up a bit again......

Thursday, 20 March 2014

Weight Watchers....

It was my best friend's birthday last Friday and one of the things that brought us together over 22 years ago now (eek!) was going to Weight Watchers together so when I saw this Art Impressions stamp last year I knew I had to have it and it's been waiting for it's first inking for this birthday in particular!


I used my favourite colouring technique of the moment which is watercolour painting with distress markers and then did a little die cutting and layering of some DP and glitter papers.

I'm going to enter it to the current Art Impressions Challenge http://artimpressionsstamps.blogspot.co.uk/2014/03/challenge-131-take-peek-mini-front-back.html  and the Seize the Birthday challenge (minus the toppings) http://seizethebirthday.blogspot.co.uk/2014/03/birthday-stitches.html


Sunday, 16 March 2014

Cats

I've been playing with cat stamps this weekend over at Make the Day Special as we got the new sets from Newton Nook that have been MIA for a few weeks at Heathrow....

Firstly I decided to sit Newton on a spritz background using my new mask and new spritzing tool so he would fit this week's Less is More challenge. 


I stamped Newton and his presents onto various scraps of card and pieced him together and then popped him over the masking (which I have to say really makes your arm ache getting a good coverage with copics)  I finished with a sentiment from the same set - Newton's Birthday Bash.

Then I decided I wanted to play with both sets of stamps so I dug out Newton's Antics too and used stamping and masking direct onto kraft to create a little scene of a cat's perfect day which, for my cat at least, involves playing, eating and LOTS of sleeping!


I used polychromos pencils and this time gave Newton some tiger stripes in greys.  I've tried to colour him like my cat, but she's a calico and has too many colours to get it right!  I brightened it up with a few pops of pink - the two bits of card as the same but the photo is awful and they look like totally different shades!


Blogging tips