Thursday, 16 May 2013

Birthday Mood Board

I loved the inspiration photo on the Monday Mood Board over on the WPlus9 blog this week - the orange and green really spoke to me.  http://stampawaywithme.blogspot.co.uk/2013/05/monday-mood-board-12.html   The Birthday theme is because both Dawn and her DH have birthdays coming up - so what better way to celebrate than with a gallery full of birthday cards ;-)


I wanted to add some solid blocks of the orange and green so immediately jumped on Quilt Prints and stamped up a full background with pear tart and morocco momento inks using the dotted diamond to pick up on the confetti in the image.  I LOVE stamping up this background - it's so relaxing - and soooo thrilling when the last bit of the pattern is stamped in place and all the little bits mean the design possibilities are near endless!


I took further inspiration from the stacked cups and threw in some red using my new favourite Fresh Baked set stacking up bowls and a jug and coating in glossy accents and adding a thin fussy cut black border to help it stand out from the quilt pattern.  Simply finished with an embossed black sentiment also from Fresh Baked and a black mat before mounting onto a 3 x 3 card base.


Wednesday, 15 May 2013

Pollycrafts is Back..........


Well I don't know about you, but I for one was very pleased when I found out that the closure of the Pollycrafts Digi store turned out to be much less of a permanent thing that we'd feared!   Good to have you back Paula - and with some GORGEOUS new designs and a DT call too - woo-hoo!  http://pollycraftdesigns.blogspot.co.uk/2013/05/new-images-and-dt-call.html


For my first play I went with the "udderly" adorable birthday cow (comes with a sentiment too) - isn't just great?  I love the slightly fed up facial expression - looks like me whenever anyone tries to take my photo!!!  She's coloured with copics and fussy cut then layered on a circular nestie and on DP with a vellum border using an old MS punch as I'd forgotten just how much I like those too - sometimes its good to dig out your old stash.  Finished with some faux stitching to tie it all together and a HA sentiment forced into a curve around the nestie.

I have a hippo coloured up and ready to be made into a card from the same animal set so watch this space!   Pop on over to the blog and store to see the new designs (there's even a discount code for your first order....)


Saturday, 11 May 2013

Clearly Besotted Day

I'm having a lovely crafting and reading day today - inside with the heating back on as it's blinking freezing in Yorkshire today.  I've played along in a few challenges - all with my new stash from Clearly Besotted.   Firstly, my favourite challenge of the week - the original CAS challenge - Less is More and this week is one layer week with the challenge of using a coloured base card.  http://simplylessismoore.blogspot.co.uk/2013/05/week-119-one-layer.html  I went with a sheet of purple card from Stampin Up so cut it in half and made two sympathy cards.


I stamped and embossed the stunning orchid from Thinking of You in white detail and then embossed the large vase from Just Fabulous underneath.  I coloured the orchids with pencils - polychromos from faber castel - they work really well on dark card stock.  I finished each with different sentiments from Thinking of You and a little gentle splattering of watercolour paint using colours found in the flowers.

Next up, when I saw Lesley's challenge image over at Fusion, I knew I had to play along using my new My Cup of Tea stamps.  http://fusioncardchallenge.blogspot.co.uk/2013/05/fusion-card-challenge-hypothesis-6.html

I decided to try the fusion approach and use Jackie's sketch as well and this is what I came up with.


I used two of the tea cup stamps in 5 different shades of ink and die cut them with the matching cup die.  Once adhered on the black backround I added some co-ordinating ribbon, made a flag with more black card and added a sentiment and die cut teapot on top to finish.

For the final card I used the same stamps but this time for the 10 minute craft dash http://prettypinkposh.com/2013/05/10-minute-craft-dash-17.html


Annoyingly, I didn't press stop on my phone stopwatch when I finished the card so I don't have my time clock to share, which is a shame, as it's my quickest one yet!  It was on 7 min 44 seconds when I thought I pressed stop!   Very simply die cutting, stamping and a couple of hand drawn stitch lines.  I love the teapot in blue - reminds me of Wedgewood.


Embossed Felt

Even though it's been a 3 week trigger, I've only just found time to play along with the gorgeous image that Kath chose to inspire us all http://www.moxiefabworld.com/2013/04/tuesday-trigger-pretty-little-petits.html


I really loved this image (well it features cake and I LOVE cake!) but I really liked the thick texture of the woodgrain icing background and I really wanted to replicate that element of it in my card.  So to get the depth I wanted, rather than embossing paper with my SU Woodgrain folder, I decided to try embossing felt - the problem was it doesn't "hold" the detail, it just springs back to practically flat and normal.  So I was toying with the idea of trying a diluted pva on it but I was worried I'd ruin my folder, when I hit upon the idea an old fashioned household product - spray starch!   (Apparently you use it when ironing, but as I don't really know where the iron is kept I wouldn't know about that lol!)   However, it does work BRILLIANTLY in this instance.   I simply trimmed an oval of white felt, sprayed it heavily with starch and then popped it in the folder and through my big kick.   I rolled it back to the centre to keep the fold shut and left it there for 20 mins so it could "dry" in situ.  It came out a little damp still so I left it flat to air dry over night and washed the folder straight away.  In the morning I had a beautiful little crisp oval with deep embossed detail (it really doesn't show up nearly as well as I'd like on the photo) with lots of thick dimension from the felt.


For the rest of the elements of my card I took inspiration from the pretty cherry blossom flowers on top of the petits fours - I stamped the cherry blossom twig from the delightful Happy Everything stamp set from Clearly Besottted and embossed it with white EP and then coloured it with watercolour pencils and a waterbrush adding a gentle blue highlight around with a broken china distress marker.  I fussy cut it leaving a border and mounted it over my felt oval.

I brought in the darker pink from the flowers for the background to my sentiment which is also from Clearly Besotted, this time the newly released Just Fabulous set.  I then made one large pink petits four as a pink mat behind the oval and mounted onto a small square card.  This is one of my favourite recent makes - much more girly than my normal style but really pretty.

I'm also going to link it up the "just add woodgrain" challenge over at Just Add Ink this week - http://just-add-ink.blogspot.co.uk/2013/05/jai165-just-addwoodgrain.html

It's turning out to be a Clearly Besotted Day - will be back with another post featuring more of their new stamps shortly.


Friday, 10 May 2013

DIY Guy

Punctuality has never been one of my strong points - ask any of my friends - and here I am, almost too late to join the party again with a card based on this week's Retro Sketch which expires in a couple of hours!  http://retrosketches.blogspot.co.uk/2013/05/retrosketches-62.html


I went for a masculine card today, and used my favourite technique again - paper piecing - only this time I did it a little differently as I did both digi and traditional paper piecing using the gorgeous freebie image from Birdie Brown so I'm entering her freebie challenge http://birdiebrown.blogspot.co.uk/2013/05/new-freebie-challenge.html  and as it's paperpieced and for a fella, it's also my entry for Here Come the Boys this week too  http://herecometheboysblogchallenge.blogspot.co.uk/2013/05/challenge-51-paper-piecing.html 


I imported the image into word and copied it 5 times and then imported some digi papers to the same document and layered them behind the images so that I had one sheet with all the papers I wanted to piece together plus one plain base image.  I coloured the face and skin with copics and then went about fussy cutting all the other pieces and layering them up on the base image.

To match the sketch I added a rectangle of paper from the bargain 12 x 12 packs I picked up recently at TK Maxx and tied a piece of twine with a pair of plyers (a metal charm) hanging off and finished with a simple masculine sentiment banner using the very useful Essential Messages stamp set from Hero Arts - I use this simple Happy Birthday lots on masculine cards as I like the plain lines of it.


Thursday, 9 May 2013

Down on the farm

You've probably heard me mention how much I love paper-piecing as a technique - I love getting my sharp scissors out and even holding tiny bits of paper with tweezers to allow for all that fussy cutting - so naturally, I had to piece one of my There She Goes stamps this week to join in their paper piecing challenge http://tsgclearstamps.blogspot.co.uk/2013/05/tsg206-paper-piecing.html


I selected the lovely farmer's wife from Oh Crop and decided to try and use the pretty colours from this week's ColourQ to direct my piecing choices.  http://colourq.blogspot.co.uk/2013/05/colourq-challenge-188.html   For the layout I went with this week's Freshly Made Sketch  http://freshlymadesketches.blogspot.co.uk/2013/05/freshly-made-sketches-85-sketch-by.html


I picked some papers that matched 3 of the colours and then stamped my sentiment in the paler pink colour.  I used a background from the same stamp set to add some interest behind the main focal element using the top line of it as my straight line on the sketch.  I left that as an outline - can't decide if I like it or not really but hey ho.


Wednesday, 8 May 2013

Foodie Gift Tag

I don't often make gift tags - not sure why - it just never seems to occur to me.   However it just so happened that I had a small cookbook I was passing to a friend as a gift today and I saw that Kath is running a gift tag challenge over on the Moxie Fab world to promote the Cards and Gifts Special issue of Paper Crafts Magazine so I thought I'd make a tag for the book and join in. http://www.moxiefabworld.com/2013/05/350-cards-gifts-week-gift-tag-challenge.html


I used my new and VERY handy set of baking related stamps from Wplus9 and stamped a selection of images from the set in browns, blue and black as the gift is for a guy so the tag needed to be masculine (I don't think he spotted the flower on the dish "wink")


Tuesday, 7 May 2013

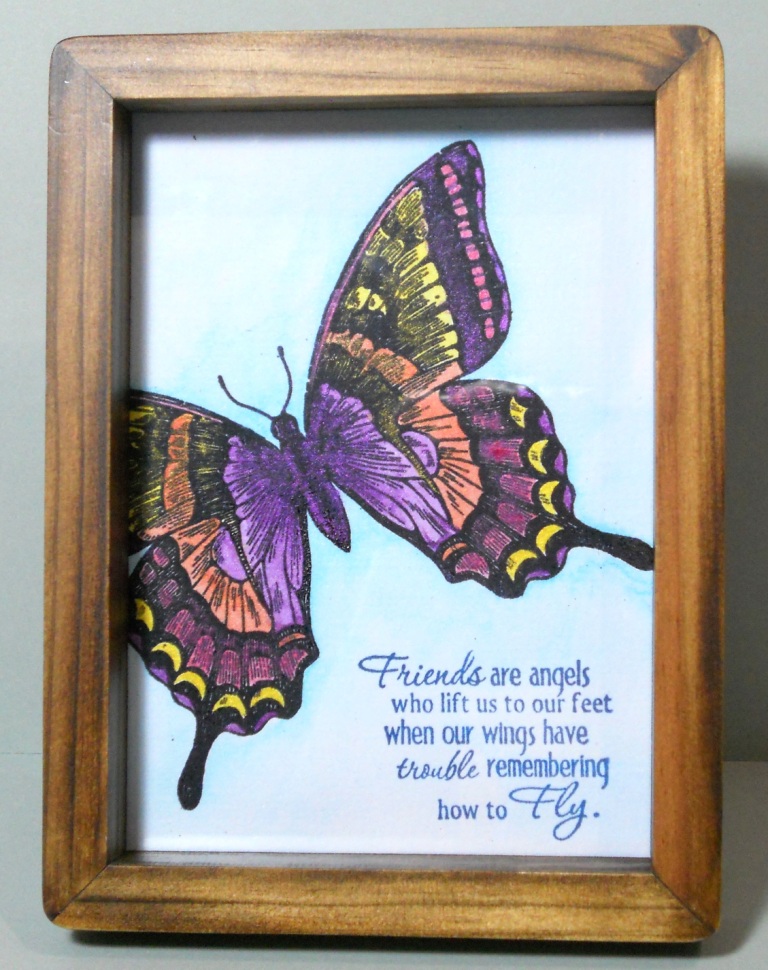
Watercolour wings

This is my 3rd attempt at making this little piece of art - I had to experiment with different watercolour papers until I found one that was smooth enough to bring out the detail of the swallowtail when embossed, but also thick enough to take the water for my luminarte paints.


I actually ended up using the back of the watercolour paper but the embossing still sank into a little more than I wanted but all the lovely detailed lines are still showing.  I then used shades of purples, pink, orange and yellow luminarte shimmer watercolours on the swallowtail and once that was dry I used the lovely soft blue called "northern lights" to create a background that gently faded away the further you get away form the butterfly.  Rather than making this into a card, I wanted to frame it, so I went with a sentiment that was everyday but uplifting.

I am going to enter it into the following challenges:

Moxie Fab's watercolour challenge - http://www.moxiefabworld.com/2013/04/the-wonder-of-watercolor-challenge.html

and Make it Mondays anything that flies challenge - http://mimchallegeblog.blogspot.co.uk/2013/05/anything-that-flies.html

and the Gift challenge Kath is running to celebrate the Special Edition of Paper Crafts "350 Cards and Gifts" http://www.moxiefabworld.com/2013/05/350-cards-gifts-week-gift-challenge.html

Sunday, 5 May 2013

Colour Wheel

This week's challenge at Less is More is to use opposite colours on the colour wheel http://simplylessismoore.blogspot.co.uk/2013/05/week-118-colour.html

I didn't get time to take part yesterday as I was out in Leeds for the day with my friend - 8 hours of shopping and we barely bought a thing (not enough craft shops for my liking lol!)  So now I'm playing catch up and I went with yellow and violet - so NOT my go to colours, but I love the results which is why I love these challenges as they make you make cards you'd never create alone.


I used a freebie set from PTI ink and stamped the sunburst shaped flowers in dandelion and grape momento inks.  The sentiment is from another PTI set stamped in grape also.  I finished with a purple gem in each centre and a matching purple mat to make it all pop.

Time for dinner, then back to browse this weeks entrants.


Friday, 3 May 2013

Fresh Baked

I've been having a little play with some new stamps from WPlus9 - I fell in love with both sets the second I saw them.  I was lucky to win a challenge so got them shipped from the USA, but they will no doubt be in stock soon at Make the Day Special.  I used them to make a simple card for this weeks
 CASe this sketch challenge.


I used the quilt stamp set to stamp the band on the sketch with vibrant red and orange gingham.  I used a tag die to create a little shelf and heat embossed a sentiment onto it.  I then stamped the crock pot from the Fresh Baked set onto a piece of kraft cut with the matching die - I cut 4 more die cuts and layered them up for dimension and after colouring the little flower with pencils I covered the whole front with glossy accents.

Here's a link to the challenge and the sketch to follow - http://casethissketch.blogspot.co.uk/2013/05/case-this-sketch-26.htm

Time for a bath now - early start tomorrow as my friend and I are off to check out the new shopping centre in Leeds - we're long overdue a shopping trip so Leeds, you have been warned......

Wednesday, 1 May 2013

His and Hers

I'm behind on this week's lessons already and there are so many brilliant videos that there are a lot of homework options to choose from so I'm even further behind on that!

It looks like I'm favouring Jennifer - it's just the way it went - I do want to do some of the other techniques I just happened to do these two first!


I really liked this stamping below the line idea and for my HIS I used Elzybells Floral Ferver leaves, a hero arts sentiment and some black pearl dots.  I double stamped in neon green and chocolate inks.  For my HERS version I used stitched flowers and stitched sentiments from the Crafts Meow with copic colouring.


Whilst I had the leaves stamps out I used a single one to have a go at the kaleidoscope technique but I just did the HIS version - you know me by now I LOVE kraft card!  I used white pearl, soft grey and teal inks only and instead of background stamping I used my new SU woodgrain folder for some embossed detail instead.  The sentiment is from hero arts embossed on vellum and folded aruond the card with a teal matt behind to make it pop.


Tuesday, 30 April 2013

CASology Care

The cue word at CASology this week is care - http://casology.blogspot.co.uk/2013/04/week-42-care.html  which was perfect for me as one of my husband's friends has just had surgery and he wanted a card to send to him.  They are all fans of comic books (my hubby works in a comic store) so I decided to go for something with a little humour and this is what I came up with.


I used the little robot from There She Goes, coloured with copics then fussy cut and finished with some googly eyes.  I created the EKG border with my cameo and cut it from lime green card and popped the robot on top.  The three sentiments are all from the same stamp set.

Hopefully it will raise a smile but not a laugh as that might pull his stitches!


Sunday, 28 April 2013

True North

Really quick post tonight as I have just minutes to get this entered into the anything goes challenge this fortnight at Cards for Men  http://cardsformen.blogspot.co.uk/2013/04/challenge-8-anything-goes.html


I used a couple of Avery Elle sets which are now much easier to get hold of in the UK as Make the Day Special stock them (but I think these particular ones are currently out of stock)  I paper pieced the cute little sail boat from "Knotty" and added it onto waves made with the background border from "fanfare".  Finished with a sentiment from knotty stamped over the compass from the same set.  I added red glitter with a sakura gel pen to the heart on the boat and compass to draw attention to it.

I am going to give this one to my DH who is having a rough time at work just to remind him that we'll always be OK as long as we sail our boat together.


Saturday, 27 April 2013

Dad's mustache

The sketch at this week's Less is More was a gift this morning as it let me use my new Waltzingmouse stamps which I'd been playing with last night so were still on my desk http://simplylessismoore.blogspot.co.uk/2013/04/week-117-sketch.html


I used the same frame from last night from My Kind of Guy as it's the perfect shape for the main element in Jen's sketch - stamped on kraft with soft granite HA shadow ink and then cut with the matching cut file on my cameo.  Whilst I had the cameo on, I cut a big fat moustache from black card to replace the sentiment strip and then I stamped one of the smaller sentiments from the new Man of the Hour stamp set.  My Dad is sadly no longer with us, but I couldn't resist this set as the sentiments are just gorgeous - I'm sure I'll find some friends who need father's day cards!


Friday, 26 April 2013

Giggle Goggles

We did a bit of a move around in the office yesterday and after filling 27 sacks with confidential waste I had a very sore back so I've been laid flat out for most of the day.  I managed a little play tonight for a couple of challenges. 


I combined the sketch for this weeks There She Goes challenge with the cue word of "Giggle" at CASology as I have lots of TSG's humorous stamp sets so it seemed a natural fit. 
http://tsgclearstamps.blogspot.co.uk/2013/04/tsg204-sketch-challenge.html  and  http://casology.blogspot.co.uk/2013/04/week-41-giggle.html


I opted for the Cutie Pi set and with a little masking and come pencil colouring had a quick and easy one layer card but still with the overall layout of the sketch.  This set appeals to the Big Bang Theory fan in me ;-)

I also wanted to ink up my new Waltzingmouse stamps and think there is some humour in this card too - more grown up and Mad Men style than the first card.


I used the square frame with grey, brown and black inks to create my backgound, added a strip of DP (Fancy Pants Swagger) and then inked up the circular frame around the "faceless-face" which I love.  I finished with a sentiment from the set in a speech bubble die (clearly besotted)

Thursday, 25 April 2013

Tilted!

This month's PTI Blog Hop required designs to be tilted, and I thought it was a perfect opportunity to play with Quilled Elegance as I fell in love with that set as soon as I saw it but haven't played with it nearly enough yet.  http://nicholeheady.typepad.com/capture_the_moment/2013/04/april-2013-blog-hop.html


I wanted to colour it with shimmer paints (luminarte) so started in the centres with a spiced red, then pumkin orange, and a bright yellow, with just a little hint of lime green - it ended up looking quite psychadelic (not my original intention but I really like the finished result!)   I used peart tart ink for the sentiment to bring the green in a little more.  I think I might add a few little green gems too to match the shimmer (honestly it shimmers lots but I just can't get it to photograph!) - or perhaps its better as a flat card for mailing.  What do you reckon?  Bling or no bling?  Yeah, Shakesapeare got it wrong - THAT really is the question ;-)

As this is a CAS one layer card - it's also my entry for this week's Paper Players Challenge http://thepaperplayers.blogspot.co.uk/2013/04/paper-players-challenge-142.html


Wednesday, 24 April 2013

Waltzingmouse Flower Show

Claire came up with a brilliant idea following this month's fabulous new Waltzingmouse Stamps release of continuing the floral theme from this months Blog waltz into a CASE competition http://waltzingmouse.blogspot.co.uk/2013/04/flower-show-case-comp-open.html

Me being me, I couldn't choose one card to CASE from the delightful array on offer from the special flower show team, so I decided to combine elements from two designers into one card.

I CASEd Aneta's background and layout and added Kimberley's big flower and glossy leaves:


and after 2 attempts and a recycling bin full of failed scraps,  (all I can say is that the lovely delicate border from Nordic Winter is not a pretty alternative to stitching when stamped in thick black over all the edges of your DP!  One of these days I'll remember to test stamp on something other than the original.....) I came up with this which is perfectly timed for my Mum's birthday tomorrow:


I started with the lovely digi papers Claire released to match the Folk Art Flower sets and printed off an A4 version in 4 colours.  Now this is where I went slightly off-piste with Aneta's card and why my first went in the bin.  I have a symmetry OCD and whilst I didn't spot it on the original, when I placed my pieces on the card I noticed that the sides didn't match - it freaked me out and I just couldn't handle it.  So I printed more (the beauty of digis you never run out!) and this time I added an extra "triangle" to the middle so I could have perfect vertical symmetry and everything became right with the world again (until I screwed it up with thick black yucky lines....)   So for attempt number 3, I took the little stamp from Classic Oval Frames and stamped and embossed it in white where the DP's joined to give me the feel of stitching from Aneta's card - much better than the yucky black!  Here's a close up so you can see how it adds such a pretty soft detail:


I cut a doily from white vellum with my cameo and then set about cutting a couple of different 3D flowers from shades of pink and orange paper again on the cameo - layered up with a brad fixing which is covered with a big blob of stickles.  For the leaves I used the cameo again with the folk art cut files (which are free btw - Claire is just too generous!) and I cut 5 of the largest leaves and stamped and embossed them with shimmer EP (WOW) and then I decided I needed a couple of larger leaves at the top so I resized the cut file a little and cut two and just covered the whole thing with shimmer to match the stamping on the small ones.

I used a banner die (Simon Says Stamps) with kraft card and stamped the Happy Birthday from what is probably my most used stamp set of all time from any company as it's just packed with useful sentiments - the Frame It set stamped in a soft chalky blue to match the background.  Finally finished by stamping MUM on a curve in grey using Wooden Heart Alphabet.

Mum doesn't know what a blog is, she doesn't own a computer, so there is no fear posting it before the day that she'll see it.  I know she's going to love it though as she adores flowers of any variety.

As it's definately on a floral theme, I'm also going to enter it to the current flowers theme over at Let's Craft and Create http://letscreatechallenges.blogspot.co.uk/2013/04/challenge-68-flowers.html and the Passion for Flowers challenge over at Allsorts Challenge http://allsortschallenge.blogspot.co.uk/2013/04/week-203-passion-for-flowers.html 

Monday, 22 April 2013

Kraken' Birthday

I hope children won't be scared of the big sea monster on my card today - whilst I've gone punny with a Kraken for my sentiment, I think he's a pretty friendly looking sea monster and therefore appropriate for a childs card and this week's Daring Cardmakers dare http://daringcardmakers.blogspot.co.uk/2013/04/childs-play.html


The sentiment is computer generate and then the rest of the card is made from one of the really fun XCut Build a Scene die sets from DoCrafts - paper piecing all those suckers in his tentacles took a while even though I did it using sticky card stock for speed!   (and yes there are 2 tentacles missing - I used artist licence when I was loosing the will to live with all the little pieces and decided 6 were sufficient!!!)


Saturday, 20 April 2013

Words, Numbers and Paperpiecing

I have a couple of cards this morning for three different challenges.

The first is my last minute attempt at this week's CASology cue word which trickily was just "word" this week!  I've really been struggling to come up with an interesting idea until I saw the new Keep It Simple challenge which is numbers and finally an idea for a word came to mind....


I love scrabble - so the idea of using letter tiles for my "word" was obvious once it finally came to me!  The choice of word was obvious too - I wanted it to be really simple - nothing but the word on the card and as the song goes "all you need is LOVE"   I used the print and cut function on my cameo to create the scrabble tiles on cream card, stacking each tile 4 thick to create dimension.  I covered the top of each with glossy accents and rounded the corners of the base card to match the tiles.

http://casology.blogspot.co.uk/2013/04/week-40-word.html

http://kis-challenge.blogspot.co.uk/2013/04/kis-12-3-2-1.html

I also wanted to play with some new stamps I got this week - I saw them on a blog and had to hunt them down as their humour really appealed to me!  I inked up one and used it as another opportunity to play with one of my favourite techniques - paper-piecing which is the challenge at The Pink Elephant this week.


The background "flash" was cut on my cameo and I used lots of scraps from my snippets box to do the paperpiecing of the lovely ladies so I'll enter this to Di's weekly snippets challenge too http://pixiescraftyworkshop.blogspot.co.uk/2013/04/pixies-crafty-snippets-playground-week_15.html
I used copics to colour the skin and hair and then simply fussy cut leaving a little border before mounting on the flash background and stamping one of the sentiments from the set using versafine.

http://thepinkelephantchallenge.blogspot.co.uk/2013/04/the-pink-elephant-challenge-tpe195.html

Friday, 19 April 2013

CASual Birthday

One of my best friends turns 40 tomorrow and as such this suitably sparkling number is currently winging its way down south courtesy of the Royal Mail....


I followed a similar theme to my 18th card but went for a more "Dioresque" quilted background rather than stamped facebook sentiments ;-)  Simple tools - just the cameo, tweezers and pinflair glue for all those lovely shimmering sequins.   Teal and gold - very classy - here's hoping that she gets a classy day out to go with it (her husband is taking her on a magical mystery tour and won't tell us where!)  

I'm entereing this into this week's CASual Friday challenge which is a birthday project http://cas-ualfridays.blogspot.co.uk/2013/04/cfc99.html


Wednesday, 17 April 2013

Waltzing through the spring flowers

Well it seems as is Spring is finally arriving here in the north of England, although, as the old saying goes "n'er cast a clout til May is out" so I'm not holding my breath for sunshine just yet!  If you're interested in sayings and are unsure what this one means, I've done some research as I was never sure myself despite it being told to me often as a child.  As best as I can tell, it refers to hobnail boots which were worn in the winter and clouts were the nails used to hold them together so the idea is that you wouldn't get rid of any nails until the end of May in case you had to repair your boots as the bad weather could still return until then.  OK enough dodgy linguistics, on with what you came for - some Waltzingmouse eye candy!  http://waltzingmouse.blogspot.co.uk/2013/04/april-waltzingmouse-stamps-blog.html


I used the seed packet from Vintage Garden Seed Packet and stamped onto kraft and fussy cut and then I decided I wanted a huge flower to burst out of it so I cut a 3D flower on my cameo and layered it up.  The orange centre is a quilled fringe.  I added some swirly leaves using a die (i forget the brand - they're purple if that helps!)  I then added some DP on the diagonal and stamped the word "flowers" from the seed packet set repeatedly along a strip of the paper I made the flower from.  As I gave this card to my Aunt at the beginning of the month, I pulled out my favourite sentiments from the most useful set ever Compact Family to create the perfect greeting stamped in Rhubarb Stalk ink to match the flower.

I'm also going to enter this into the Creative Card Crew's challenge this week which is to make your own flower http://creativecardcrew.blogspot.co.uk/2013/04/challenge-34-handmade-flowers.html 

Tuesday, 16 April 2013

Gift Voucher

Something a little different today - not quite a card - although from first glance I guess it could look like one from the photo!


It is actually a gift voucher for my Mum for her birthday next week but I've already given it her so it's safe to blog.  Now in her 70s she doesn't get out much - I do her shopping each week on a Sunday but that meant she was missing out on a days worth of TV listings which start in the UK on a Saturday.  So, lacking any bright ideas for a gift, I've subscribed to the TV times for her and her first issue arrives today (hence giving her the voucher this morning.

I used my favourite Paper Smooches set - Boob Tubes - which was the first set I bought from them - love the vintage TVs which are really useful for masculine cards normally but fit the gift perfectly here.  I paper pieced the 4 different sets with scraps of DP from my snippets box before colouring the screens with a grey copic and stamping some of the sentiments from the set (the ! is the i turned upside down incidentally)  I matted it onto a piece of kraft so the copics didn't show through and so I could put a poem on the back explaining the gift (I'll not share that as Pam Ayres I'm not!)

I'm linking it up to this week's Paper Piecing Challenge over at The Pink Elephant http://thepinkelephantchallenge.blogspot.co.uk/2013/04/the-pink-elephant-challenge-tpe195.html


Sunday, 14 April 2013

Marvellous Magnolias


This week's Tuesday Trigger over in the Moxie Fab World really caught my attention so I thought I'd play along and I've just about managed to get my entry in before the deadline http://www.moxiefabworld.com/2013/04/tuesday-trigger-magical-magnolias.html


Now you might well be looking at my card and wondering what the hell it has to do with Magnolias!  Well we've been watching a TV show recently with Keifer Sutherland called "Touch" and in it his son has the ability to see the mathematical in the world around us and I'm learning, even though though I'm a math-o-phobe, just how much maths there is in the natural world.   So I saw the pattern in the branches and interpreted that into the fretwork white frame which I cut on my cameo, and I took the colours in the flowers and pieced the pattern back into the frame (I cut it 3 times from different card stocks).  To add the hint of orange in the petals, I turned to my go to embellishment of the moment - are you fed up of sequins yet?  I hope not as I have LOTS of them to get through!!!

So that's how I saw the trigger image - hope you see I'm not so crazy now.......


Saturday, 13 April 2013

More Film Inspiration

I said I'd try and come up with something a bit less obvious for this week's LIM film inspiration challenge and Gillian's Monster's Inc card (No 5 in the gallery) lead me down the Pixar path - we LOVE all the pixar movies in our house but our favourite has to be "UP" and my first card is quite a literal translation for a scene from the film.


I used a house stamp from Maya Road and then masked a balloon from Mama Elephant repeatedly and "tied" them all to the roof, just like Carl does in the film, only I just had to use a pen ;-)   The house is brightly coloured just like in the film.  I thought the sentiment also from Mama Elephant Good Times was perfect as it really summed up the theme of the movie.


This one might not be quite so obvious - it's a little bull from Mama Elephant's Cosmic Stars set and IRL I've coloured him red but it looks brown in the photo.  The idea of the red was to make him angry which should give you a clue to the film.............     Raging Bull of course!

My final card is also my entry to CASology this week where the trigger word is "Travel"  http://casology.blogspot.co.uk/2013/04/week-39-travel.html


I was inspired by Blue Thunder - a film from the 80's which centres around a helicopter.  I went with a blue base (made more sense than having a blue helicopter on a different coloured sky!) and cut a mat with a circular cut out to create a circular slider card and added a helicopter (Clearly Besotted's Going Places).  I stuck 2 x 5 pence pieces behind the helicopter separated with a round foam pad so that the helicopter to can fly in circles around the card.  The sentiment is from the same stamp set.  I coloured the helicopter with copics and fussy cut.  Very CAS but cute and fun (unlike the film that inspired it!)

I think that's all my film inspiration exhausted now.


Aliens

The theme this week at Less is More is to be inspired by a film - my title gives mine away but don't fear - no face huggers here - just some cute green critters!  http://simplylessismoore.blogspot.co.uk/2013/04/one-layer-week-115.html


He's from the There She Goes "Out of this World" set and I just masked the central one and stamped a couple of buddies to either side.  Cos it's one layer week, I had to skip my normal copic colouring medium as it shows on the inside and that bugs me, so I went with polychormos pencils and blending solution instead.  The dots are from a sakura glitter pen.  The sentiment is from the same set and, although it doesn't snow so clearly in the photo, is stamped with an appropriately Alien looking neon green ink (Hero Arts)

I might have another go at this challenge late as I'm sure I can come up with something a bit more obscure but this was my first thought this morning.  Off to the craft shop first though so I'll catch you later.


Blogging tips