Thursday, 11 April 2013
Say Cheese!
I'm combining a couple of my favourite challenges tonight - this really fun and funky sketch from CASe this sketch http://casethissketch.blogspot.co.uk/2013/04/case-this-sketch-23.html was the perfect jumping off point for me to work out how to tackle this weeks colour combo over at There She Goes stamps http://tsgclearstamps.blogspot.co.uk/2013/04/tsg202-color-challenge.html
I paper pieced the fun camera from their superb "Oh Snap" set with 2 shades of yellow and some DP - all from my scrap drawer so I'll link it up to Di's Sunday Snippets challenge too - been ages since I made it into the playground. I added a little glitter for the flash and some liquid black pearl from the lens.
I die cut a film strip (MFT die) from some blue card and backed it with a little blue vellum and stamped the Say cheese! sentiment from the same set over the top and finished with 3 yellow sequins just because I can't get enough of them and bought a stupid amount of colours!
Status Update: 18 today
We had an 18th Birthday in the family this week and now the card is open I'm safe to blog it. I had such fun making this card - lots of bling but still very masculine and very trendy with all the facebook like words and icons.
I used the brilliant set from Mama Elephant plus one stamp (status update) from Sn@p and just blue and grey ink. Drawing some feint pencil lines helped get the sentiments all lined up nicely. The 18 was cut with my cameo and then I used pinflair gel to cover the area under the negative die cut and lined up the black sequins in rows (painfully slow but worth the effort for the finished effect)
As I had stamped the sentiments to form a background over the die cut, I'm going to enter it into the stamp your own background challenge at Make My Monday this week http://mimchallegeblog.blogspot.co.uk/2013/04/create-your-own-background.html
Wednesday, 10 April 2013
CASEing JJ
It's very late (or early in the morning depending on how you look at things) and I should be asleep but just before I was about to go to bed I spotted that the deadline for CASE study will close before I get up - so - I'm still up and playing. I just loved this technique on JJ Bolton's brilliant card and really wanted to try it. http://casestudychallenge.blogspot.com.au/2013/04/case-study-challenge-135.html
I used the new Folk Art Medallion stamp set from Waltzingmouse and stamped the floral element in orange soda and butter bar ink (HA) and then added a leaf in pistachio (Memento) Rather than letters I chose to die cut a couple of butterflies (Clearly Besotted Dies) and I finished with a sentiment from Frame It (Waltzingmouse)
The orange, yellows and greens remind me or Narcissus so I'm also going to enter it into this week's Pink Elephant challenge which is all about Spring Colours http://thepinkelephantchallenge.blogspot.co.uk/2013/04/the-pink-elephant-challenge-tpe194.html
Night all.........
Tuesday, 9 April 2013
Cat in a Box
I got a delivery from Simon Says yesterday and I managed to finish a card with it tonight so I'm just about in time to link up to their Happy Birthday challenge before it closes in a few hours http://simonsaysstampschallenge.blogspot.co.uk/2013/04/simon-says-happy-birthday.html
I used their exclusive Furry Cat & Box stamp which I just adore so I used it to create both my background and the focal image. I paperpieced the box from a sheet of wood veneer paper (designed for dolls houses I think) and then coloured the cat with copics and added him over the top. The DP oval is BG Kneehighs. Sentiment from same set.
Monday, 8 April 2013
A new surface to stamp on
Thanks to browsing Kristina Werner's "other" blog I've discovered konad nail stamping and now I have 20 new surfaces to stamp on! This is my 3rd attempt and it's surprisingly easy to do even with your non dominant hand.
I've never been able to grow my nails long enough to paint - it seems to be the one good side effect to my drug so nice to have a bit of a silver lining! I've got 20 design plates to play with so this could well feature alot round here til I get bored of it!
Saturday, 6 April 2013
Flowers and Feathers
My mojo seems to have gone on strike which is a bit of a bugger as I have lots of cards to make! I had several attempts to make a card for CASual Friday last night with the idea of kissing a chevron stamp to a flower - they are all in the bin and I actually gave up on crafting in favour of housework last night so that might tell you how far my mojo went!
However, I am determined by nature, so I'm back this morning for another go and the black and lime colour combo at Less is More this morning lead me to my black and white chevron washi tape and before I knew it I had something not so terrible that I can post to both challenges - http://cas-ualfridays.blogspot.co.uk/2013/04/cfc97.html and http://simplylessismoore.blogspot.co.uk/2013/04/week-114-colour-challenge.html
I lined up 3 strips of washi tape to make it a continuous chevron pattern and then stamped a sentiment from Clearly Besotted's Frame Sentiment set underneath in pear tart ink. I die cut a flower from lime green felt (IRL it's very close to pear tart in colour but I cannot for the life of me get a good photo of it) and rolled it (think it's an MFT die) and added some die cut leaves using a Wplus9 die. Finished with a simple gem in the middle.
As Stephanie is sponsoring LIM today and I got her new release yesterday, I thought I'd share another card I made - no challenge involved this time I have just been waiting for this set since I saw the sneaks so couldn't wait to play with it.
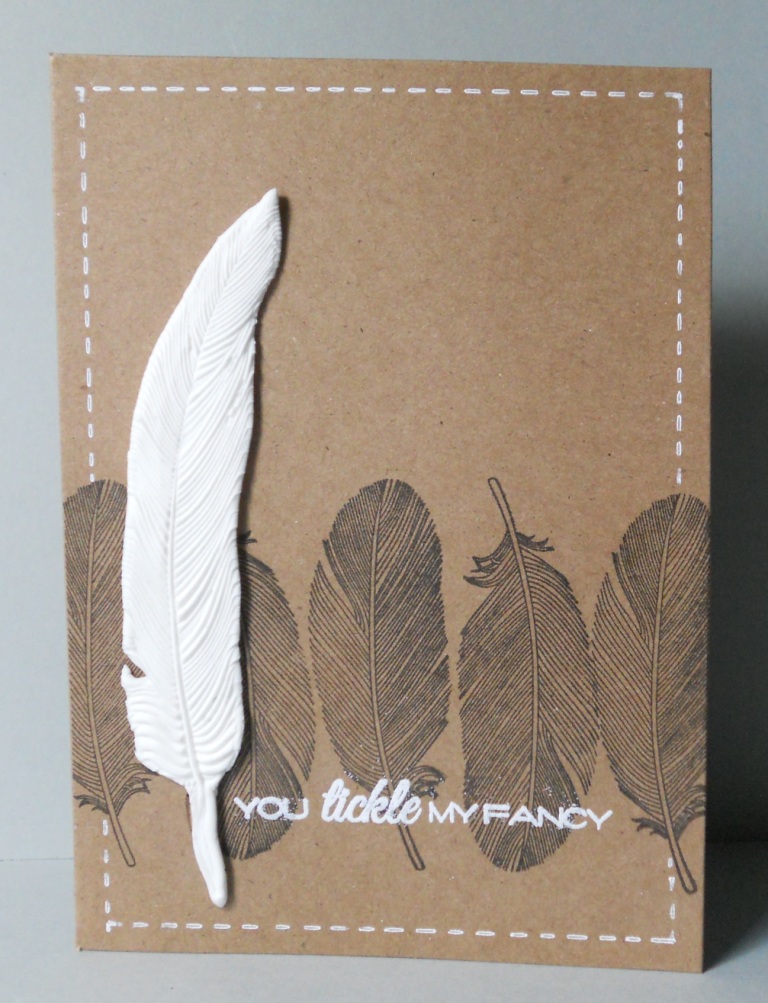
I started with the largest feather in the set and stamped it into some cloud clay which I rolled out - if you haven't discovered cloud clay it's amazing air dry clay that is super light so perfect for using on cards. If you ink your stamps with versamark you can stamp into the clay and your stamps don't get stuck. I let the clay dry a little and then simply trimmed the feather with scissors. I then stamped another feather in versamark to capture all the lovely detail top to toe to form a border across the kraft card base. Once fully dry, I heat embossed one of the fabby sentiments from the set in white to match the clay feather, drew some white lines to frame it all and stuck the clay feather over the top with pinflair glue.
Friday, 5 April 2013
What's your sign?
As soon as I saw the really cute star sign stamp set from Mama Elephant I knew I had to have it so despite the astronomical import duty I ordered directly from the USA and I've finally got around to playing with it for their recent sketch challenge http://www.mamaelephantblog.com/2013/04/me-sketch-challenge-03-41-414.html
I drew a feint pencil circle on the corner of my white card stock to replicate the doily in the sketch and then aligned 3 chronological signs along it (Taurus, Gemini, Cancer) and coloured them with copics. I added some strips of card and DP and stamped the sentiment on the same DP rounding the edge with scissors. I finished with 3 sequin stars in gold and silver.
Thursday, 4 April 2013
There She Goes Spotlight :-)
Well was I blown away today or what? Seeing my name pop up as being in the trendsetting spotlight over at There She Goes Stamps in my news feed was a very pleasant surprise indeed http://tsgclearstamps.blogspot.co.uk/2013/04/trendsetting-spotlight-tara-caldwell.html
So I thought the best way to celebrate was by getting my entry to their challenge this week finished and up on my blog and this week the challenge is to make it masculine http://tsgclearstamps.blogspot.co.uk/2013/04/tsg201-masculine.html and I knew exactly which set I wanted to play with ;-)
I coloured up the cute donkey from Donkey University with copics and selected the stud muffin sentiment for his t-shirt and fussy cut him out. I thought with his pointy ears he looked a little like a tag shape so decided to use the sketch from CASE this sketch this week for my layout. http://casethissketch.blogspot.co.uk/2013/04/case-this-sketch-22.html
The moustache DP is from the swagger paper pad from fancy pants which is just perfect for masculine cards as its full of strong masculine patterns, hats, ties, shoes and all things manly. The additional sentiment is from TSG's other donkey set "Ba Donkey Donk".
Krafty Bird Sketches
I really liked the panels in the sketch at Retro Sketches this week so thought I'd play along with some of my new goodies http://retrosketches.blogspot.co.uk/2013/03/retrosketches-57.html
I knew I wanted to use one of my new bird paperclips from Prima so used that as a starting point and then selected some paper and washi tape to go with my craft card base and decided to echo the birds by stamping on the DP using Stampin Up's "For the Birds" set which were coloured with pencils. The sentiment under the paperclip is also from that set and normally runs in a line under the birds on the wire but I inked and stamped it into a 2 line sentiment to fill the empty space under my clip. Finished with a little twine and a button.
There are a number of "kraft" challenges out there this week - my favourite base card - so I'm linking this card up as follows:
http://cupcakecraftchallenges.blogspot.de/2013/04/cupcake-236-get-your-kraft-on.html
http://abc-challenge.blogspot.co.uk/2013/04/k-for-kraft-1st-april.html
http://movingalongwiththetimes.blogspot.co.uk/2013/04/lets-get-krafty.html
Wednesday, 3 April 2013
What goes up?
This week's cue word at CASology is "UP" which initially made me think of the Pixar movie as it's one of our faves (we have no kids but we love animation) but it had already been done by the DT so I had a rethink. http://casology.blogspot.co.uk/2013/04/week-38-up.html
I thought I could play with a sentiment from PTI that included "up" and mixed in some chevrons pointing upwards using the colours from this weeks' ColourQ http://colourq.blogspot.co.uk/2013/04/colourq-challenge-183.html
The chevrons are from My Favourite Things Document It and the sentiment is from Movers and Shakers and the answer (not shown but on the inside) says ... Your Age! Happy Birthday. I finished with a triangle of sequins in the same colours as the chevrons (the yellow one looks a bit orange in this shot)
I'm also going to enter this into Make My Monday's One Layer CAS challenge http://mimchallegeblog.blogspot.co.uk/2013/04/cas-one-layer-card.html, addicted to stamps CAS challenge http://addictedtostamps-challenge.blogspot.co.uk/2013/04/challenge-39-addicted-to-cas.html
and Ardyth's threesome challenge for One Layer Wednesday http://ardythpr.blogspot.co.uk/2013/04/olw134-threesome.html (3 x 3 chevrons in 3 colours, plus 3 sequins)
Saturday, 30 March 2013
Scalloped Sequins
Hope everyone is having a lovely Easter and enjoying the long weekend. Now I've got the shopping done I'm giving myself a little play time with Less Is More and the challenge this week is to feature scallops http://simplylessismoore.blogspot.co.uk/2013/03/lucky-dip-use-scallops.html
I immediately saw this challenge as another opportunity to play with my favourite embellishment of the moment - sequins! I stamped a fancy frame from Maya Road onto thick card in pool party ink and masked the edge so I could stamp the girl from TSG's "Egg-stra special" set into it. I coloured her with copics in teals to match my sequins and added a sentiment from the Maya Road set. Once dry I turned it over and stuck extra strong d/s tape around the edge and then carefully placed sequins evenly around to create my scalloped border. I added a couple of strips of matching washi tape down the edge of the card and then used pinflair glue to mount the sequin framed panel as pinflair glue behind the sequins helps to keep them in place and it gives a little dimension to the design.
Friday, 29 March 2013
Easter Butterfly
This week's CASual Friday challenge is to make something for Easter but NOT a card so I thought I'd enter one of the butterflies I've made as Easter gifts this year. http://cas-ualfridays.blogspot.co.uk/2013/03/cfc96.html I spotted them on pinterest a few weeks back but as I needed to make lots of gifts for boys, I tried to give them a masculine feel with darker colours and an added moustache!
I filled a 3 x 5 inch card bag with skittles but leaving a finger width gap at the top and sealed the open end. I pinched the middle to form the wings and wrapped a pipe cleaner around to hold it firm and taught with 2 twists so there was enough left over to form the antenna. The body is a clothes peg, covered with washi tape and a couple of googly eyes secured with glossy accents. The moustache comes from the Crafts Meow "Fun(tache)tic" set - stamped onto card and fussy cut and again secured with glossy accents. Very quick and easy to make but bright and cheery and lots of fun.
Thursday, 28 March 2013
Runway Inspired
I look at every Runway Inspired challenge but quite often I find it hard to be inspired by the outfits but I browsed this one over lunch and was immediately hit smack in the face with an idea so I came home and had a play after dinner. http://runwayinspired.blogspot.co.uk/2013/03/ric32-moschino-cheap-and-chic.html
It's a top fold black card and I stamped and clear embossed the lines using my big Impression Obsession Random Lines stamp. I mounted some more black card stock onto some plain chipboard to give a little dimension and added Hi! which was die cut using an old sizzix alphabet from silver glitter sticky vinyl. I added a silver dotted border to provide some extra definition and picking up the details from the boots. I used hot pink sequins to suggest the skirt. I think it's quite a striking card and am really pleased with it unlike everything else I tried to make tonight which ended up in the bin!
Milk it!
The challenge at There She Goes Stamps this week is a lovely sketch http://tsgclearstamps.blogspot.co.uk/2013/03/tsg200-sketch-challenge.html
I flipped it on it's side, dug out the "Oh Crop" set and came up with this punny little number ;-)
I stamped the adorable little cow image onto copic colouring card (I use a coated cardstock from Rymans) and coloured with warm greys and bisque and then fussy cut her out. The DP circles were cut from a double-sided 6x6 sheet from Papermania Happy Days pad - I love the vintage tins. I used some lovely washi tape to create a border around my kraft base by simply folding it in half over the edge. I added a sentiment made up of half a sentiment from the Ninja set and the really funny milk it sentiment from Oh crop. I finished with a few milk bottles stamped on white and fussy cut to emphasise the sentiment. I do love the punny and interesting sentiments TSG always include with their sets - great to mix and match with too.
Wednesday, 27 March 2013
MUSE
This week's MUSE over at the Muse Card Club is Ardyth and I love her style - fun, funky, CAS, often quirky and always interesting. http://musecardclub.blogspot.co.uk/2013/03/muse-challenge-10.html So I knew that I'd have to play along in the challenge this week and see if I could replicate her style.
I loved the rainbow of colour on the black background so chose to replicate those elements from the card, changing the shape and the swapping the circles for butterflies.
I masked off an area on the white card stock with washi tape and stamped 4 butterflies from Clearly Besotted's Butterfly Wishes Additions in 5 shades of memento ink - I would normally have done this in a standard rainbow pattern but I went for a more random approach following Ardyth's card. I originally intended for all the decoration to be flat but I messed up the embossed sentiment so stuck a strip over the top and embossed it again. I finished with a couple of die cut butterflies over the top using the matching die that you can now get with this set.
Can't wait to see the full gallery this week - should be an interesting one.
Tuesday, 26 March 2013
Chalky Thanks
As I had a chalk board card made but not blogged - I thought I'd link it up to this week's Daring Cardmakers Chalkboard challenge http://daringcardmakers.blogspot.co.uk/2013/03/chalkboard-creations.html. This was actually one of the cards I recently submitted to Paper Crafts Magazine but it was rejected so I am now free to feature it on my blog.
I used what is fast becoming one of my favourite new stamp sets (even if you haven't seen it on my blog before - I've used it for a few card submissions) the beautiful Many Thanks set from Clearly Besotted who are fast becoming one of my favourite stamp brands too - have you seen the sneaky peeks of what's coming? Be still my beating heart :-)
I decided to go for a dark maroon chalk board instead of the normal black and stamped the sentiment twice - firstly in versamark which I then heat embossed in white and then secondly I stamped over the embossed sentiment and just down and to the right with a pearl white ink to create a subtle shadow. I die cut and embossed the sentiment using labels 25 (I think but don't quote me on the number) and used a white pencil to trace the edge and the embossed centre line. I added a few more soft scribbles of pencil and blended them out with a stump to get the chalky effect. I used the same card to create my card base (it's actually a line embossed card so I used the rear for stamping on) and added a layer of DP from MME. I added a layer of blue to match the flowers and cut the end like a banner and stamped half of one of the other sentiments from the same set to the top. I framed this sentiment with a line of twine and a couple of tiny bows and stuck over hearts stamped from the same stamp set which were fussy cut.
Hope you like it more than the editors of the magazine did!
Monday, 25 March 2013
CAS Sequins
I thought I'd play along with the PTI Blog hop today - I never usually manage it - it seems to be over so quick - but today's is all about sequins and I've got tonnes of them so couldn't resist. http://nicholeheady.typepad.com/capture_the_moment/2013/03/march-2013-blog-hop.html
I used the trendy trees stamp and die set and stuck a circle of sequins behind the tree and a matching row behind the grass which a strip of paper embossed with the hessian plate and gently inked to look similar to the pattern on the tree. Very quick and simple and very CAS too so I'm also going ot make it my entry to this week's CAS challenge at the Pink Elephant http://thepinkelephantchallenge.blogspot.co.uk/2013/03/the-pink-elephant-challenge-tpe192.html
Sunday, 24 March 2013
More Homework
Thanks to the unseasonal snowfall in the last 48 hours, I've managed to catch up on all the homework I missed out on for this great class which really has given me a new insight into patterned paper. As I'd very much moved into CAS style card making I thought my patterned paper days were behind me - but oh no!
This first card uses Kristina's for using large patterns - cutting it into strips to divide it up a little. This is a glittered floral sheet from the 8x8 New Leaf pad. I selected a dotted pattern to match one of the flowers and a grey strip to stamp and emboss a hero arts sentiment onto.
This one is based on the brilliant idea by Laura Bassen to stamp strips over die cuts over gently patterned paper. I die cut happy on my cameo and stamped 3 stripes of green over the temporarily adhered letters. Once removed I stamped the "wishing you" which is from a Hero Arts Christmas stamp set and the "birthday" from a PTI set over the top in black.
This one uses Kristina's "rules" of mixing patterns of big + medium + small/solid. This was a light bulb moment for me which made me realise why lots of my previous attempts to mix papers were disastrous! I'm putting this rule on my wall as a permanent reminder......
This one was based on the lesson by the Queen of CAS - Debby Hughes - I loved her card so this is my case of it. I used washi tape as my "paper" here but the principles are the same - I just wanted a multi-stripe and couldn't find a nice bright one in my stash (shopping trip required despite my huge stash of paper - Jennifer did say we had to hoard stripes so that sounds like an order lol!)
This one was actually my first attempt at stamping stripes over die cuts but my colour choices were WAAAAYYYY off. So instead of binning it, I just covered it up, again using the size rules for mixing papers. The floral strip is from my stash box as are the solids. I added a new sentiment from SU - I love their paired sentiments and a striped stamped heart from Clearly Besotted.
Wow - I did make a lot of cards, no wonder the ironing pile is touching the ceiling ;-)
Saturday, 23 March 2013
Anniversary Muse
Sorry I'm back again so quickly but I thought I'd missed the deadline for this week's MUSE challenge and then I popped over to vote and realised it was still open so I managed to make the card I'd planned when I saw it but didn't feel well.
I loved the idea of stamping over stripes, but given the pattern play class I've been playing along with, I decided to use a couple of double-sided papers from First Edition Papers New Leaf 8x8 stack and I thought the colours lent themselves to an anniversary card so I changed the sentiment to suit. I stuck with the idea of a flower though but embossed the big flower from Stampin Up's Betsy's Blossoms set in white and scattered a few pearls around as embellishments. The photo's not great - poor light today with the constant snow, but irl it's really soft and delicate, my favourite make of the day.
Easter is coming?
So, what else to do but stay warm in the craft room and have a good old play :-)
But, regardless of the weather, Easter is coming and I needed some more cards so I used the Monday Mood Board at WPlus9 this week as my inspiration and made a little card.
I used one of their lovely littler banner stamps and inked it simply with yellow and orange ink and used a momento pen to ink the string in between. I then used stamps from the new Good Egg set from Waltzingmouse for the remaining elements of my card with the same inks. Quick one layers ready to repeat in a few colours for all the cards I need to send.
Paper, beads but NO stamps!
I'm playing with paper again today - following Betsy Veldman's tips to create your own floral embellishments from patterned paper. - although I haven't been quite as elaborate as she was with her layers and stitching.
I started with some fussy cutting from a sheet of 8x8 paper from the Citrus Stack from DCWV which has lots of lovely glittered flowers and leaves. I layered them with pinflair glue for dimension and added gems to the centres. I stuck them to a piece of white card embossed with the PTI hessian plate for some subtle texture and then popped leaves cut from the same sheet of paper around the flowers and added some bicone beads to be flower buds. My sentiment is cut using lobster font on my cameo from copic colouring card which I then coloured with cadmium red and chrome orange copics to give a blended look to match the flowers.
I've also added beads to represent buds on my design as my effort for this week's rather tricky challenge at Less is More http://simplylessismoore.blogspot.co.uk/2013/03/week-112-recipe-use-beads.html and as I haven't used a single stamp anywhere it is also my entry to the equally tricky CASual Friday's challenge as well http://cas-ualfridays.blogspot.co.uk/2013/03/cfc95.html
Friday, 22 March 2013
Playing with paper...
I've been watching all the videos for the wonderful Pattern Play Online Card Class all week feeling excited to play with paper but frustrated that I haven't felt well enough to play, only watch, so now I'm finally feeling up to sitting up again I've tried to make up for lost time! I have far tooooo many packs of patterned paper and have been very guilty of not wanting to use them cos once they've been used they're gone but using it not hoarding it was one of my goals for this year so this class was the PERFECT kick in the butt I needed to get started!
I started with something simple - and my favourite thing to do with patterned paper - paper-piecing and I used the cue word "song" at CASology this week as my inspiration for this one http://casology.blogspot.co.uk/2013/03/week-36-song.html
I selected a few co-ordinating scraps from my scrap box and stamped the cassette design from a We R Memory Keepers mini stamp set 4 times and fussy cut them. I arranged them on the bottom of the card and then carefully cut apart the sentiment in the set so I could stamp it more interestingly than just in a straight line. I love this stamp set - reminds me of making tapes from the top 40 in my bedroom in the 80s......
I then skipped straight to today's lesson as I was really taken by the paper quilting technique Kristina taught us - however, I had to have a couple of attempts as I missed a bit of the instructions and didn't get all my pieces in the right direction first time around (still make a cute useable paper though)
I decided to make a belated birthday card for my stash box and went with the super-cute skunk from There She Goes "Scent-sational" set and coloured him with copics. I used a "paws" embossing folder (not sure of the brand sorry) and used a copic to match the background of the sentiment to his paper-pieced tie. I'm going to enter this into this week's anything goes challenge at the TSG blog http://tsgclearstamps.blogspot.co.uk/2013/03/tsg199-anything-goes.html
Given the fact that we're forecast another deluge of snow overnight I should have time to play some more tomorrow.
Sunday, 17 March 2013
Be lucky
It's my favourite day of the month - the 17th - and time to waltz :-) This month's theme is "Luck" - just in time for St Patrick's Day now isn't that lucky ;-) http://waltzingmouse.blogspot.co.uk/2013/03/march-is-lucky-monthso-lets-party.html
I used the gorgeous new folk art frame and embossed it in white onto some watercolour card. I covered the whole thing with lime green luminarte paint and then picked out some leaf and flower details with other shades of the same paints and some stickles. I made my sentiment from Woodenheart Alphabet and then by carefully just inking the b and e from "best" in Compact Sentiments. Some matting and layering and a little gingham to add a bit more green to this party and we're done.
Wishing you all the luck of the Irish - Happy St Patrick's Day!
Saturday, 16 March 2013
Framed Vienna
I'm working on submissions again today - deadline Monday and we're out tonight celebrating my friends 50th again so I've got to start to try to make myself presentable too - which all in all means I shouldn't be playing in this week's LIM challenge yet.......
So here's my framed entry for it! http://simplylessismoore.blogspot.co.uk/2013/03/week-111-theme.html
I used part of one stamp from one of my favourite stamp ranges ever - the Uptown Girls from Stamping Bella and this one is Vienna on her Vespa but I masked off some of the Vespa so I could fit her into a Polaroid style frame (cut on my cameo). She is coloured with copics and then I added the sentiment onto the bottom part of the Polaroid frame. I added a second thin green frame which was again cut on my cameo to add a little more interest to the edge of the card.
It's also my entry into the Anything Goes challenge over on Stamping Bella's Splitcoast forum http://www.splitcoaststampers.com/forums/stamping-bella-f176/bellatastic-tuesday-7-scs-win-%2420-stamping-bella-goodies-t570150.html
Right, time for a bath so I can "attempt" to add some rollers to my hair - if all else fails I hear the shaved look is in thanks to Jessie J ;-)
Friday, 15 March 2013
Red Noses
Just a quick post - my nod to red nose day and the good work of Comic Relief over the last 25 years.
I remember the first day well, and the second even more when my school friends and I blocked the exit to a garage and only let the cars out when they put money in our bucket!
If you can spare some cash and haven't already donated call 03457 910 910 or check out http://www.rednoseday.com/
Stamp is PTI funky florals, glasses and mouth cut on cameo - red nose is a rolled up bit of tissue paper - border is washi tape.
Shades of Green
Contrary to popular belief (and according to my DH who is a Japanophile) Ninja's never wore black, just dark colours so colouring this little fella green isn't as daft as it seems! I coloured him with copics, added come glitter to his cupcake frosting and stamped the gift onto DP before colouring the ribbon with copics again for depth. It's actually for a birthday tomorrow but I'm pretty sure the recipient doesn't look at my blog so we're safe to post it without spoiling the surprise.
The challenge at There She Goes which is the company that makes the two stamp sets I've used here is to use shades of green http://tsgclearstamps.blogspot.co.uk/2013/03/tsg198-color-challenge.html and was the inspiration for the card. However, with it being so close to the day the world turns green (St Patrick's if you don't know) there are quite a few other challenges that also want to see green so I'm entering into the following challenges as well:
http://thepinkelephantchallenge.blogspot.co.uk/2013/03/the-pink-elephant-challenge-tpe190.html
http://just-add-ink.blogspot.co.uk/2013/03/just-add-ink-157.html
Thursday, 14 March 2013
Be dazzling
I've not played along with a Kraftin Kimmie challenge in ages and I have so many stamps that have yet to see ink that I thought it was time I joined in again and this weeks CAS challenge was the perfect one to draw me in http://kraftinkimmiestamps.blogspot.co.uk/2013/03/challenge-169-clean-and-simple.html
I inked up the delectable Lana and coloured her with copics, pencils and shimmer paints on her dress and shoes. Fussy cut and mounted onto a nestie shape embossed with a sizzix folder for some added luxury in the form of texture. I added a strip of washi onto a white panel, added a suitable sentiment and a few hand drawn lines around the shape to tie it all together and she's ready to be papped on the red carpet!
Wednesday, 13 March 2013
Easter Bunnies
I made some little 3 x 3 Easter cards using A Good Egg and Folk Art Medallion - I think I should have used a different colour to the teal as it makes it feel a bit cold and not very "spring" - just like the current UK weather lol! I love the little matching bunnies in this set - well all the matching animals they are really cute.
Subscribe to:
Posts (Atom)