Saturday, 12 December 2015

What's in your stocking?

The challenge at Less is More this week is a one layer card featuring what's in your stocking http://simplylessismoore.blogspot.co.uk/2015/12/week-254-one-layer-challenge.html.   I made a couple, but one isn't one layer so fails the criteria but it made me giggle so I'm sharing it anyhow.

Here's my one layer version featuring the cute little elf from Santa's Elves by MFT.


I used a die with an embossing mat to create a one layer frame and then coloured the image with pencils so the colour doesn't show on the inside.

Now for my not quite one layer version. This one features a stamp by Waffle Flower called Stockings and what's inside the stockings is, for those who know me well, definitely what I'll be wishing for on Christmas Day ;-)


I covered up the "You" in the sentiment with a word stamped with alphabet stamps and added the tops of bottles from a Simon Says Stamp set called Adult Beverages.   All backed with the classic gin bottle green ;-)   [Although my preferred gins these days come in a clear bottle!]

Right I really must make a few more quick cards so I can get them written and in the post on Monday!

Saturday, 14 November 2015

One Layer Santa

I have lots of stuff I should be doing right now, but I decided to give myself 10 minutes off to play along with my favourite weekly challenge.  Less is More this week want One Layer Santa cards http://simplylessismoore.blogspot.co.uk/2015/11/one-layer-week-250.html and this is my super quick take on it.


I die cut a moustache using some Paper Smooches dies through post-it tape and sponged unicorn white ink through.  The sentiment is stamped using Violet's ABCs from Lawn Fawn and then the whole thing got fine white embossing powder.

I did make a pair of these whilst I had the supplies out to boost my stocks for Christmas, but my Tip of The Week is do not try and wipe the dust from your embossing buddy off  before the embossing powder cools down...........


Doh!

Tuesday, 10 November 2015

Colours of Fire

This week's Less is More challenge is to use the colours of fire and nothing else (other than neutral or metallics) and I took it a bit literally and used a fire image too.  http://simplylessismoore.blogspot.co.uk/2015/11/week-249-colour-challenge.html


I used a fun new set from MFT called Toasty Greetings which I think is just hilarious!  I just love the roly poly snowmen and this one and his penguin friend with their marshmallow kebabs are perfect to pair with a fire and coloured with reds, oranges and yellows for a warm and toasty feel mean it fits the challenge perfectly.   As it's a one layer card I coloured them with polychromos pencils, added a sentiment from the same set and a couple of red-pen drawn broken borders to tie it all together.


Saturday, 31 October 2015

Piecing Naptime

Paper piecing is probably my favourite paper crafting technique.  I do love it so couldn't resist the LIM challenge today.  http://simplylessismoore.blogspot.co.uk/2015/10/lucky-dip-week-248.html


I used a stamp with a very familiar image in my house - what is is with cats and clean washing????  You'd never find mine in the dirty pile!   This is Newton's Naptime from Newton's Nook and I simply stamped it a few times on a variety of scraps of patterned paper to make a nice comfy pile for him to sleep on.  He's pieced from a scrap of kraft and coloured with lots of lines using pencils to get a tabby look.

As I used a lot of scraps from my snippets drawer, I'll link this up to Pixie's Snippet Challenge when it opens later tonight too http://pixiescraftyworkshop.blogspot.co.uk/

I could do with a little nap myself now!


Wednesday, 21 October 2015

Getting Masculine

I know most people hate making blokes cards, but I love the challenge of them, so couldn't resist having a go at this week's LIM challenge which is simply to make a CAS Masculine card.  http://simplylessismoore.blogspot.co.uk/2015/10/week-246-theme.html


I generally reach for a kraft base for masculine cards as I just think it gives a masculine feel to start off with.  I added some pumice stone dots with a Tim Holz stencil and a Frantic Stamper die cut guitar with some ropey hand drawn strings!  The stamped sentiment and flashes are from My Favorite Things Keep on Rockin' stamped in silver to match the guitar and finished with some matching washi tape.

I've been in masculine mode this week actually as my hubby requested a couple of cards for friends - they're not really CAS enough for the challenge but I'll blog them with this one as I rarely get time to blog these days.


This one was inspired by one of the DT for my store who did a great escaping your job card yesterday with a snow globe (she's a genius!) and I thought the escaping theme was great for someone leaving a job which is what my hubby requested.   This uses a lot of My Favorite Things products - Barn Die, Rolling Hills Die, Barbed Wire Die, Whole Herd stamp and die set and Milo's ABCs from Lawn Fawn for the sentiment.

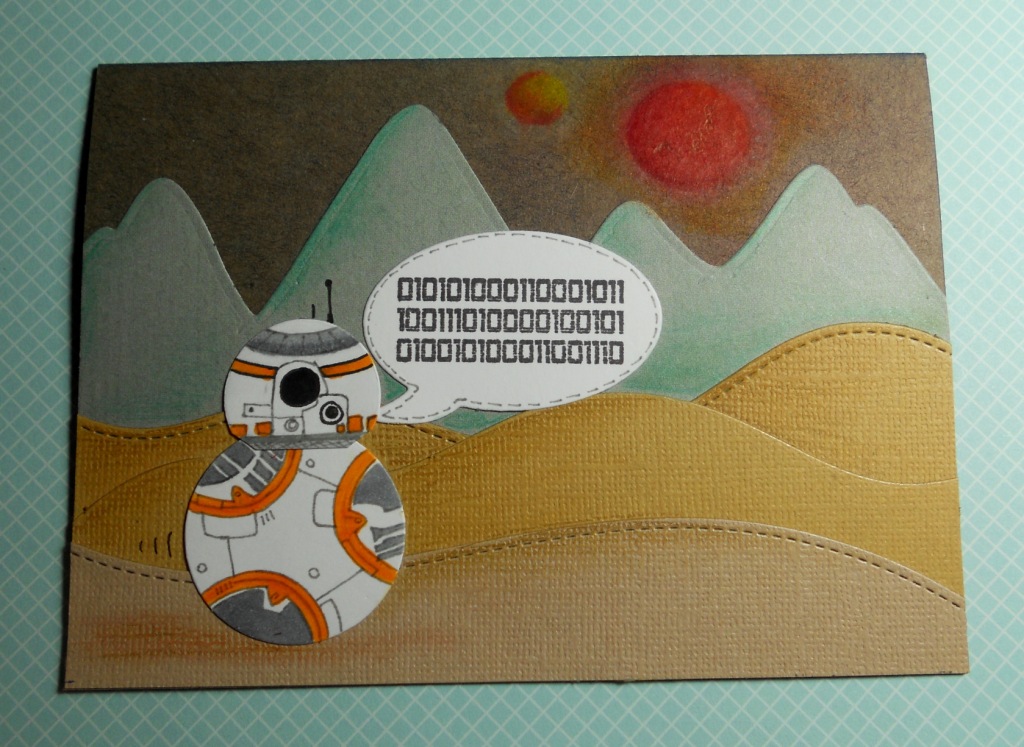
He also needed a Birthday card for his friend who is a HUGE Star Wars fan so I made a scene on Tatooine complete with two suns.


This uses the Mountain Dies from Mama Elephant and Hillside dies from Lawn Fawn.  The BB8 robot is two die cut circles and then I had drew all the details in with a grey fine liner and some copics.  The stamped sentiment (he's saying Happy Birthday in binary) is from The Alley Way Stamps.   It went down really well so that's a couple of happy geeks!

Thanks for visiting.
Tara

Saturday, 3 October 2015

Sad Birthday Birds

Happy World Cardmaking Day folks - I hope you've managed more cards than I have so far today!

I did manage a couple, and this one is for the "jewel colours" challenge at Less is More.   Anne's card reminded me that I hadn't yet inked up my bird stamps so I gave them a go using topaz, amber and amethyst as my gems.  http://simplylessismoore.blogspot.co.uk/2015/10/week-244-colour.html


I coloured them with distress markers and added some depth with polychromos pencils over the top.  Die cut them with the matching dies and then grouped them with some washi tape and a sentiment from Winston's Birthday form Newton's Nook.

Right - cards to make and a turbot to cook.

Catch you later - thanks for visiting.

Tara


Saturday, 26 September 2015

Shiny Christmas

It's very rare I get to make and blog anything these days so thanks to those of you who still bother to visit me - I appreciate you hanging in there!   I haven't managed to play in my favourite challenge for a few weeks, but today's challenge drew me in like the magpie I am - I can't resist the challenge to get something shiny on a card!  http://simplylessismoore.blogspot.co.uk/2015/09/week-243-recipe.html

I made a couple of quick Christmas cards using foiling as my shiny thing.


This one uses Simon Says Stamps Ornaments set - the technique here is to use FlitterGlu from IndigoBlu (I haven't found an alternative that works with foil) on some cut and dry foam and to apply a TINY amount to your stamp - too much and the foil won't stick - and to give it a minute to get tacky before applying the foil.   Leave the foil on for a few seconds to make sure its drying and then buff with your finger before gently peeling back the foil.   If masking like I did here, don't press the foil over the image in the front or the foil with "find" any bits of glue not covered in the original image!


For this second card I used Hero Arts new Colour Layering Christmas Tree (sorry I know its out of stock everywhere - I have it on back order too) and stamped the bottom two layers with their green ombre ink pad before stamping the final layer with flitterglu as above and foiling with green foil.  I added a gold foiled star and some ornaments and some red baubles with stickles.  The sentiment is from the same stamp set.

Don't forget to have a bowl of water on hand when using flitterglu and wash it off your stamps IMMEDIATELY or it will dry on and damage them.   If you're going to batch stamp, I would recommend washing after each stamping as it dries pretty quick on the rubber.

Catch you later

Tara

Friday, 4 September 2015

Arabian Nights

I've got a card in the current issue of Craft Stamper which goes on sale today!   http://craftstamper.blogspot.co.uk/2015/09/the-new-look-october-issue-is-out-on.html  It was for their ready set stamp theme of "Arabian Nights" which had a really lush colour palette so appealed to me and I was really thrilled when it was accepted for publication.


I used the Persian Motifs stamp from Altenew and embossed it in gold before painting the elements with LuminArte shimmer paints.  I was going for a Persian rug feel.   Watercolour painting with embossing is very forgiving and very relaxing to do!   The sentiment is embossed in gold onto a vellum strip which is secured behind the painted panel to hide the fixings but still allows the pattern to show through ;-)


Sunday, 23 August 2015

Pearly Snowflakes

I missed playing in the LIM challenge last weekend as I was at the races on Saturday so I had to make sure I played along again this week!   The challenge is a sketch  http://simplylessismoore.blogspot.co.uk/2015/08/week-238-sketch.html


I started with a new stamp from Hero Arts which I just fell in love with as soon as I saw it - beautiful hand-drawn snowflakes and I embossed it onto glossy card stock using the new pearly white embossing powder also from Hero Arts.  I inked over the embossing with 3 shades of Hero Arts inks (mint julep, cornflower and emerald) which gave a verdigris look so I decided to pair it with copper snowflakes for the before and after look!   The sentiment is from Winnie and Walter's Big Bold and Seasons and the snowflake is a Lil' Inker Designs die cut embossed with copper powder.


As the snowflake stamp is a 6x6 background, I had another triangle to play with so I made a second card, which doesn't quite fit the sketch, but it was still inspired by it.  Cutting the panel in half means you get 2 cards for the price of one!  Same sentiment just on a flag this time and a different snowflake gives two different looks.

Thanks for looking.   If you're a Hero Arts fan, then all the new Autumn and Winter range is now available in my online store Make the Day Special Stamp Store


Saturday, 8 August 2015

One Layer Eyes

That's this week's LIM challenge http://simplylessismoore.blogspot.co.uk/2015/08/week-236-one-layer.html

I made this one first using and old TSG (no longer trading) set which is a set I love.


But then I had a better idea so knocked it up quick!


It's an awful photo - black cards can be a bit tricky!  I just embossed it all in white  - sentiment is spelt out using Violet's ABCs from Lawn Fawn, the eyes are from a couple of Papersmooches sets - Spookalicious and Squeaky Clean.

Catch you later


Saturday, 1 August 2015

Berry Wedding

The challenge at Less is More today is berry colours and I immediately thought of the rich ruby reds so I thought I'd make a ruby wedding card.  http://simplylessismoore.blogspot.co.uk/2015/08/week-235-colour.html


I die cut some letters using Waffle Flower's Papercut Alphabet dies and layered them over a heart gem from Winnie and Walter's My Precious embossed in red and coloured with distress markers and wink of stella for a touch of added sparkle.  I spelt out wedding using Violet's Alphabet from Lawn Fawn.  An embossed die cut frame holds the design within the card.

Not my most imaginiative take on the colour scheme so I may google berries and be back....


Saturday, 25 July 2015

CAS Scraps


It's a fun challenge today at LIM - using scraps from your scrap stash and Di is joining in from Pixie's Crafty Snippets challenge too which I haven't played in for ages - as you can see - I need to - this is just ONE of my 6 scrap drawers and this one won't even fit in the drawer anymore so it sits on top!


The two cards at the top were made yesterday but all from scraps so they fit the challenge.  Scraps from the drawer plus some cool arrow word dies from My Favorite Things cut from more scraps of black.


This one I made today specifically for the challenge so I used as many scraps as I could.  The stamps are from Lawn Fawn's party animals - the bear is stamped onto a kraft scrap and shading with polychromos pencils.  The birds, cake and hats are all paper-pieced from more scraps ad I made a CAS background with 3 more scraps and stamped the sentiment in an arc to match the background paper image.

Saturday, 18 July 2015

Life's A Beach

That's the theme at LIM this week, and I'd already half made a card that would fit the theme, but when I put it together there wasn't really enough white space to meet their CAS criteria, so I made another with the same set ;-)


These penguins in paradise are my favorite stamp set at the moment - I've made about 6 cards with them already.   This one will be for a friend's son who has a birthday next week.  A little masking and some colouring with inktense pencils and then some simple colour washes to hint at a beach and the sea.

I thought I may as well share the anniversary card I finished whilst I'm  here.  This is for friends who got married on a beach.


Same set, more masking but this time coloured with copics.   The sentiment is actually just "you're the coolest" but there are lots of other sentiments in the set so it was pretty easy to pick out the letters I needed to add "couple" to it to make it suitable for an anniversary.  Just mask off the letters you don't want with washi tape and remove it before stamping - it's a pretty nifty trick to get more from your stamps ;-)

Right having spent the afternoon glued to the Davis Cup and the Murray brothers, I really should get something done before the hubby comes home.....


Saturday, 11 July 2015

My Husband The Hero

My husband was visiting his friend last night who are having some building work done and when he arrived the builder (his friend's brother in law) had an accident and fell off his dumper truck which ended up trapping his leg.  So that's when the hero part comes in - my  hubby and another friend lifted the truck up so they could pull him out (luckily he had only just fallen so there was no risk of making it worse my removing the trapped leg).  He had quite an eventful night - paramedics, ambulances and even the police had to make visits.  The builder is OK but is having surgery today to pin his ankle bone which was broken in the fall.   So I made a card for my hubby to send to him.


The band aids seemed an appropriate choice. I die cut them from some ranger card stock, arranged them on a square of white card and then die cut the get well word die from the panel (keeping the little bits in the loops of the letters.  I die cut it again from red and pieced it back together.  Both sets of dies are Paper Smooches so as it's an anything goes week on their challenge, and I'm just about in time for it, I thought I'd link it up.

I also made a card for this week's Less is More Challenge today which is one layer masculine using the new My Favorite Things products I now stock in my store.


I used the split diagonal background stamp and applied 3 shades of distress inks in greens and blues using a blending tool and letting the stripes fade off on the right.

A simple sentiment from Brushstroke birthday paired with a couple of balloons from Birthday Wishes and Balloons both stamped in bold black give it a masculine feel for me.

Thanks for visiting.


Saturday, 4 July 2015

Red White and Blue

It's the 4th July so Happy Independence Day to all my US friends.   Less is More has a very apt colour challenge today - red, white and blue http://simplylessismoore.blogspot.co.uk/2015/07/week-231.html


I made a super quick shaker card with an MFT die and a selectively stamped greeting from  Mama Elephant's Make a Wish.

Got to rush - off out for the afternoon.


Saturday, 27 June 2015

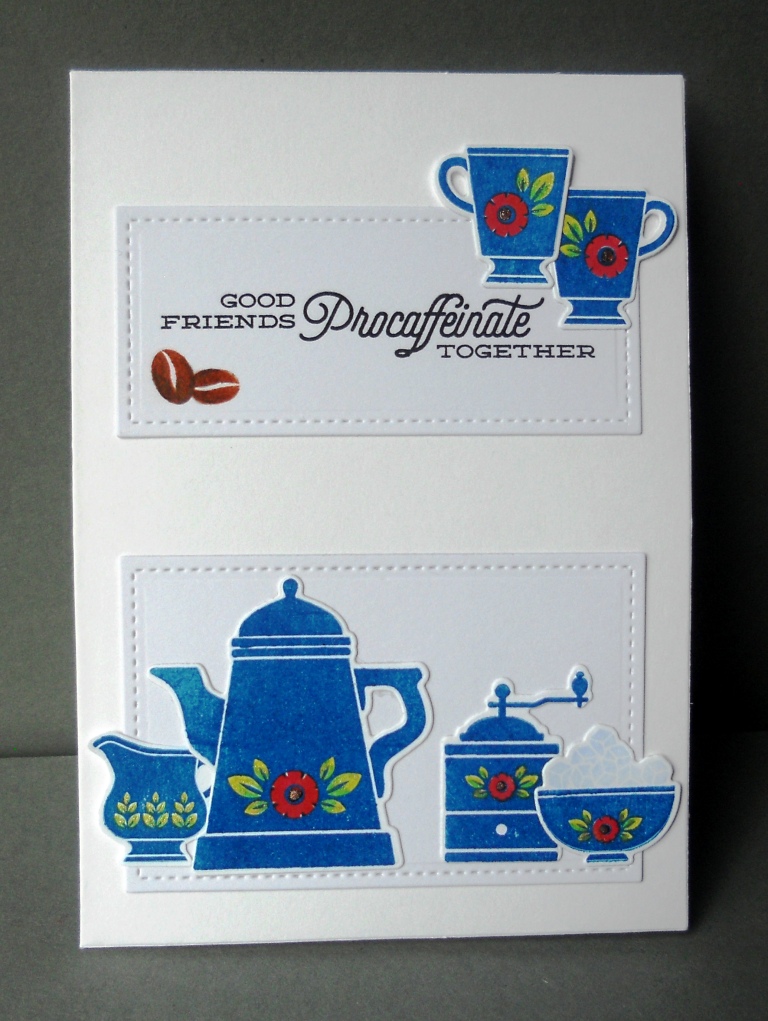
Let's Procaffeinate!

I'm back quicker with this week's LIM challenge which is based on a sketch but I just released I got it upside down!   That'll teach me to have the challenge open whilst I'm designing my entry!   http://simplylessismoore.blogspot.co.uk/2015/06/week-230-sketch.html


I used Coffee Set stamps and matching dies from Waltzingmouse Stamps.   I love this set as it makes me think of canal barges and the lovely artwork that they are often decorated with.  Simple stamping, die cutting and then layering the elements over some die cut stitched rectangles from Lawn Fawn (I used the same die but cut one panel narrower by moving the die half through cutting)

Right, time to make dinner....


Friday, 26 June 2015

Hey You!

I'm very late to the Less is More party this week - the challenge closes in a few hours.  I did have a play on Saturday with stencils and marbelling ink but I just made a big ole mess!  So I had another go last night and here's my card for the stencilling theme combined with the current sketch at CASe this sketch. 


I used a memory box stencil called "shine" but instead of going for the classic yellow I decided to take the grunge route and went with grey card stock and inked through the stencil with versamark and scattered it with clear, grey and silver powders for a random look to the embossing.

The balloons are Lawn Fawn dies cut from vellum and coloured with yellow copics - grey and yellow is one of my fave colour combos of all time.

The gorgeous sentiment is from the latest release at Waltzingmouse and its called Best Day stamped in stazon so it will stay over the vellum and embossing powder.

Thanks for visiting.

Sunday, 14 June 2015

Hidden Starfish

It's PJ Party time over at Waltzingmouse Stamps and you all know how much I love WMS right?  Well time was I would have made a card for all 4 challenges but time is short these days but I usually manage to squeeze one challenge in and I made it this month too.


When I do these challenges, I only ever use Waltzingmouse stamps on them, so having read that, are you all scratching your heads and wondering if you missed a starfish stamp?   Well no, you didn't - this came about by accident.   I was testing out ombre inkpads and needed a solid stamp but the ones on my desk happened to be Kaboom so I just turned the dotted star over and inked up the back and when I stamped it I realised it looked like a starfish with it's lovely wobbly edges.  So I inked it up again in red stamped it on to kraft, added brown around the edges and stamped it on top again and then cleaned it before turning it over to stamp the front with the dots in white over the top as real starfish are a bit knobbly.  I drew the face in with a sharpie before coating in glossy accents.

The sentiment is from My Island and I inked it red and then added the brown over the edges for that too tone suntan look ;-)   I finished with a hand drawn border and some tiny stars in the corners from Kaboom.

You've got 24 hours to play along if you want to join in http://waltzingmouse.blogspot.co.uk/2015/06/welcome-to-june-pj-party.html

Saturday, 13 June 2015

Home Down Under

One of my blogging buddies has recently moved down under and I needed to make her a new home card so I was very happy when I saw today's Less is More theme!  http://simplylessismoore.blogspot.co.uk/2015/06/week-228-one-layer-card.html


She's waiting to pick up her dog from quarantine so I knew the set I wanted to use as it features the perfect doggie along with lots of bits and bobs to decorate the house and garden  - This Awesome House by Winnie and Walter.  I did a little masking to add the topiary by the front door, used glossy accents on the glass to keep the white space and then just did some soft water colouring with distress markers.

Thanks for coming up with the perfectly timed challenge ladies!


Saturday, 30 May 2015

Gladys the Superhero

I've been falling back in love with my copics recently, mostly because I now have Sandy Allnock's hex chart which has revolutionised my colouring - it makes it soooo much easier to get colours to blend when you can see which ones are next to each other by shade rather than trying to work out the complex numbering scheme!

So I've had my pens out today to play in Less Is More's 2 or 4 legs theme http://simplylessismoore.blogspot.co.uk/2015/05/lucky-dip-week-226.html and now let me introduce you to Seniorita Gladys by Stamping Bella - I just LOVE her!


She is simply coloured with copics  - I gave her a slight blue rinse as she reminds me of my Nannan!  I deliberately had her cape just hanging over the edge of the card to add a little interest to an otherwise plain card.  To balance out all the red I highlighted the yellow by adding a matching strip of card to the left hand side.   Isn't she rocking those starry pants lol!

Catch you later :-)
Thanks for visiting

Tara

Blogging tips