Sunday, 29 December 2013

Love is all you need

It's my day over on the Make the Day Special Stamp Store blog again today and my card was inspired by the current 2 week challenge at Less is More http://simplylessismoore.blogspot.co.uk/2013/12/week-151-merry-christmas-everyone.html which is to select any of their previous challenges to have another go at.

I decided to have another go at metallics and one other colour from a few weeks ago (Challenge 149) although my card would also fit challenge 24 - circles.

I wanted to use one my holiday sets to show that there is versatility beyond Christmas in some sets if you look for it so I decided to play with Strictly Sentiments 3 from WPlus9 and pair it with a matching styled sentiment from Mama Elephant's Smitten set.


Now whilst this set looks aimed squarely at Christmas with it's big sentiments - I was actually more interested in the striped circles that come with it and used those in 5 shades of pink to create a bubbly border down my card.  I then ignored the two Christmassy words and just focused on  LOVE and found another "LOVE" in Smitten which had the same style and another sentiment which paired with love perfectly.  I carefully cut the sentiment apart so I could rearrange the words in the famous song and just embossed all the words in silver for my metallic element of the challenge.


Saturday, 28 December 2013

Waltzingmouse and Flamingos

After our little Christmas break, it's time for another challenge over at Waltzingmouse Fanatics and we have a colour challenge based on a flamingo.


Although it's a bright and sunny image, the weather here in the UK has had me digging out my Christmas jumpers so I decided to use that for inspiration for my card.  I selected the flamingo pink, white and black from the colours for the stripes on my jumper inspired background and put it on kraft base to use 4 of the 6 colours in the scheme.


The background stamps are all from Nordic Winter and I just masked off the edges of my card before stamping them across and filling the background.  Once I removed the masks I added some faux stitching with a thin marker and then stamped a sentiment from Say it Loud Winter Holiday over the top.

We have a prize up for grabs for this challenge too - so I do hope you'll hop over to blog and play along with us - you have until 9th January - http://waltzingmousefanaticschallenge.blogspot.co.uk/

Sunday, 15 December 2013

Last minute gift making

Morning all, if your house is anything like mine at the moment then I'm sure that crafting is pretty low on the agenda of things that must get done.......

However, however much chaos is around me, I usually have a few last minute homemade gifts to make so need a few inexpensive and easy to make ideas up my sleeve and thought I'd share one with you today that you can make in under 5 minutes and costs just pennies which has to be a good thing right?


I bought these paper blocks for 99p from Waitrose a while ago and one block will actually make two of these little Christmas notelet sets.  I simply clamped them tight (an extra pair of hands is helpful here!) and then stamped the twigs and berries from Woodland Wreaths by Wplus9 and then added one of the greetings to the centre.  A little cellophane and a bit of ribbon and hey presto a perfect little gift for around 60p but looking like it cost a lot more!

I actually bought a lot of note holders in the John Lewis January sales that have been waiting to be turned into Christmas gifts so I added my stamped notes to them (and yes I really could have made them MONTHS ago instead of my usual last minute panic - will I ever learn????)


The wreath is from Make the Day Special and is currently out of stock but will be back in store soon, and if you don't have it, you could use just about any stamp set you have from a simple sentiment to some flowers or even fruit and vegetables - just clamp the edges of your paper tight as you stamp on them.


Friday, 13 December 2013

House of Cards Term One Blog Hop

THIS IS A STICKY POST - so if you've come for Waltzingmouse Fanatics or Make the Day Special - please scroll down - thanks :-D

Welcome to the House of Cards Term One Blog Hop!

If you've come from Sue T's blog then you are in the right place!   If you have just stumbled here and would like to participate then hop over to the House of Cards Challenge blog to get started.  We've got some fabulous sponsors that are providing prizes, so make sure to leave comments at each stop for a chance to win!

For the hop, our challenge was to use one of our sponsors images and to be inspired by the photo below.


I was lucky to get a a fabulous image from Dilly Beans - #516 Framed Snowmen http://sillydillybeans.blogspot.co.uk/  and I used the cool colours and lots of sparkle from the photo to come up with this.


I coloured the snowmen entirely in grey copics and added a hint of blue in the background.  For the sparkle I used silver stickles and some blue and silver beadazzles.  I added a ring to frame the snowmen as a nod to the plates and to contain my greeting which I stamped inside.  The card base looks grey in the photo but it's actually a silver pearl.

Here's a close up on the snowmen so you can see the glitter detail better - I love the tiny blue beads in the beadazzle.


Unfortunately, this will be last post as part of the House of Cards DT as I have a massive new project coming this way in January which unfortunately means I've had to step down.  Thanks to Mynnette and Ruth for having me - it's been great fun ladies and I wish you all the best for the new term :-D

Thanks for stopping by!  Please join in the fun of our hop and make your way over to Vicki's blog!
 

Sunday, 8 December 2013

Candlelight

It's my day to bring you inspiration over on the Make the Day Special blog again and I'm playing with one of the only remaining WPlus9 sets still in the store since everyone had a rush on them last week - Merry and Bright


I do love the multi-layer stamps that WPlus9 produce as they are such fun to play with and watch the images grow as you stamp them.  If you've never used them, I thought I'd show you how they work - for example the pine branches I've used on my card come in 3 parts so I've stamped them to show you how to layer them up.


For the rest of my card I used a mixture of the stamps and the matching dies, stamping the lantern twice, first on the card base and then again on vellum.  The pine branches went over the base image and then I used the die cut pine cones and holly leaves to cover up where they showed under the vellum - this allowed me to have the candle higher in the lantern but not have it floating in mid-air as you can't see the bottom of it.  I framed the scene in a die cut circle and stamped the sentiment onto a banner die cut with white embossing and layered it across the circle.

We're off to a food and drink fair at Donnington Park today for a little festive shopping so I expect to see lots of candle and pine arrangements just like this one!


Saturday, 7 December 2013

Triangular Circles

I picked up a new delivery from Simon Says Stamps this morning and I have about a million things to do today, so naturally, I'm not doing any of them and am playing with my stamps instead!   And it being Saturday, the first place I always go looking for a challenge is Less is More where today the challenge is a colour based one - a metallic element plus a colour of our choice http://simplylessismoore.blogspot.co.uk/2013/12/week-149-colour.html


I'm hoping that using lots of shades of green is permitted as I really wanted to play with my new "lots of circles" stamps so I stamped 3 different sized solid circles in 5 shades of memento inks into a triangle I'd masked onto my card base to form a Christmas tree.  I then used 2 of the outline circles to add some gold embossing onto the tree.   The die is also from SSS and is called sparkling tree lights and I die cut it, and the tiny star on top, from some gold card, adding extra sparkle to the lights themselves with gold stickles.   I finished with a gold embossed sentiment underneath (Christmas Quotes from Kaiserkraft) with the "I" looking like the tree trunk (well hopefully!)  I'm really pleased with how this turned out.

Right - I really must go and get a stew in the oven or we'll be eating at 10pm!

Catch you later.
 

Tuesday, 3 December 2013

Sparkle!

It's Lucky Dip week at LIM and one of my favourite card designers is GDT and the challenge is inspired by her name - Made With Sparkle!  http://simplylessismoore.blogspot.co.uk/2013/11/week-148-lucky-dip.html

I decided to play with my cameo as I had it out making Christmas reindeer mobiles tonight and this is what I came up with.


I cut BRIGHT from a 3x4 piece of white card and stuck some red glitter paper behind the negative of it.  The Merry and & were cut from more white card but this time stuck on top of the card - the merry was coloured with a green copic and the & edged with a fineliner.

Sorry it's short and sweet but I'm currently very busy with an exciting new crafting venture that I'll bring you news of soon.


Sunday, 1 December 2013

Merry Scraps

Sunday is here again so it's Make the Day Special Day again - is it just me or does it come around quicker the closer we get to Christmas???

I'm definitely in full on Christmas card mode at the moment, which means I've used a set that's come in and gone out of stock again - Peace, Joy, Love from Lawn Fawn - so I'm sorry if you haven't got it but I hope this is a bit of inspiration if you did manage to snag a set.


I decided to raid my scraps box as it's so full the drawer won't close again!   So I pulled out a selection of scraps in blues, greens and grey and trimmed them to different thicknesses to create my own striped paper.  Once happy with the arrangement they were glued down and the edges trimmed flush.  I then used 4 elements from the set - a single tree stamped in white at the bottom overlapping to create a border, the Be Merry border and fairy lights border were stamped and embossed and then the snowflake border stamped twice at the top.  All that was needed then was a little stickles in lights and hey presto - a card from scraps.

Saturday, 30 November 2013

Golden Bauble

It's time for another Waltzingmouse Fanatics challenge today and after our tough theme we thought we'd better have a nice easy sketch and this is what I came up with for it.


I embossed the lovely ornament from Ornate Ornaments in gold onto kraft cardstock and added the bauble centre from Vintage Ornaments in the centre before cutting it out.  I mounted it onto a panel of candy cane striped paper from crate paper which is featuring heavily on my holiday cards this year as I think its very festive and cheerful!  The sentiment from Alpine Christmas was then simply stamped in black onto a strip of red paper and glued across the whole card.

I do hope you'll join us - it's an easy sketch to play with - you just need one Waltzingmouse product to play and there are freebies if you don't have their stamps.  http://waltzingmousefanaticschallenge.blogspot.com/2013/11/challenge-7-sketch.html


Friday, 29 November 2013

Bedtime Story

I'm much later getting around to the bedtime sketch for this month's Waltzingmouse PJ Party http://waltzingmouse.blogspot.co.uk/2013/11/welcome-to-november-pajama-party.html but I finally managed to get it finished tonight.


I decided to twist up Christmas a little with a cake from the Your Lovely set which I stamped in white but kissed stamped against the vintage Christmas Background stamp with green to give it a subtle pattern the likes of which I could never do in icing myself!  I decorated it with some holly from Festive Foliage stamped and shrunk on shrink plastic.  I added a sentiment from Compliments of the Season pulled into a curve.  I replaced the circles in the sketch with more holly leaves and added some red ribbon and a red pen line to finish.


Monday, 25 November 2013

Christmas Birds

That's the theme this week at LIM http://simplylessismoore.blogspot.co.uk/2013/11/week-147.html and I decided to have another play with my distress markers for it - have I said how much I love them????


The image is from Stampendous and the sentiment is Kaiserkraft.  Coloured with distress markers and a paintbrush and water for blending.  I continued last weeks's CAS DP theme into the card too and added a couple of strips to draw the eye in.  Quick and CAS - perfect for Christmas.


Sunday, 24 November 2013

Wiggle it!

Good morning all it's my day again over at Make the Day Special and I'm feeling in a masculine mood today - I think it must be all the Dr Who we were forced to enjoyed watching yesterday.....

So I've been playing with my favourite masculine stamp set Fish More and the companion die set.


I went for a faux embossing look by lining all the die cuts up across the card in rows and then added colour by stamping on top in a variety of blue and green inks.  Trimming off any die cuts that overhang the edges of the card.  For the sentiment I used a strip of vellum and embossed it with an opaque blue powder.  I also embossed the hook in silver before adding the fishing line both on and off the vellum with versafine.  There wasn't anywhere really to "hide" adhesive behind the vellum, but wackytac tape is pretty much invisible (I have a strip the whole way across) so that's a really useful addition to your craft stock if you want to use vellum and aren't handy with a sewing machine ;-)

Saturday, 23 November 2013

PJ's in the daytime

I normally play along with the PJ Party late at night as it starts but my hubby is working away this weekend and had to be up at 5am today so we had an early night last night.  So - as I'm alone, I can still be in my PJ's at noon ;-)

There were 4 play ahead challenges plus the bedtime story sketch this month - I've managed 3 of them and will back to play the sketch later  http://waltzingmouse.blogspot.co.uk/2013/11/welcome-to-november-pajama-party.html

Challenge 2 was to make a Christmas card and I couldn't resist playing with my new Alpine Christmas set.


This set is soooo much fun to play with!  I stamped the village twice (masking off the church on the second with a scrap of tape) using momento luxe ink.  I have to say I have been searching for a decent white ink for a long time and Wedding Dress from this range is STUNNING!  I used it for the hill in the background too and used a cotton bud to dot some snow around to ground the village.  The trees were stamped in olive grove and the sentiment in black.  Simples.

Challenge 3 is a doozy - make a Tag - but Claire is judging this round so you have to make a tag she will like - yikes!  I went old school with Festive Foliage.


I started with a kraft tag and stamped the mini pinstripe background across it in pearlescent ivy.  I added my holly sprig in bamboo leaves over the stripes and masked it off so I could stamp the pine leaves behind in the same ivy colour as the background.  Pinecones (adirondack ginger) and berries (SU real red) finished off the stamping.  To add some texture, rather than stamping the mistletoe directly to the card, I used some of my favourite material - cloud clay - and stamped it in the ivy colour (ink stops the stamp sticking to the clay) before letting it dry overnight.  Once dry I cut it out with scissors and painted on a wash of ink and shimmer.  I used liquid pearls and glossy accents to give dimension to the berries and a bow before sticking it to the tag.  I cut a larger tag from DP and tied the two together with some green twine.  I finished with a sentiment from the opera tags Christmas set stamped over the holly.   Hope you like it Claire ;-)

Challenge 4 was actually the one I tackled first - I did it as soon as I got my alpine set as the darling little chalet was screaming decoration to me!


I stamped it 4 times on copic card so the corners touched at the base and then coloured it in and very carefully cut out all the teen-tiny little windows!


I cut it out and and used the up and under method around the eaves - so for two facing each other I cut a slit up and for the other two I cut a slit down from the top of the roof - so once folded you can get it to hold together to make a little decoration without the need for any glue.  Pretty, but really, it doesn't come into it's own until the lights go out.....


Sorry for the dodgy photo - it's very hard to photograph - but you can now see the point of cutting out all the tiny windows - this makes THE most perfect tea light holder.  [BATTERY TEA LIGHTS ONLY PLEASE - don't burn the house down with flames and paper!]  I wish I could show you it properly but hopefully you get the idea - I plan on using them to decorate my Christmas table :-D

See you all later with my bedtime story sketch.


Thursday, 21 November 2013

CAS Paper

I decided to have another crack at this week's LIM as my first attempt wasn't the most imaginative way to use DP in a Clean and Simple way http://simplylessismoore.blogspot.co.uk/2013/11/week-146-theme.html


I used a memory box alphabet die set to die cut "merry" from some Christmas DP and then cut them again from thick white card stock 3 times and layered them up to get a chipboard sticker effect.  I then simply stamped Christmas underneath in red (Simply Besotted stamp) and added a double border in the same red and blue as the paper.

I was contemplating making a few of these as I really like the look, but it takes too blooming long!


Wednesday, 20 November 2013

Anniversary Bells......

Quick post tonight as I'm in need of an early night and it's already close to midnight....

But, I had an idea to combine the cue word of Bell at CASology http://casology.blogspot.co.uk/2013/11/week-71-bell.html with the anniversary challenge at Addicted to CAS (who are celebrating their first anniversary) http://addictedtocas.blogspot.com.au/2013/11/happy-anniversary-to-us.html and this is what I came up with....


When I tried to think of something other than a bell for the cue I thought about what bells do - ring!  So one gold engagement ring cut on the cameo with a diamond cut (by hand) from glitter vinyl and then over embossed with a silver sentiment from Waltzingmouse stamps.   If only my photography was as good as my card making as this is a truly awful shot of what is a really lovely card in real life - honest!


Monday, 18 November 2013

Kraftin Kimmie Anything Goes

The current Kraftin Kimmie challenge is anything goes and I've recently been rediscovering my love of colouring with my new distress markers so it seems churlish not to play along  http://kraftinkimmiestamps.blogspot.co.uk/2013/11/november-krafty-previewsday-five-plus.html


This was the first attempt I had at using my new markers and I'm quite pleased with the results.  I used Lana from Kraftin Kimmie and tried the let her elegance shine through the simple layout.  The sentiment is from Kars.


Sunday, 17 November 2013

Cosmic


One of the reasons I bought the Cosmic Stars set from Mama Elephant was because I thought it would make a really cute calendar.  I have some desk calendars holders so I used one of those and I intend to make a few more -  they're a lot quicker and easier than you might think and make really inexpensive gifts for Christmas so I made one as my project today for the Make the Day Special blog (their shop is currently the only place in the UK where you can get Mama Elephant stamps)

I'll not fill the blog with 12 pictures - you'll get the gist from the couple here:


The actual calendar part is a free printable I found on the internet (here) and I just saved them as pictures and added them to a table in a word document where I sized each "cell" to the size of my desk calendar and then printed them on copic colouring card.

Then it's just a case of stamping each star sign to the left, adding the name from the starry nights companion set underneath and colouring in the images - you could easily knock out half a dozen in an evening I reckon.

I also had a cute idea using the same images to make a card for the current Less is More challenge "to use DP in a CAS way" which I combined with the new sketch at retro sketches.


I just used one scrap of DP with tiny hearts on (Knee Highs stack) and overlayed it with a strip of vellum and embossed a sentiment from Mama Elephant's Smitten set over the join using a little wacky tac to secure it.  I coloured the character with copics and used a craft knife to cut around it so you could see through the bow and arrow.

Saturday, 16 November 2013

Christmas without Christmas

It's time for another challenge at Waltzingmouse Fanatics today and I've set a quirky little challenge that I think will stretch the grey matter a bit but I hope you all find it fun and join in!  This time around we're looking for a festive Christmas card but the only Christmas themed stamp you're allowed to use is a single sentiment - the images must be from a "non-Christmas" set.

OK - I know that sounds a bit hard, but once you put your mind to it, it's actually a lot of fun - I got a card into Paper Crafts magazine for this very challenge using entirely Waltzingmouse images (see it here) so it is possible.

This time around, the card actually happened by accident - I was trying to make a card with our first colour theme based on the red and green peppers and I decided to play with creating a background using elements from the Folk Art Medallion stamp set and when I'd finished I realised it looked quite "Christmassy" so I put it to one side and made another card for that challenge......


To finish this one, I simply stamped the Christmas greeting onto vellum and embossed it in black - I like the contrast of the strong black with the soft filter the vellum gives to the pattern underneath.  The sentiment is from Compliments of the Season 2.   As glueing vellum is tricky I just used some sticky backed card strips on either edge to adhere it to the card base.

So now it's your turn - hop on over to the Waltzingmouse Fanatics Challenge site and put your everyday sets into overtime for Christmas!

Friday, 15 November 2013

Cosy Cuddles

So I don't blog in ages and then I'm here twice in a day - just like a bus you wait for ages then two come at once!

I'm back as I need to squeeze this one in under the deadline - it's a card for my friend's birthday this weekend and I wanted an unusual layout to mount my image and this week's retro sketch really fit the bill http://retrosketches.blogspot.co.uk/2013/11/retrosketches-89.html


The focal image is from Lili of the Valley and is stamped onto watercolour card and coloured with distress markers - my newest addition to the craft room thanks to my lovely hubby and I adore using them!  The sentiments are from two different Hero Arts sentiment sets.  I added striped paper and spotty washi tape and 3 brad heads.

Right - time for bed - night all.

Buttons and Triangles

Hello there blogland - long time no see.  I finally seem to have shaken off the vertigo and can once again sit and craft and use my computer - hurrah!

So to celebrate my return to crafting and to see if I could find my mojo I decided to try a challenge or two and I managed to combine a few in this next card.  I took the triangle challenge at CASology http://casology.blogspot.co.uk/2013/11/week-70-triangle.html and combined it with the button challenge at the 10 minute craft dash http://prettypinkposh.com/2013/11/10-minute-craft-dash-29.html and for once I was easily within the time limit which is a first for me!  I was also inspired by the combo challenge from CASual Fridays and Curtain Call where they are looking for a CAS Christmas card  http://cas-ualfridays.blogspot.co.uk/2013/11/cfc120.html  and  http://curtaincallchallenge.blogspot.co.uk/2013/11/curtain-call-inspiration-challenge-cas.html


As I was afraid all the buttons would make the card too fussy to be CAS I decided to stick to a single colour pallet so I stamped the tree and sentiment in the same shade of green (SU gumball).  All that was left to do then was to decorate the gaps in the tree with a range of different sized buttons in varying green hues.   I think it came out really cute and at 5 mins 26 seconds its definitely quick enough to replicate for a set of cards for Christmas ;-)

That's all for tonight - but if you're a Waltzingmouse Stamps Fan than do come back in the morning for our new Waltzingmouse Fanatics challenge - it's a goodie!


Monday, 11 November 2013

House of Cards Poppies


This month at House of Cards we have a colour/photo inspiration for you to follow through the weekly style challenges and this week it's the Clean and Simple style.   You can chose to be inspired by the colours (at least 3) or by the photo but as you can see from my card above I decided to use both.


I used the orange and green as mats for my focal image which was entirely created with a memory box die.  I cut it from some black card and then used the waste as a stencil to ink through flipping it over to give me a bud on either side.  I then cut the black die cut apart to create a different shape and glued it down with a fine glue pen.  The sentiment (sorry can't remember which set its from) was stamped onto dark green card stock to get more of the colours in.

Now it's your turn - hop on over to House of Cards and play along with us :-)


Sunday, 10 November 2013

Christmas Peas

It's my day over on the Make the Day Special blog again today and I needed to search for a little inspiration for my make this week so I chose to play along with the "stripes" challenge at Paper Smooches Sparks and as I have this fabulous candy cane striped washi tape I immediately thought Christmas.  However as I don't have any Christmas Paper Smooches I had to think a little outside the box......


I thought the "Peas, Love, Happiness" sentiment in the Vegtastic set could lend itself to Christmas so I opted for Christmas Peas!  I stamped the peas on scraps of green card, added shading with copics and fussy cut.  I put a strip of washi down some white card, stamped the pea tendrills and stuck the pods in place before stamping the sentiment in versamark so it worked over the washi.  I stuck more washi onto a scrap of white card and trimmed a couple of thin strips from it.  All were then mounted onto a small red base card.

Peas out!


Saturday, 9 November 2013

Moxie Fab Thanks


Well I know I am not alone in feeling a lot of sadness when I read this post from Cath about her decision to leave Paper Crafts and the Moxie Fab World blog that she hosts so brilliantly - I know I am not alone because there are hundreds of us sharing projects today to show how much we're going to miss you Cath.  I hope you're having fun hopping even if you too are finding it a little hard and a little sad.   I also feel sorry for whoever is going to take the blog over when it reopens in December, boy do they have some BIG shoes to fill!  The Moxie Fab World is going to be a very different place without you!

I was trying to think of what I'll miss most - I think it will be my nightly fix of  "Oh my Moxie Fab" as it was often the last thing I saw before I went to bed so it was my "goodnight John boy" moment.  I'll miss the trendwatching too - especially the amazeballs way you could round up the whole of CHA in a few blog posts and all those pictures of the new trends so we felt like we were there too.  My proudest ever challenge win was getting to be a Trigger Target so I'll miss playing along with those too.

My card tribute is simple and says it all really - you are WONDERFUL Cath!


This card uses the Camelia set from Waltzingnmouse stamps with the small flower stamped repeatedly in grey on a kraft base card to make the background.  The sentiment is stamped onto multicoloured thread which was wrapped tightly around a piece of cardstock covered with double sided tape so you end up almost with material.  The largest flower from the set was stamped onto white card using grey ink and coloured lightly with copics.  The same multicoloured thread was then used to hand stitch around all of the petals to keep with the theme.  The die cut leaves are Wplus9 folk art florals.

If you are following the hop then you should have come from Lorena Canto http://paperella.typepad.com
 and your next step on the hop is Joscelyne Cutchens http://www.cutchens.com  or if you've only just found it then start at Moxie Fab World or you can follow the whole hop from the links below:

Sunday, 3 November 2013

Fireworks

I've made a card for a couple of challenges today - CASology gave us the cue word Black which foxed me until LIM shared a fireworks inspiration photo and then I managed to make this card...


When I saw the fireworks I naturally thought of bonfire night - it's actually my favourite "event" of the year as it's just before my birthday so I always feel like the fireworks are my personal birthday treat as that's what my Dad always told me.   However, you don't send cards for bonfire night so my thoughts turned to the other major firework event which is New Year's Eve and that's when inspiration struck.

I grabbed one of the dies from my London set from X-Cut and die cut it twice - once from grey and once from gold shimmer paper and I used the "waste" from the gold to piece back into the windows and clock face on Big Ben so they looked illuminated.  For the fireworks I used the USA 1776nset from Waltzingmouse with opaque embossing powders in lime, mustard and orange.   The sentiment is from Clearly Besotted and is embossed in white.


Saturday, 2 November 2013

Anniversary Cake

I'm sharing my weekly project at Make the Day Special a day early this week and as it's our niece and nephew's wedding anniversary this weekend I made a card for them.   I decided to use Fanfare from Avery Elle to make them a cake instead of baking them one ;-)


I stamped the two layers of cake onto some lovely paper from Echo Park (Victorian Garden set) and as all the papers in that pad are double-sided I used the reverse to create the cake ribbons and bows and paper-pieced it all together.  To add a little dimension to the ribbons, I used a couple of shades of toner grey copics to knock the "insides" back a little - toner greys are your friends when you don't have the exact shade you need.  I stamped the sentiment from the same set onto the larger cake.

For the cake stand I stamped and embossed it in gold on a scrap of card and fussy cut it before sticking it down and outlining it in black to match the cake.  I cut it out with a nestie and used the larger die to cut a mat from the same patterned paper I cut the ribbons from.

I finished with a little sheer lemon ribbon and a liquid pearl centre to the bows.


Stormy Seas

Are you ready for a new challenge?  Well we have a great colour challenge for you today over at Waltzingmouse Fanatics and here's what I did with it.


I paired our colours with the sketch from the current Seize the Sketch challenge to inspire my design and the colours led me naturally to a masculine card.


I started with a piece of of chevron striped paper in blue and grey from my favourite masculine pack - swagger from fancy pants and stamped the lovely splatter pattern from splat that over the top - I think we often forget than we can still stamp on decorative paper!   I added a little distress ink to the right edge to give it a moody feel to match the picture on our colour theme.

Next came the focal strip - another piece from swagger with a couple of feathers from funky feathers stamped on the right hand side in aspen mist from versa magic.  I embossed the sentiment from the same set in smoky slate powder from stampin up.  For the focal feather I stamped the same feather using aspen mist and aegean blue but rather than stamping it onto paper I stamped it into cloud clay - an ultra-lightweight airdry clay that can be cut with scissors (or even run through a die cut machine) - so once it was dry I trimmed the excess with scissors and stuck it down with glossy accents.

Masculine cards can be fun too you know ;-)   Hope you all hop on over to the challenge and give it a go - all you need is one Waltzingmouse product and there are freebies in their shop if you don't own any stamps ;-)   http://waltzingmousefanaticschallenge.blogspot.co.uk/


Friday, 1 November 2013

Inlaid Die Cuts

I'm still feeling really dizzy - suspected inner ear infection but antibiotics have failed to make much difference so far - so I've not felt up to crafting all week.  I did make one very simple card as I love playing with putting the bits back into die cuts and that's the challenge this week at PTI Inlaid Die Cut Challenge


I didn't have an appropriate PTI die to play with so I used a memory box flower and die cut it from craft and some DP.  I used the DP for the outline and then inked up the pieces from the main card panel to ink with distress inks and piece back in.   I finished with a matching gem and a sentiment from Embroidered Blooms in deep lagoon (although it looks black!)

That's all I can manage for now folks - need to go and lie back down to stop the room spinning.  Catch you later.


Sunday, 27 October 2013

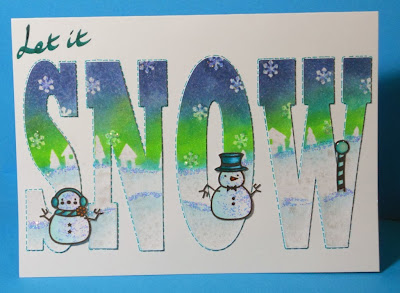
Let it snow....

It's Sunday which means my day to blog over at Make the Day Special and as the much of the UK is braced for storms tonight, my thoughts turned to winter and I decided to play my Mama Elephant Polar Pals again but this time I set them in the snow...


I used my Silhouette Cameo to cut the word snow in large capital letters from some white cardstock but I left them on the mat while I worked on creating my scene across them.   Firstly I used the smallest snowflake from Lawn Fawn's Critters in the Snow to emboss some falling snow at the top of the letters.  I used a memory box die to create a mask and then using distress inks to create a sky adding an aurora borealis with neon green from from Hero Arts.   I created snowy hills in the foreground with more distress inks and some pearl spritz.  At this point the letters came off the sheet and onto the card before being edged with a stitched line.

Then it was time to add my pals - I stamped them onto more white card, coloured them with copics and glitter, before fussy cutting and adding to the card.   I finished by handwriting "let it" in the corner with a teal calligraphy pen.

It's a fun technique and you can do it with any word you fancy, just create your scene before moving the letters and then make sure the gaps stay the same when transferring to your project.

Friday, 25 October 2013

PTI Blog Hop

I'm feeling pretty eugh today - dizzy and sick - so I'm not feeling up to crafting much but I wanted to play along with the PTI blog hop and as the task is to make 5 gift tags, I managed to play along in under 10 minutes!   I now have more tags than cards ready for Christmas so will have to try and make some quick cards too.....


I simply used some plain kraft tags I bought in the January sales from Paperchase (I love their sales and always stock up - these were 50p for 10!) and stamped the tree from Holiday Cheer in lettuce and used the small dots to stamp the baubles in red.  The sentiment is from the same set.

Here's the link if you want to join the hop  http://nicholeheady.typepad.com/capture_the_moment/2013/10/october-2013-blog-hop.html


Blogging tips