Monday, 28 February 2011

Kraftin Kimmie GDT Contest Week 4 - Scallops

The challenge over at Kraftin Kimmie this week was to include scallops on your card.  I was determined to used one of my new 50's stamps, and when I started to stamp and look at options, I really liked the idea of having both Patsy and the Jukebox on my card but I couldn't get them to fit in a pleasing way on an 8x8 or an A5 card which are my largest.  So I came up with a cunning plan and made my own custom card.....


I cut out a scalloped oval using a Nellie Snellen nesting die, and then masked off the central part so I could ink the scallops in black - I did this direct to paper with a momento inkpad.  I then masked off the scallops at the bottom and stamped Patsy and the Jukebox into their frames.  I paper-pieced Patsy's dress in gingham and a mottled blue for her overskirt and then added shading with copics.  The rest of her is coloured with copics and sakura gel glaze pen for her sunglasses and patent belt.  I gave the jukebox the same paper piecing treatment with a dark wood grain from the DCWV Latte stack.  I decoupaged the pink, blue and chrome elements over the top on more white card and coloured them with copics and a silver highlighter.  I mounted them on an old paper and I don't know where its from but I thought it had a "Honolulu" look to it and felt vaguely 50s.  I used an additional MS scallop punch down the centre of my card to indicate where to "open" it....


I wanted to have the two sides slide apart to reveal the sentiment inside - I'm not sure if this card has a name, but my friends at work have nick-named it the "push me, pull me" card and if its good enough for Dr Doolittle, then I guess its good enough for me!  I used the "let's rock and roll" sentiment which comes with the Jukebox, coupled with "its your birthday" which come from a couple of different Elzybells word sets which allow you to make up your own perfect sentiment.  I stamped these on another Nellie Snellen diecut, which I then put inside the waste from another of the same die to make a frame.

Check out the rest of the cards for this challenge here http://kraftinkimmiestamps.blogspot.com/2011/02/challenge-67-scoopy-scallops.html

I thought I'd do a VERY mini tutorial to show you how I put this card together (and so I have a record in case I want to do it again, as my long term memory aint what it used to be!!!) So I started with 3 sheets of A4 card.  I cut two of them to 10 x 12 inches and folded them in half to give me two 5" by 6" cards as per the picture below.  The other one, I cut to 8 inches long and 5 inches wide, then measured half an inch from the top and bottom and cut from 0.5 to 7.5 inches to create a "tabbed" shape.  The strips that I cut off, I cut in half and then folded each of those in half to give me 4 double thickness tabs.  I also doubled the thickness of the tabs on the central portion by sticking an extra strip of card behind to prevent them from bending too much when opening.


I used these tabs on the insides of the card to stop the central part being fully pulled out of the card.  I sealed the top of each card with quarter inch tape so that the glue wouldn't interfere with the pushing and pulling.  You can see the tabs below left, and then the picture below right shows the tabs butting up against each other.  Once sealed the sentiment section just slides in and out.


Well that's enough waffling from me for one night - writing up how you do something isn't all that easy or exciting!

Thanks for sticking with me.....

                              Craftilicious x

Saturday, 26 February 2011

Simply Less is More Week 4 - 3 Squares

I didn't make a card last night, I did a little colouring on a complex card I'm making ready for a March birthday, but I didn't finish an actual card and I found myself tapping my fingers on the work desk wishing it was Saturday morning as I'm really relishing my Saturday crafting sessions at the minute.  Saturdays bring my favourite two challenges of the week - Kraftin Kimmie whose stamps I adore and I'll be back with my KK card tomorrow, and the new CAS challenges at Simply Less is More which keeps me coming back for more each week and I'm loving it!

So, as soon as my shopping chores were done this morning, it was straight into the craft room, laptop in hand to check out this weeks challenge.  It's a recipe this week - but a very simply one, naturally ;-)  Just 3 squares, no more information, do with them what you will, but remember to KISS!

I had a look in my stamp sets to see what I had, and a had a play with 3 different sized patterned square stamps, as I was really drawn to the card that Mandi made this week, as it was different to my normal linear and symmetrical style.  However, although I liked the actual stamping, try as I might, other than directly copying Mandi's layout, which I didn't want to do, I couldn't arrange my squares in a way that wasn't offensive to my need for symmetry!  Me and asymmetry just don't get on!

So I scrapped it and went back to my more familiar and comfortable linear style......


The stamps are really old clear cling stamps and I think they were from Lakeland when they used to do a separate craft catalogue that is long since gone.  I matted my white squares onto the pearlised black card and drew a white line around to create a border leaving a gap for a sentiment, stamped and then overwritten with the same pen I drew the border as my white ink pad wasn't opaque enough for my liking.  I didn't quite get the sentiment central but decided I could live with it despite the lack of symmetry ;-)  I added a white pearl to each end of the border line and a black pearl to the centre of each stamped image.

You can join in the challenge here - http://simplylessismoore.blogspot.com/2011/02/week-4-recipe-three-squares.html and do have a go - it's such a lot of fun!  I'm looking forward to next week already :-)

Thanks for stopping by today....
                                            Craftilicious x

Friday, 25 February 2011

Moving Along with the Times - Fashion Challenge

This challenge caught my eye today, and immediately made me think of a Tim Holtz stamp I bought on first sight last year that has been sitting un-inked in a drawer ever since.  I loved the look of the stamp but its out of my usual colouring-in comfort zone, so I wasn't too sure what to do with it.


I'd got a lovely paper collection from Cosmo Cricket called material girl, so I figured, with this and the stamp, this challenge was going to get me over my distressing hang-up.  I stamped in black on white card, distressed the edges (again, probably didn't do this as much as I should have) and then distress inked with crushed olive, tattered straw and bundled sage.   I cut strips of paper from the sheet which looks like buttons, and threaded them through a couple of green buttons, and used the same paper to mat the stamped image onto which I distressed inked as well.

The fashion challenge can be found here - http://movingalongwiththetimes.blogspot.com/2011/02/challenge-87-fashion.html

It's also relevant to the button/bows challenge at Sugar Creek Hollow - http://sugarcreekhollow.blogspot.com/2011/02/buttons-bows-challenge.html

And the "distress" challenge at Creative Inspirations - http://creativeinspirationschallenge.blogspot.com/2011/02/challenge-53.html

Thanks for stopping by again.....
                                          Craftilicious x

Bellarific Friday Again

It's time to play with the Bella Babes again over at Bellarific Friday.  This week the challenge was to ink up a stamp you've never inked before.

I got this new stamp from the Craft Barn a couple of weeks ago and hadn't shown it any ink, so it was the perfect pick for this challenge.


Leslie and Lorie Lulu are BFF's so I used by favourite colour - teal,  and that of my BFF - lilac and mounted them on the monarch butterfly punch around the page onto a dramatic black background to match their shiny black hair (I sakura gelled over the stamped image).  It's not coming out clearly on the photo but I distress inked the butterflies with crushed velvet and weathered wood.

I am also entering this card into the Wags n Whiskers Challenge which is currently all about punches http://wagsnwhiskersrubberstamps.blogspot.com/2011/02/challenge-48-punches.html

and the My Sheri Crafts Challenge which is all about girls - http://myshericrafts.blogspot.com/2011/02/my-sheri-crafts-challenge-45-all-about.html and this stamp is DEFINITELY all about girly best friends!

Thanks for stopping by......

                                      Craftilicious x

Thursday, 24 February 2011

Kenny K Challenge

I decided to play in this weeks kenny k challenge as I got one of their stamps a few weeks ago but hadn't yet gotten around to colouring her in.  I just loved her attitude and her guitar, which I decided to colour up like a Daisy Rock, which I've loved ever since I saw Ace of Cakes make one as a surprise birthday cake.  Not that I can play guitar, but if I ever learnt, I'd want a purple sparkly one!


The challenge was all about "R's" - you had to use anything beginning with R on your card, rhinestones, red, ribbon etc.  I went for the rhinestones and used the great bazil bling template to create the swirls of them around the image.  As she's a super rock chick, there's another R too!  This has quickly become my new favourite image - I love the attitude and the chance to give her the funky pink striped hair!

The decorative papers are from the Papermania capsule collection, and I used my new distressing tool to scuff up the edges a little for a rocky look.  I'm new to distressing though and don't think I took it far enough.  I added a strip of glitter paper and some matching corners using a sizzix die.  The sentiment is computer generated using a fab font called "bleeding cowboys" from http://www.1001freefonts.com/

Here's the list of challenges I'm entering with this card:

http://kennykkraftygirlzchallenges.blogspot.com/2011/02/kenny-ks-krafty-girlz-challenge-33.html

top tip tuesday want us to "bling it on" with lots of glitter, gems or anything that shimmers - well a rock star has to shine now doesn't she ;-) http://toptiptuesday.blogspot.com/2011/02/top-tip-23-inserts-bling-it-on.html

Glitz and glam is the order of the day over at Delicious Doodles - when this rock chick is definately glam and the card is very glitzy!!  http://deliciousdoodleschallenge.blogspot.com/2011/02/challenge-13-glitzglamshimmer-and-bling.html

It's also eligible for "something funky" over at http://stampchallenges.blogspot.com/2011/02/something-funky-challenge.html

At Simply Create they want something "bold and bright" - the black is bold and the pink is bright!  http://simplycreatechallenges.blogspot.com/2011/02/37-its-bright-in-here.html

EDITED 9 August 2011 - I've just found this great site Make it Monday which allows you to link up new or old posts under their blog every week where anything goes.  It's all about showcasing your favourite projects to a new audience.  Well this is one of my all time favourite cards :-D  Hope you like it!

Thanks for stopping by today.

        Craftilicious  x

Wednesday, 23 February 2011

Fairy Wishes for a Speedy Recovery

Just a quick post with a card to share today.  One of my friends had surgery on Monday and is now recovering at home so I wanted to send her some love.  I used the very cute "Nurse Nora" from CC designs, and coloured her with copics in a retro pink and blue theme as I didn't want her to look to clinical.  I'm really pleased with how she turned out - particularly as I started her at gone midnight!  DP's are from my scrapbox but I think they are a mixture of Bo Bunny and DCWV.


I am going to enter Nora in the following challenges:

http://cutecardthursday.blogspot.com/2011/02/challenge-152-shiny-happy-cards.html - even though its a get well card - I think its very shiny and happy!

Four crafty chicks wants a fairy, angel or butterfly - http://4craftychicks.blogspot.com/2011/02/challenge-25-fairyangelbutterfly.html - so Nora fits their theme too

Crafts and Me want anything with wings - http://craftsandmechallenges.blogspot.com/2011/02/time-to-spread-your-wings_16.html

ResQ want you to do something to make YOU happy - well sending a card to brighten up my friends' recovery does indeed make me happy :-)  http://resqchallenge.blogspot.com/2011/02/dont-be-sad-resq71.html


Thanks for stopping by today...

           Craftilicious x

Monday, 21 February 2011

The Paper Shelter's First Challenge!

I saw that the paper shelter were starting a new challenge this week, and all you had to do was use one of their images, plus some buttons and bows.  I love their cake image - its perfect for birthdays  as everyone loves a great big birthday cake!


I decided to combine the entry with a couple of other challenges that fitted the theme.  Cupcake craft challenges this week have a theme of cake or ice-cream, so this image fits that theme.

Our creative corner wanted us to use a sentiment stamp to create a background.  I cut a mat of the cake out and covered the original image, and over stamped a do-crafts multiple happy birthday stamp in grey to form a background.  I like this technique as it brings the main image forward.

Here are the challenges I am entering this card into:

http://thepapershelter.blogspot.com/2011/02/challenge-1-buttons-and-bows.html - Buttons and Bows

http://cupcakecraftchallenges.blogspot.com/2011/02/cupcake-130cake-n-ice-cream.html  - Cake and Icecream

http://ourcreativecorner6.blogspot.com/2011/02/getting-wordy.html - Using words as a background

Thanks for stopping by :-)

           Craftilicious

Sunday, 20 February 2011

Kraftin Kimmie Week 3 - Elaine's Sketch

This week's Kraftin Kimmie challenge was a sketch from Elaine and this is my interpretation of it.  I did get all my new February 50's style stamps from Elaine in the post yesterday so was very tempted to ink one of them up straight away, but the monkey just called out to me, and I thought he'd fit nicely in the circle on Elaine's sketch.


I used jungle themed papers from DCWV and the Birdsong pad from Papermania.  I used some brown and olive cardstock to bring it all together and added extra vines with a Martha border punch. I coloured with copics and pencils - using the copics to flat colour the cheeky monkey, then adding fur like texture with pencils over the top - no sansoder blending this time.  The sky was done pointillism style with lots of dots in pale copics - this technique reminded me of doing my GCSE in art when we had to pick a painter to emulate and I chose Seurat whose paintings were all dots - such hard to do close up but the effect from far away is AMAZING when you see the paintings in real life! The effect with copics is much softer as the palest colour put on last blends the dots together a little.

 
I used the following to colours my image this week:

Monkey - Copics E50, E53 and E33 to undercoat, then added texture for the fur with my Polychromos pencils 102 Cream, 187 Burnt Ochre, 179 Bistre and 179 Nougat for the shadows.
Vine - Copics YG03, GY23, G07, G99
Sky - Watercolour effect with Copics in C3, BG10, B60, BG000 and B000 - see the super talented Suzanne Dean and her brilliant video tutorial for how to achieve this great effect.

The challenge can be found here - http://kraftinkimmiestamps.blogspot.com/2011/02/challenge-66-super-sketch-from-elaine.html

Thanks for stopping by today.  Don't forget to check out my blog candy :-)

Craftilicious  x

Saturday, 19 February 2011

Less is More Week 3 - Spring

I woke up this morning to snow........

....and as my BH is away for the day, this meant one thing to me - a whole day in to play in the craft room!  Woo hoo!!!

I had a look at the new challenges that had been posted in my google-reader and spotted that the new one from Simply Less is More was now live, and as I had such fun making my CAS card for it the other night, I thought I'd play along again.  Especially as this week its a theme - Spring.  Given the snow outside this morning, thinking of spring seemed like a very good idea to me!


I decided to use a flower again, one of my all time favourite stamps that I use time and time again - its just perfect for classy cards for a variety of occasions from birthdays, to get well to sympathy. 

For me, the spring theme led me to "yellow" as spring to me is when the daffodils and crocuses pop their heads out of the icy ground.  Rather than colouring the whole image, to keep it CAS, I decided to highlight a central area, in a circle to hint at the sun which also comes in Spring occasionally, and colour that portion only.  I used just yellow and grey copics to colour the highlighted spot, then double mounted onto two shades of yellow.  Finished with a Elzybels sentiment which I thought was very appropriate to the challenge and I would like to send to sunshine to myself today as well to melt the snow...

You can check out the other entrants here -  http://simplylessismoore.blogspot.com/2011/02/week-3-theme-challenge.html

Thanks for stopping by.

Craftilicious
x

Friday, 18 February 2011

Bellarific Friday

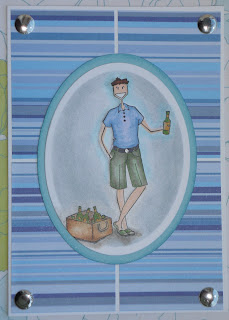
I haven't played along with the Bella babes before in Bellarific Friday, although I do watch them play every week.  However, this weeks sketch was so easy, and I needed a boys card, so I thought I could use the sketch and my beerafella stamp to create this cute card below.


You can find all the other bellarific friday cards here http://stampingbella.com/blog/

 While you're here - don't forget to check out my blog candy....

Thursday, 17 February 2011

Simply Less is More

Whilst I do love my hanglars, kimmies, bellas and magnolias and all the copic colouring that comes with them, and all the beautiful dp's that currently up my craft room drawers, my first forays into stamping, didn't involve any colouring, any layers or any fancy embellishments.  I do like a clean card, with lots of white space and plenty of symmetry.  So I was thrilled to find a new challenge blog last week called Simply Less is More who aim to set challenges on a rolling basis that prove that sometimes that is totally correct....

This weeks challenge was to make a card in a single layer which included either a flower or tree.  This gave me the chance to break out one of my beautiful Elzybels floral sets.  I stamped a simple black frame on a tall slim card, masked it off on all sides with post-its, and stamped a range of floral stems with momento ink in bamboo and olive allowing them to overflow the frame onto the masks for a crisp clean line. I used a sentiment from the same set as the frame at the bottom of the card to balance the design.  Simple and effective and all complete in 5 minutes.


The challenge entries (and there are loads so obviously they've hit a trend!) can be found here - http://simplylessismoore.blogspot.com/2011/02/week-2-one-layer-challenge.html


Thanks for visiting....
    Craftilicious x

Having a Ruff Day?

I got this image when it was released by Kraftin Kimmie but hadn't had time to colour it.  I thought however that it would be a nice image to try to stamp and colour direct onto kraft paper as the natural colour lends itself perfectly to the image which means less colouring, just shading.


Isn't Buster just lovely - despite being fed up - I just love his expression.  This time I coloured him entirely with pencils - not a single copic in sight (shock horror!!!)   I wasn't sure how well they would blend on kraft with it not being hot-rolled like the paper I normally stamp on, but it actually worked very well.  I think as long as you don't over wet it, its just fine, and the rougher texture works well on buster.


I framed him with some faux stitching, matted onto red to make him pop, used some DCWV papers in the background, and a sheer bone ribbon.  A bone button brad adds a little interest in the corner.


I'm entering the following challenges with this card:

http://thespottedchick.blogspot.com/2011/02/thats-krafty-thursday-47.html  - use kraft card or paper on your card

http://toptiptuesday.blogspot.com/2011/02/top-tip-22-sewing-on-cards-all-stitched.html - use stitching (real or fake)


Tuesday, 15 February 2011

Blogiversary Blog Candy

As it's coming up to the anniversary of my first crafting blog post on 5th March, I thought I'd share the love with my friends in blog land by handing out a bit of candy :-)

Once I reach 50 followers, I will do a random draw of all my followers and give away the following candy:

3 meters each of 8 lovely ribbons in various widths
12 gorgeous dusky blue paper roses 
A craftilicious necklace kit (my own design) - which will make the necklace you can see on my blog here and includes semi-precious gems, freshwater pearls and all the findings you need to complete the design.


Here's the finished necklace - its very easy to make, even for beginners, you just need pliers.


So, you know what to do, click the little link on the right and follow me and leave a comment on this post.  Only followers will be eiligble.   That's all there is to it!   I am happy to post world-wide so you don't have to be in the UK to be eligible for the candy.  Don't forget to tell your friends there is candy up for grabs....

Thanks :-)

Monday, 14 February 2011

Outside the Frame

Today I decided to play with one of my new Tildas - as soon as I saw that great big fluffy bow on her head I knew I had to have her - I'm loving the bloomers too!

She is coloured with copics, cut out with a nestability and set off centre on another.  The background papers are from the Basic Grey Wisteria pad.  Some co-ordinating paper roses and a bow finish her off.


This is another one of the images I used to practice hair colouring - the tops work, but I need more practice on the long and flowing bits.


Over at top tip Tuesday last week, they showed you the technique for having bits of your image outside of the frame when using nestabilities.  I've done it a couple of times before but forgot how much I liked the effect, so I had another go at it so I am entering the card in their challenge this week.  http://toptiptuesday.blogspot.com/2011/02/top-tip-21-outside-frame-tutorial-frame.html

Over at Just Magnolia they had a sketch, which was rather a complicated one, and this is my interpretation of it.  http://justmagnolia.blogspot.com/2011/02/week-93-minas-sketch.html 


Thanks for visiting....
    Craftilicious x

Saturday, 12 February 2011

Kraftin Kimmie Challenge

This is week two of my efforts to gain the April GDT spot on the Kraftin Kimmie Design Team.  To play along check out this blogpost

The challenge this week was a recipe - 3 main colours, 2 designer papers, one ribbon, one button.  I decided to pick my papers first and take the colours from them.  I selected a lovely floral from the My Minds Eye Pretty Please pad and selected 3 matching copics to colour my image with.

I ordered a load of new stamps in Kimmie's Birthday sale last week, and unbelievably, they made it all the way from Canada and arrived this morning :-)   It was hard choosing which to colour first but I plumped for Nadine.  I flat coloured her dress in the copics, then overshaded with matching tones of pencils for added depth.

I used the teal colour to match the second paper, also from the same paper pad, and also for the ribbon and button.  I tied a double bow on the wonderful bow easy, and tied a polka dot button into its centre.  Some colour co-ordinated sizzix corners and a few gems tied it all together.


I've been practicing hair colouring this week - think I'm finally getting where to put the highlights!


The challenge post for this week can be found here http://kraftinkimmiestamps.blogspot.com/2011/02/challenge-65-recipe.html  and the DT's have used the AMAZING new stamps from Annie - don't you just luuuurve that Grease theme???   I know what I'll be doing tomorrow...........


Thanks for visiting....
    Craftilicious x

Monday, 7 February 2011

Valentines are Red

Whilst I was still in a romantic mood in the run up to V-day next Monday, I decided to ink up a new magnolia stamp - tilda with lots of hearts - isn't she a cutie??? 

I used a mix of copics and pencils to colour her in, with some glitter on the hearts.  I double mounted her with a lables nestie, and did the same for the matching sentiment which came from an Elzybels set.  The card background doesn't show too clearly but its a DCWV hearts embossed 6x6 card.


Here's a close up which shows the colouring in a bit more detail.


There are still several valentines challenges around this week so I am entering the following:

http://cupcakecraftchallenges.blogspot.com/2011/02/cupcake-128-seeing-red.html - Red
 
http://thesecretcraftersaturdaychallenge.blogspot.com/2011/02/challenge-120.html  - Valentines

http://allsortschallenge.blogspot.com/2011/02/wk89-it-must-be-love-love-love.html - Love Love Love

http://cutie-sunday.blogspot.com/2011/02/cutie-sunday-130-06022011.html - Hearts

http://magnoliadownunderchallenges.blogspot.com/2011/02/magnolia-down-under-challenge-82.html - Love

http://pileitonchallenge.blogspot.com/  - Bright and Breezy

Thanks for visiting....
    Craftilicious x

Sunday, 6 February 2011

A Chance to Be A Krafty Girl

As well as having a fabulous Birthday sale last week, Kimmie over at Kraftin Kimmie announced a competition to become a Krafty Girl and join the design team as a guest designer for the month of April.  This is a chance I just can't pass up.......

To be entered, you have to participate in each of the weekly challenges throughout February, and the first challenge posted yesterday was "Seeing Red" - you had to use red on your card somewhere.  I decided to use Monique and she just scream "red" to me - she's a sassy little gal!


I decided to make a step card, in black to go with the red for added drama, and I used an Alota background stamp to make a theatrical backdrop which was coloured with copics, then I masked off the curtains, painted a spotlight with shimmer paints, and over blended with distress inks.


I coloured Monique herself with copics and mounted her onto thick white card to provide some extra strength before cutting her out.  I added some stickles for sparkle to her bodice and a gem necklace and another on her hat.  She comes with a cute sentiment which says "when in doubt, dance", but I wanted a larger sentiment to fill the side of my step card, so I decided to use a Stempleglede stamp which I thought matched the confident stance of Monique.


I'm not sure how clear the image is to read, but the sentiment says "Go confidently in the direction of your dreams.  Live the life you have imagined"   So I am confidently going to imagine myself winning the guest designer spot......   ;-)

http://kraftinkimmiestamps.blogspot.com/2011/02/challenge-64-seeing-red.html

Thanks for visiting....
    Craftilicious x

Friday, 4 February 2011

Under the Sea...

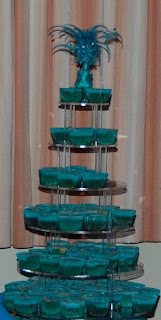
I wanted to colour my mermaid stamp from Kraftin Kimmie so thought I'd use her to enter their weekly challenge.  This week it was "reduce, reuse and recycle" and it caused me a few headaches as I couldn't think of anything to reuse or recycle, UNTIL I cleared the craft room out this week that is.  I had the topper I made for my cupcake tower for our wedding anniversary/reception which is a couple of years old now and the feathers had gone a bit tatty, so I pulled it to pieces, and re-used and recycled one of the ribbon diamante flowers from it and used that under the bow - the very first successful bow I've tied on a card, thanks to my new magic bow-easy tool :-)  Here's a picture of the tower with the topper intact so you can see where my recycled item came from.


On Nerissa, I've done the colouring with copics, but then I wanted her scales to shimmer, so I dug deep in the back of my drawer and dug out my LuminArte paints.  I liked the effect on the tail so much I overpainted her hair with a yellow shimmer too - the photo doesn't do it justice but the effect in real life is very cool I think!  The craftwork cards sentiment got the same painting treatment and a few pearls finished it off.

If you like the image, and get on over to the Kraftin Kimmie website today, she's having a special birthday sale with 40% off...........  but hurry the sale ends today!!!!

Check out their weekly challenge every Saturday here

Thanks for visiting....
    Craftilicious x

Wednesday, 2 February 2011

Auntie's Easel

I made this card for my Aunt's Birthday yesterday.  I wanted to do something different for her, so I decided to make an easel card as I'm not sure she's ever seen one.


I used a lovely Hanglar girl with a fab floral headband and mounted her onto some DP which I punched with a PATP from Martha and mounted onto some colour-matched card to make the pop up element for the easel.  I added some flowers and hid the wires between the layers and finished with a metal butterfly brad that dangles and flutters.  There is a close up shot below.  The Happy Birthday is from a Stempelglede set, and the just for you is a new "mini cling" but I forget the brand name - sorry - currently in Hobbycraft for a £1 each.


It fits a couple of themes for challenges so is entered as follows:

Papertake Weekly  - Anything Goes + Flowers

Res-Q Challenge - Get in Line - your project must have a straight line on it - and my line of punching is on lined paper so I think that counts twice ;-)

Top Tip Tuesday - Girlie - can be anything girlie this week and this certainly is :-)  Loving their top tip this week to create a banner from ribbons - lovely idea.

Thanks for visiting
        Craftilicious x

Tuesday, 1 February 2011

Lace and Dots

I've had a busy week at home making cards and sorting out my craft room so I've not managed to blog for a week.  Here's the first of the creations to show you.


I made this card for a colleagues birthday on some new 7" x 7" cards so a little larger than I have worked with before which gives you scope to put a little more on the cards I found.  I started with two layers of complementary papers (sorry not sure what stacks they are from) and used my Martha Steward "Scroll Lace" punch-around-the-page set on both layers to give a doily effect.  Some complimentary double mounting popped the image off the background, and I used the "waste" from the corner punch to add decorative corners to the image.  Some fabric flowers with pearl centre and a craftwork cards sentiment colour matched with distress inks finishes it off.

The image is a gorgeous pair from Hanglar (sorry no link as website only works in Sweden), which was coloured completely with Faber-Castell pencils and blending stumps - no copics even as a base.  I was trying to emulate one of my colouring heroines - Paulabella - but I need a lot more practice - just wish I was stateside so I could do one of her classes :(  I do love the effect on the boys hair though, that came out better than I get it with copics and I think the blending makes his waistcoat look like leather.  I've done a close up shot so you can see the detail a bit more.


This card fits the following challenges this week:

Going Dotty - over at the Just Magnolia challenge blog

Punch It - is the challenge this week at the Pile It On Challenge  where you have to enter at least one other challenge to enter their challenge (they also helpfully list a lot of other challenges so good if you're browsing for something to do)   There is definitely a lot of punching going on on this card!

Layer it up - is the name of game at Paper Play Challenges and this card has 5 layers so fits that challenge perfectly.

Flowers - are the requirement at Fun at Fairy Knoll so I'm entering their challenge for the first time too.

Scallops - are the in vogue at Some Odd Girl and there are lots of scallops with my punched layers.


Blogging tips