Thursday, 20 August 2009

Bompas & Parr Inspired Dessert Tower & BBQ

Being a girl who loves jelly, I have read, with much jealousy, lots of reviews of Bompas and Parr events of late and drooled over the glorious and quirky pictures on their website. Jelly mongering is not their only skills, but it is the one that gets me excited and their Architectural Dessert Trolley in particular caught my eye as lets face it - who wouldn't fall for a tower of wobbling jelly loveliness such as this. I decided therefore to make my own interpretation of their tower as the centrepiece to my annual girlie BBQ, although not totally made of jelly as I wanted a choice of scrummy desserts for my girlies to choose from. I started my tripple layer tower with raspberry and marzipan cupcakes which the girls all raved about so I have included the recipe below, I then had my "tripple layer boozey jellies" in the middle, and topped it off with a rippled peach melba pavlova.


Now, as you can no doubt see from the photograph - my tower was somewhat less impressive than the one the genious team at Bompass and Parr created - as despite my love of eating jelly, I've never been very sucessful at making it! I think it could have something to do with my ponchon for adding booze to jelly and the catastrophic effects that alchohol seems to have on the setting agents. Whilst I did sucessfully manage to get my first jelly out of its mould in one piece - I could not, for all the tea in china, manage to make the darn thing stand upright, and I decided a roly-poly sidesliding jelly looked worse than upturning the glasses I made them in. The actual jelly was delicious - blackcurrent with cassis at the bottom, a sharp raspberry with chambord in the centre. Top off with elderflower with the peary hint of eau-de-vie - we just had to eat them from the container with a spoon.

That was my second disaster of the day as my first attempt at a gentle rippled meringue had all gone very wrong as I had followed the magazine recipe which called for me to cook the meringue like a sabayon over a water bath - the resulting bubble gum pink liquid went straight in the bin and out came my faithful
Cookery Bible for Prue's unfailing meringue recipe and batch two was peaky perfection. Adding the ripples with the use of a gel food colouring on a cocktail stick reminded me of those marbling inks we used to use at school which you floated on water and stirred around to get the swirly pattern before dropping your paper in and taking the ink off the water. Very satisfying.

I served cocktails on the day which also went down very well and were greatly enjoyed in the moment of sun when the wind and rain finally died down. It was a twist on a kir-royal, instead of raspberries, I used homemade blackberry puree (as I couldn't find any Creme du Mure), added blackcurrent gin and elderflower cordial and added a tablespoon of the resulting syrup to the bottom of a glass and topped up with champagne.


Unfortunately, due to the on/off rain and juggling all the cooking, I didn't manage to get any photos of the rest of the BBQ food, just the dessert but the basic menu was as follows:

  • Aubergine Vinaigrette
  • Courgette & Goats Cheese Rolls
  • Chickpea & Feta Salad
  • Potato & Quails Egg Salad (Valentine Warner's recipe)
  • Plaice fillets with Clams and Samphire in Caper Buerre Noisette
  • Beef and Parmesan Mini Burgers or
    Mushroom and Parmesan Mini Burgers
  • Sparkling Cranberry-Vodka Chicken Kebabs
  • Butternut Squash and Corn Koftas
  • Morrocan Spiced Lamb Rump
The aubergine vinaigrette is a noteworthy Spanish tapas dish which can be preparred the day before a party as it only gets better the longer it is soaked in its dressing. You simply layer griddled aubergine slices in a dish with dressing between each layer which consists of good sherry vinegar, olive oil, capers, lots of garlic, parsley and chopped roma tomatoes.

The other standout dish of the day was the butternut squash and corn koftas - a simple mix of roasted squash (sprinkled with cumin and corriander when roasting) blitzed with chickpeas, coarsley ground pistacios, breadcrumbs and tahini. Fresh corn and parsley are stirred in after blitzing and then the mixture moulded on kofta skewers. Really nice vegetarian BBQ alternative but it went great with the spice lamb rump in a pitta too....

Cheers ladies - same time next year?


My girlfriends (and the one boy allowed as he's under 1 year old.....)


Raspberry & Marzipan Cupcakes


Cupcakes
250g butter - at room temperature
250g caster sugar
250g self raising flour
2 eggs
1 teaspoon baking powder
150g marzipan
up to 4 tablespoons milk
raspberry jam (seedless is best)

Topping
100g butter (must be at room temperature not from the fridge)
200g cream cheese
300g icing sugar
1 teaspoon amaretto or almond extract
fresh raspberries and pearly sugar sprinkles to decorate

Method
Set oven to 175 C or Gas 4
Line 18 muffin moulds with cupcake cases
Dice the marzipan into 5mm cubes - put in a bowl with one tablespoon of flour and toss to keep the individual cubes from clumping. The flour coating will also prevent the marzipan from sinking to the bottom of the cupcakes when cooking.
Cream the butter and sugar until light and fluffy
Add the flour, baking powder and eggs and beat until combined and fluffy. The consistancy should be that of whipped cream - if its a little thick, add some milk, a tablespoon at a time and beat to combine.
Gently fold the marzipan cubes through the mixture.
Spoon one teaspoon of cake mixture into the bottom of each cupcake case.
Add half a teaspoon of raspberry jam to the centre of each cake.
Add another teaspoon of cake mixture to each case, taking care to completely cover the blob of jam.
Bake for 15 - 20 minutes or until risen, firm to the touch and golden.
Allow to cool for 5 mins in the tin then transfer to a cooling rack.

While the cakes are in the oven, make the frosting.
Cream the cheese and butter.
Turn the mixer to its lowest speed to prevent puthering and add the icing sugar and flavouring.

When the cakes are completely cool, pipe or spoon the frosting onto each cake, sprinkle with frosted sugar strands (or hundred and thousands for a retro feel) and top each with a fresh raspberry.

Monday, 3 August 2009

Learning to Cook Fish

Fish has always been my nemesis in the kitchen (anyone who saw my unfortunate appearance on MasterChef Goes Large a couple of years ago would have seen me carbonise a defenceless piece of tuna....) and so I have tended to avoid cooking fish at all costs. However, The Milestone, that fabulous bar and restaurant in Shalesmoor has recently started to offer a range of Saturday cooking classes, having done one some months ago called "Nose to Tail" where we learned how to cook pigs cheeks and all manor of strange and under-used but delicious cuts of meat and finding it to be very liberating (well if you can peel the face off a pig....) I decided to book another one of their courses simply entitled "Fish" as I hoped to learn some similar skills and overcome my fear of all things aquatic.

The Milestone's cookery schools run once per month currently and at the time of writing cost £75 for the day (10.30am til about 4.00pm) and includes drinks and lunch (often something you have cooked yourself during the class) and all your ingredients (my advice would be to skip breakfast as there is lots to eat throughout the day, but they will happily provide cartons for you to take home things you can't eat, and there is usually something part prepared to take home to cook for dinner if you've any room!) At first glance, that might seem like quite a lot to pay for a day out, but believe you me, if you take the time to compare the prices of similar courses around the country - you are getting HUGE value for money (well this is Yorkshire after all!!!) as most courses in this price bracket last normally around 2 -3 hours.

On this occasion a couple of friends came with me and the class was quite busy - around 12 of us gathered behind our tables in the upstairs restaurant dinning room which is where the classes are based. The format for the day seemed to follow the same procedure as before - head chef Simon and his sous chef James demonstrate a technique (in this case the way to fillet both flat and round fish, including the ingenious "V" boning technique which made me very happy and my fish tweezers forever redundant!) and then teach you a dish using the ingredient you have just prepared. On our course (18th July) we tackled gilt head bream, plaice, trout and mackerel and finished the day with mussels.

The bream was the first fish we got our hands on, after the guys had demonstrated all the techniques and we all gutted and scaled them and then took the two fillets off (bit tricky as for some of us it was the first attempt we'd ever made but both chefs (and the owners Mum) were on hand to point us (or our knifes!) in the right direction if we went astray. Once we had the fillets off the bones, we then had to pin bone them and this is where the revelation of the day occurred for me - in restaurants, chefs don't spend hours grappling with tweezers and bones which refuse to be extract, oh no, they very carefully follow the central line of bones and make a narrow V shaped incision on either side and hey presto, out pop the bones in one quick slice!!! Admittedly, you do loose a tiny bit of fish, but to be honest, it's nothing worth worrying about and could be slung in the stock pot if you felt overly precious about it. The fillets of bream on this occasion were to form the basis of our lunch, with the additional of a chickpea and spinach curry (very easy and delicious even for someone like me who isn't keen on chick peas). The fillets were simply pan fried, skin down (having slightly oiled the skins first) on a sheet of grease proof paper (a neat trick to make your pans non-stick if they aren't, but make sure you trim the edges so they aren't on a naked flame as it can be hard to disguise black paper flakes as pepper.......)

After lunch, which was taken downstairs in the pub, we returned to tackle the plaice. I had always been really scared of flat fish - they seem so small and thin that I couldn't understand how you could be left with any fish once you removed the bones, but here came the days second revelation for me - flat fish are sooooo much easier to fillet that their round cousins. Follow the lateral line, make and incision on one side of it, using a very flexible filleting knife (in this case the importance of a good sharp and flexible knife cannot be highly stressed enough) and side it down and along the bones, gently peeling the fillet away as you go. Turn the fish and repeat on the top fillet, and flip over and repeat again twice on the bottom. We pan fried the fillets again in the same was as we had the bream, but this time made a sauce in the pan (minus the grease proof) with butter cooked just until the browning point (buerre noissette) which you stop cooking at that point with the additional of lemon juice, samphire and capers. Quick (the whole cooking process took less than 5 minutes) and delicious - the definition of home form work cooking - even if you added the filleting into the time frame, dinner could be ready in under 15 minutes (10 with practice).


We then took on the trout, a round fish again, but this time no need to scale it, so it was simply gutted, and left whole this time, on the bone, to cook "en papiotte" (or to the Yorkshire folk amongst us - in a bag!) We simply crammed the fish with thinly sliced onion, julienne carrot strips, a couple of wedges of lemon, some salt, pepper and cardamom seeds with a big blob of butter, placed it on a sheet of grease proof paper and folded over the edges in the way you would crimp a Cornish pasty until you had sealed from tail almost all the way around. We then poured a couple of tablespoons of wine into the parcel, sealed it again and put it into the cooler. These were for us to take home and bake (hot oven for 12 - 15 mins) later for tea - and darn tasty it was too.

Mackerel was the final fish of the day, again, no scaling required, just gutting and in this instance we butterfly boned it - once gutted you simply open it up and press down on the central line of fish, from the skin side, turn it back to flesh side and the whole bone structure then just simply lifts from tail to head. The mackerel were again to be cooked at home, Morrocan style, so we marinated the fillets in a little harissa let down with olive oil, and made a cous cous, pinenut and raisin salad to serve on the side. This was a less effective dish, but I think the quality of the fish deteriorated over the course of the day in the hot room so I would be tempted to try it again with fresher fish.

The finale was a lesson in how to prepare and clean fresh mussels - the interesting point here was that the simple mantra of throw open when raw but closed when cooked is not quite right - open raw mussels may well be fine and fresh - they are alive and are just "gasping" so a sharp tap should close them. If they remain open, then yes do throw them. We made a bowl of moules marinare, simple and classic so I won't bore you with the recipe here.

All in all, the three of us had a very memorable and enjoyable day and I for one have certainly put into practice the skills I learned already and will going back to "Dinner Party Secrets" very soon. Nice one The Milestone!

Sunday, 2 August 2009

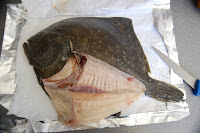
My First Turbot....

I have had a thing about Turbot for quite some time now - so many chefs proclaim it the king of fish, but for me it has been a little illusive. It doesn't seem to have made it to many Sheffield restaurants as to-date I haven't seen it on a menu up here, and on the odd occassion I have seen it on a fish counter, it's high price has kept it beyond my reach (I did get a half of one weighed as possible New Years Eve dinner last year but at £65 it was too pricey for my limited purse).

Today I saw a smaller example of a whole fish in Waitrose and and a little red tag caught my eye, and I became quite excited - reduced to £12.49 a kilo, so I had it weighed - a much more approachable cost of just under £22 for the whole fish, and bouyed by success at a recent fish filleting and cookery course I snapped it up and took it home.

The first challenge came when I looked at the lateral line of the fish - this is the line we'd learned to follow on the course a couple of weeks ago - however - this line curved - on the plaice we practiced on there is no such curve! After searching many books in vain for pictures of someone filleting a turbot, I gave up and just went for it. The first fillet came off in the same way as the plaice - on the second, I ignored the curve and got a much bigger fillet, the same pattern followed on the underside, so there was easily a very good meal for 4 people from the one fish (or in our case, 2 for lunch and 2 for the freezer...)

With the fillets removed, they were simply pan fried, finished in the oven and served with asparagus (despite it's lack of seasonality as I couldn't get samphire), new potatoes and a buerre noisette and caper sauce. And how did I find my first turbot - it had a lot of hype to live up to afterall, but it definately did not disappoint. Its flesh is firm and meaty, much more so than its other flat cousins, but the taste is quite unique - not at all fishy but rich deep and earthy. In fact it was so good that my normally frugal husband was quite keen to repeat the lunch again despite the extravagent price.


Blogging tips